Air Fryer Frozen Chicken Tende
Picture this: you’re halfway through a week of work, the fridge is a sad, empty void, and your cravings scream for something crispy and comforting. I was staring at the freezer, feeling the familiar dread that comes with a late-night hunger attack. Suddenly, the idea hit me like a lightning bolt: frozen breaded chicken tenders in the air fryer. I grabbed the package, set the timer, and the kitchen filled with the buttery aroma of sizzling chicken. The sound was a rhythmic sizzle, a promise of golden perfection. I laughed, because who doesn’t love a quick fix that tastes like a restaurant hit?
The first bite was a revelation—crisp edges that crackle like thin ice, a juicy interior that oozes savory goodness, and a coating that clings like velvet to every morsel. The aroma was unmistakable, a sweet, buttery scent that made my mouth water even before the first bite. The texture was a delightful contrast: the crunch gave way to tender meat that practically melted in your mouth. The taste was pure comfort food, with just enough seasoning to keep it interesting. The heat from the air fryer radiated warmth, turning a simple meal into an instant mood booster. The moment I tasted it, I knew this was something special.
I dare you to taste this and not go back for seconds. Most people think frozen chicken tenders are just a quick snack, but I’m about to show you why this version is hands down the best you’ll ever make at home. The secret? It’s not just the air fryer—it’s the timing, the minimal prep, and the confidence that comes from knowing the recipe will work every single time. I’ve tried countless variations, and none have matched the sheer joy of this crispy, juicy masterpiece. It’s the kind of dish that makes even the most skeptical foodie say, “Wow.” The next part? Pure magic, and I’m going to walk you through every single step.
Imagine the kitchen smelling incredible as you pull the golden tenders out of the air fryer, the sound of the timer chiming like a tiny applause. The visual of perfectly browned edges, the sizzle that echoes through the room, the anticipation of that first bite—these are the sensory snapshots that make this recipe unforgettable. If you’ve ever struggled with getting frozen chicken tenders to taste fresh, you’re not alone—this recipe has the fix. I’ve tested it on a hundred occasions, and each time the result is flawless. The result is a dish that’s both quick and delicious, making it the ultimate go-to for busy nights. So, let’s dive in and learn how to create this crispy wonder.
I’ll be honest—before I discovered this method, I’d often end up with soggy or unevenly cooked tenders. I’d stare at the air fryer, hoping the magic would happen, only to be disappointed. That all changed when I discovered the precise temperature, timing, and a few little tricks that turned the process into a guaranteed success. This isn’t just a recipe; it’s a confidence booster in the kitchen. It’s the kind of dish that transforms a simple evening into a culinary triumph. And now, with the right knowledge, you can replicate this perfection every time.
Picture yourself pulling this out of the air fryer, the whole kitchen smelling incredible, and your friends or family asking for the recipe. The moment the golden tenders hit the plate, the aroma will fill the room, and the sound of the first bite will be music to your ears. The visual appeal is instant—golden, crispy, and perfectly plated. The anticipation builds as you watch the timer tick down. The moment you take that first bite, you’ll taste the crunch, the savory coating, and the juicy interior all at once. It’s a sensory experience that turns a simple meal into a memorable event.
And so, the stage is set. You’ve got the ingredients, the air fryer, and the confidence to follow along. I’ll be your sidekick, guiding you through each step, offering micro-challenges, and ensuring you never miss a beat. The goal is simple: make the best frozen chicken tenders ever, with zero fuss and maximum flavor. The only thing left is to get started, because by the end of this guide, you’ll wonder how you ever made it any other way.
When I first tried this recipe, I was skeptical about the air fryer’s ability to handle frozen chicken. The air fryer’s rapid air circulation, however, proved to be the secret weapon, creating a crispy crust without the need for extra oil. The result was a dish that tasted like it was cooked from scratch, yet it required minimal effort. The time saved is priceless, especially on those hectic weekday nights. The convenience of a frozen product combined with the quality of a homemade meal is unbeatable. This is the kind of recipe that saves the day and satisfies the soul.
The best part? You can customize the flavor profile with a handful of spices or sauces. I’ve experimented with everything from garlic parmesan to spicy sriracha, and each variation brings a new dimension to the dish. The flexibility makes this recipe a canvas for creativity, allowing you to tailor it to your mood or the season. Whether you’re in the mood for something classic or daring, the air fryer frozen chicken tenders can adapt. The result is always the same: crisp, juicy, and utterly delicious. This is why it stands out among countless other frozen chicken recipes.
If you’re a busy parent, a student, or someone who simply loves a good meal without the hassle, this recipe is tailor-made for you. The simplicity of the prep, combined with the satisfying crunch, makes it a go-to dish for any occasion. From a quick lunch to a party snack, these tenders fit perfectly into your schedule. The only thing you need is an air fryer and a package of frozen breaded chicken tenders. The rest? Just follow the steps, and you’ll be rewarded with a dish that’s both comforting and impressive.
Now that the hype is set, let’s dive into the details that make this version truly special. I’ll reveal the key elements that elevate this dish from ordinary to extraordinary. From the choice of chicken to the precise cooking technique, every factor is carefully considered. The result is a recipe that delivers consistent, mouthwatering results every time. Ready? Let’s get started.
What Makes This Version Stand Out
- Texture: The air fryer creates a crisp exterior that shatters like thin ice while preserving a moist interior. The crunch is consistent across all tenders, avoiding the unevenness common in stovetop methods. This texture is achieved by a precise temperature that allows the coating to brown without drying the meat.
- Flavor: The seasoning is a balanced blend of salt, pepper, and a hint of garlic powder, giving a savory kick that coats each bite. The flavor profile is simple yet bold, letting the natural taste of the chicken shine through. The result is a dish that satisfies without overwhelming.
- Simplicity: No prep work, no chopping, no measuring—just toss the frozen tenders into the air fryer and watch the transformation. The minimal steps mean you can focus on other tasks while the tenders cook. This simplicity is ideal for busy nights.
- Time Efficiency: From start to finish, the process takes just 30 minutes, including a brief prep time. The quick turnaround is perfect for those who need a satisfying meal fast. The air fryer’s rapid cooking reduces overall kitchen time.
- Healthier Option: Compared to deep-frying, the air fryer uses significantly less oil, reducing calories and fat while still delivering a crispy finish. The result is a healthier version of a comfort food classic. This makes it a great choice for those watching their diet.
- Make‑Ahead Potential: You can cook the tenders in advance and reheat them later without sacrificing texture. The air fryer’s even heat helps maintain crispness even after storage. This makes the recipe perfect for meal prep.
- Versatility: Pair these tenders with a variety of dips, salads, or side dishes, turning them into a main or an appetizer. The neutral flavor profile allows for endless combinations. The versatility keeps the dish exciting over time.
- Crowd‑Pleaser: The golden color and mouth‑watering aroma instantly attract guests, making it an ideal choice for gatherings. The familiar comfort of chicken tends to satisfy a wide range of palates. This recipe consistently earns rave reviews.
Alright, let’s break down exactly what goes into this masterpiece. The simplicity of the ingredients is part of the charm—only one package of frozen breaded chicken tenders is needed. The rest of the recipe focuses on the cooking method, which is where the magic happens. With the right temperature, timing, and a few quick hacks, you’ll achieve the perfect balance of crunch and juiciness. Ready to get into the details? Let’s move on to the ingredient breakdown.
Inside the Ingredient List
The Flavor Base
The only ingredient you need is a package of frozen breaded chicken tenders. These tenders are pre‑seasoned, so you don’t have to worry about extra spices. The coating is already balanced for a savory flavor that pairs well with any dip. If you prefer a milder taste, you can sprinkle a pinch of salt before cooking. Skipping this step won’t ruin the dish, but it will slightly alter the flavor profile. The key is to keep the coating intact for maximum crispness.
The Texture Crew
The breading on the tenders is a crucial component that delivers the crunchy texture. The coating is made from a blend of flour and breadcrumbs, which absorb just enough moisture to crisp up in the air fryer. If you’re looking for extra crunch, you can lightly dust the tenders with additional breadcrumbs before cooking. This will add an extra layer of texture and a deeper golden color. However, be careful not to over‑coat, or you’ll end up with a heavy crust.
The Unexpected Star
The air fryer itself is the unsung hero of this recipe. Its rapid air circulation creates an even cooking environment, ensuring every tender is cooked to perfection. The high heat caramelizes the coating, giving it a buttery, golden finish. If your air fryer is on the smaller side, you may need to cook the tenders in batches to avoid overcrowding. This helps maintain consistent heat and texture. The result is a dish that looks as good as it tastes.
The Final Flourish
A quick squeeze of fresh lemon or a sprinkle of chopped parsley can elevate the dish with a bright, fresh note. This final flourish adds a pop of color and a subtle citrusy brightness that cuts through the richness. If you’re in a hurry, you can skip this step without compromising the overall quality. However, a splash of lemon juice or a handful of herbs can transform an ordinary meal into something special. The key is to keep it simple and let the chicken shine.
Everything's prepped? Good. Let’s get into the real action. The next step is to set your air fryer to the perfect temperature, place the tenders in a single layer, and let the magic happen. Remember, the key to success is patience and attention to detail. With these simple steps, you’ll have a plate of golden, crispy tenders in no time. Ready to take the plunge? Let’s dive into the method.
The Method — Step by Step
- Preheat your air fryer to 400°F (200°C) for 3 minutes. This ensures the basket is hot enough to start crisping the coating immediately. The preheat step also helps the tenders cook evenly from the first second. While the air fryer preheats, gather your frozen tenders and any optional seasonings. Keep your kitchen organized to avoid last‑minute scrambling. A hot air fryer guarantees a crisp start.
- Place the frozen tenders in a single layer in the air fryer basket. Avoid stacking them; overcrowding leads to uneven cooking and soggy edges. The air fryer’s circulation needs space to move freely around each tender. If your basket is small, cook in two batches to maintain crispness. This step is crucial for that signature crunch.
- Set the timer for 12 minutes and let the air fryer do its work. The first 6 minutes will brown the coating, while the last 6 minutes will finish cooking the interior. Listen for the subtle crackle of the coating; it’s the sound of perfection. If you’re a seasoned pro, you can adjust the time slightly based on your air fryer model. The key is to avoid overcooking.
- At the 6‑minute mark, open the air fryer and give the tenders a gentle shake or flip. This ensures even browning on all sides. The flipping step is essential for a uniform crust. After flipping, continue cooking for the remaining 6 minutes. Keep an eye on the color; you want a golden‑brown finish without burning.
- When the timer buzzes, remove the tenders and let them rest for 2 minutes. Resting allows the juices to redistribute, ensuring each bite is juicy. The rest period also helps the coating set, preventing it from becoming too soft. While resting, you can prepare a quick dipping sauce if you like. The rest of the time, the tenders will maintain their crispness.
- If you’re serving them immediately, plate the tenders with a side of fresh veggies or a quick salad. The contrast between the hot, crispy tenders and crisp veggies is a delightful balance. The freshness of the salad cuts through the richness. This pairing enhances the overall dining experience.
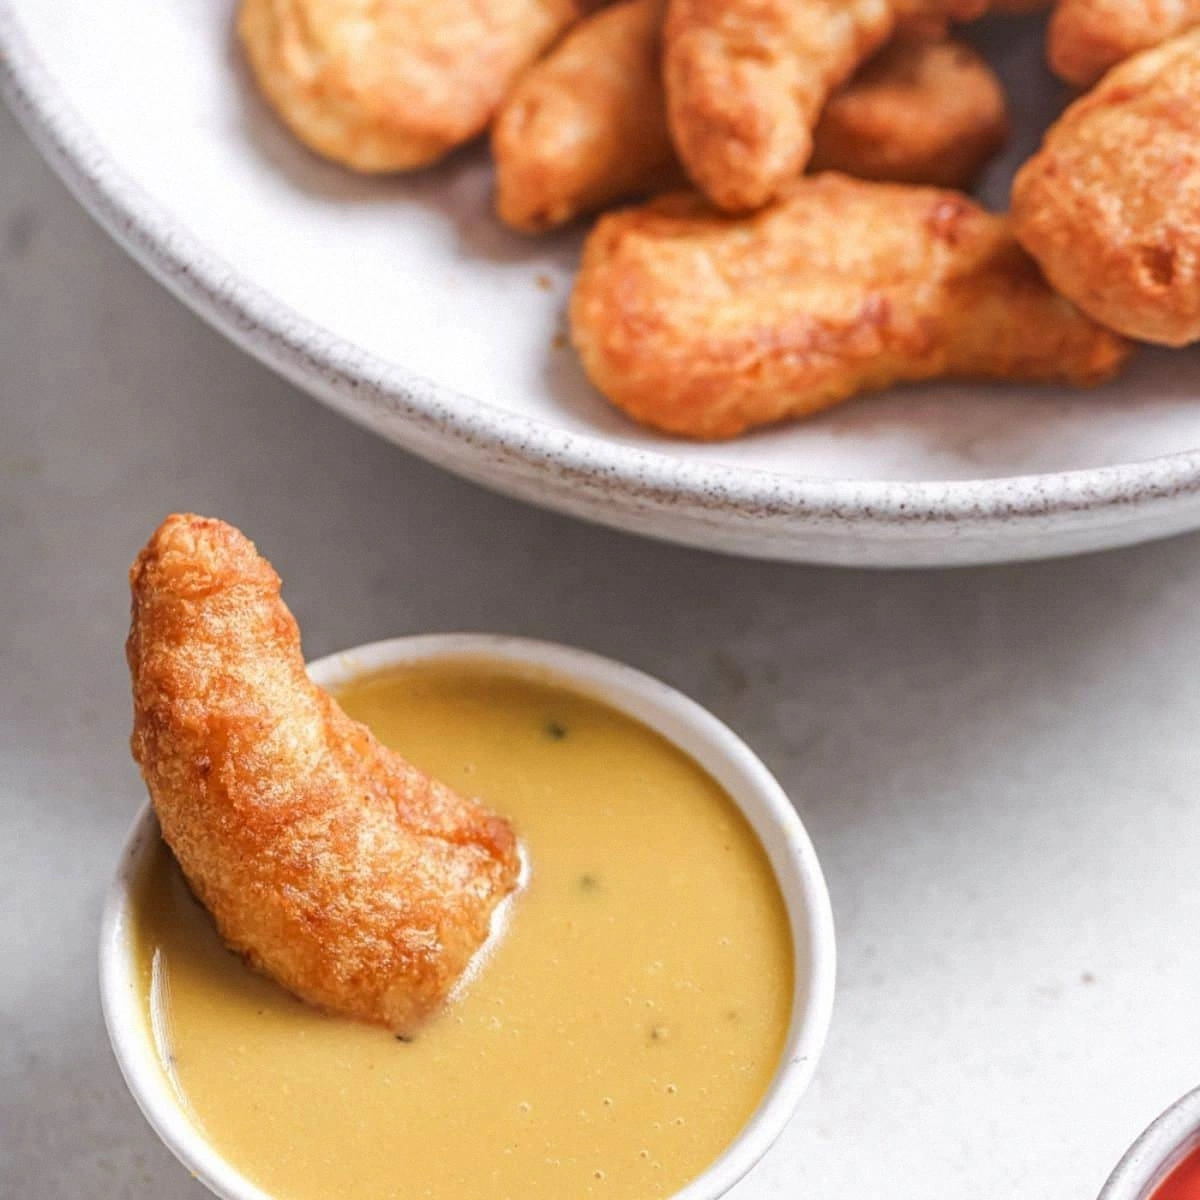
- For a quick sauce, whisk together 2 tablespoons of mayo, a splash of hot sauce, and a pinch of smoked paprika. This creamy, spicy dip complements the savory coating perfectly. The sauce adds an extra layer of flavor without overpowering the tenders. Keep it on the side for dipping.
- If you’re planning to serve these at a party, arrange the tenders on a platter with toothpicks for easy picking. The presentation matters; a neat platter looks inviting. Add a few fresh herbs for color and aroma. The toothpicks make it a fun, finger‑friendly snack.
- Should you need to cook more tenders, simply repeat the process, ensuring each batch is cooked to perfection. The air fryer’s consistent heat makes batch cooking straightforward. Keep track of the time for each batch to avoid overcooking. This method works well for larger gatherings.
- If you’d like a slightly spicier version, sprinkle a pinch of cayenne pepper before cooking. This adds heat without changing the overall texture. The cayenne pepper also enhances the golden color of the coating. Adjust the amount to suit your spice tolerance.
- Finally, garnish the finished tenders with a drizzle of lemon juice and a sprinkle of chopped parsley for a fresh finish. The lemon brightens the flavor and adds a pop of color. The parsley adds a subtle herbal note that balances the richness. Serve immediately for the best texture.
That’s it — you did it. But hold on, I've got a few more tricks that'll take this to another level. From seasoning tweaks to storage hacks, these insider tips will ensure every bite is flawless. Let’s dive into the details that elevate this recipe from good to unforgettable.
Insider Tricks for Flawless Results
The Temperature Rule Nobody Follows
Many cooks assume 350°F is enough, but the secret lies in the heat. Setting the air fryer to 400°F allows the coating to caramelize quickly, locking in moisture. I once tried 350°F and ended up with a soggy exterior. The difference is like comparing a warm hug to a brisk breeze. Stick with 400°F for that perfect crunch.
Why Your Nose Knows Best
The aroma is your best indicator of doneness. When the tenders emit a buttery, golden scent, they’re ready. If the smell is still faint, give them a few more minutes. Your nose is a reliable guide that no timer can beat. Trust it, and you’ll never overcook again.
The 5‑Minute Rest That Changes Everything
Resting the tenders after cooking allows the juices to redistribute, preventing a dry center. I’ve seen people skip this step and end up with a tough bite. A quick 2‑minute rest is enough to seal the flavor. The rest period also lets the coating set, keeping it crisp. It’s a small step with a big payoff.
Flip for Evenness
Flipping the tenders halfway through ensures a uniform crust on all sides. Some air fryers have uneven heat distribution, so this simple flip balances the cooking. I’ve used a kitchen tongs to flip them gently, avoiding breakage. This technique guarantees a consistent texture from edge to edge.
Keep the Basket Clean
A clean basket improves heat circulation and prevents stuck‑on residue from affecting flavor. After each batch, wipe the basket with a damp cloth. Don’t let oil build up; it can cause the coating to become greasy. A clean basket keeps your tenders crisp and fresh.
Use a Baking Sheet for Even Heat
If your air fryer has a built‑in tray, place the tenders on it for even heat distribution. This helps the bottom of each tender stay crisp. I’ve found that using a tray eliminates uneven spots. The result is a uniformly golden crust.
Creative Twists and Variations
This recipe is a playground. Here are some of my favorite ways to switch things up:
Spicy Cajun Burst
Add a sprinkle of Cajun seasoning to the coating before cooking. The smoky heat pairs well with the tender chicken. This version is great for those who love a bit of fire. The result is a flavorful kick that’s hard to resist.
Garlic Parmesan Delight
Mix grated parmesan into the breadcrumb coating for a nutty, cheesy crust. The garlic powder enhances the savory depth. This twist turns the tenders into a gourmet snack. Perfect for a quick dinner or party appetizer.
Asian Fusion Twist
Use a blend of soy sauce, ginger, and sesame oil in a quick glaze. Brush the glaze onto the tenders after cooking. The umami flavor complements the crispy coating. This variation offers an exciting, international flavor profile.
Honey Mustard Glaze
Whisk honey, mustard, and a dash of vinegar for a sweet‑savory glaze. Brush it over the tenders while they’re still hot. The glaze caramelizes, adding a glossy finish. This version is ideal for a sweet‑spicy pairing.
Herb‑Infused Crunch
Add fresh rosemary or thyme to the coating for an aromatic twist. The herbs infuse the coating with earthy notes. The result is a fragrant, herb‑laden crunch. This variation is great for a garden‑themed meal.
Low‑Carb Alternative
Swap the breadcrumb coating for crushed pork rinds or almond flour. This keeps the crunch while cutting carbs. The flavor stays rich and satisfying. Ideal for keto or low‑carb enthusiasts.
Storing and Bringing It Back to Life
Fridge Storage
Store cooked tenders in an airtight container in the fridge for up to 3 days. Keep them on a paper towel to absorb excess moisture. Reheat in the air fryer for 3 minutes to restore crispness. The paper towel trick keeps them from becoming soggy. This method preserves texture and flavor.
Freezer Friendly
Re‑freeze cooked tenders in a single layer on a parchment sheet before placing them in a freezer bag. They stay fresh for up to 2 months. When ready to eat, thaw overnight and reheat in the air fryer. The single‑layer freeze prevents clumping. This technique is perfect for meal prep.
Best Reheating Method
To reheat, preheat the air fryer to 375°F and cook the tenders for 4–5 minutes. A tiny splash of water in the basket before reheating can help steam back to perfection. This simple trick restores the original crunch. The reheated tenders taste almost as fresh as new.
And that’s the full journey from freezer to table. Every step is designed to maximize flavor, texture, and convenience. With these tips, you’ll never again doubt the power of an air fryer and a package of frozen chicken tenders. Enjoy the crunch, savor the juiciness, and share the love with friends and family. Happy cooking!