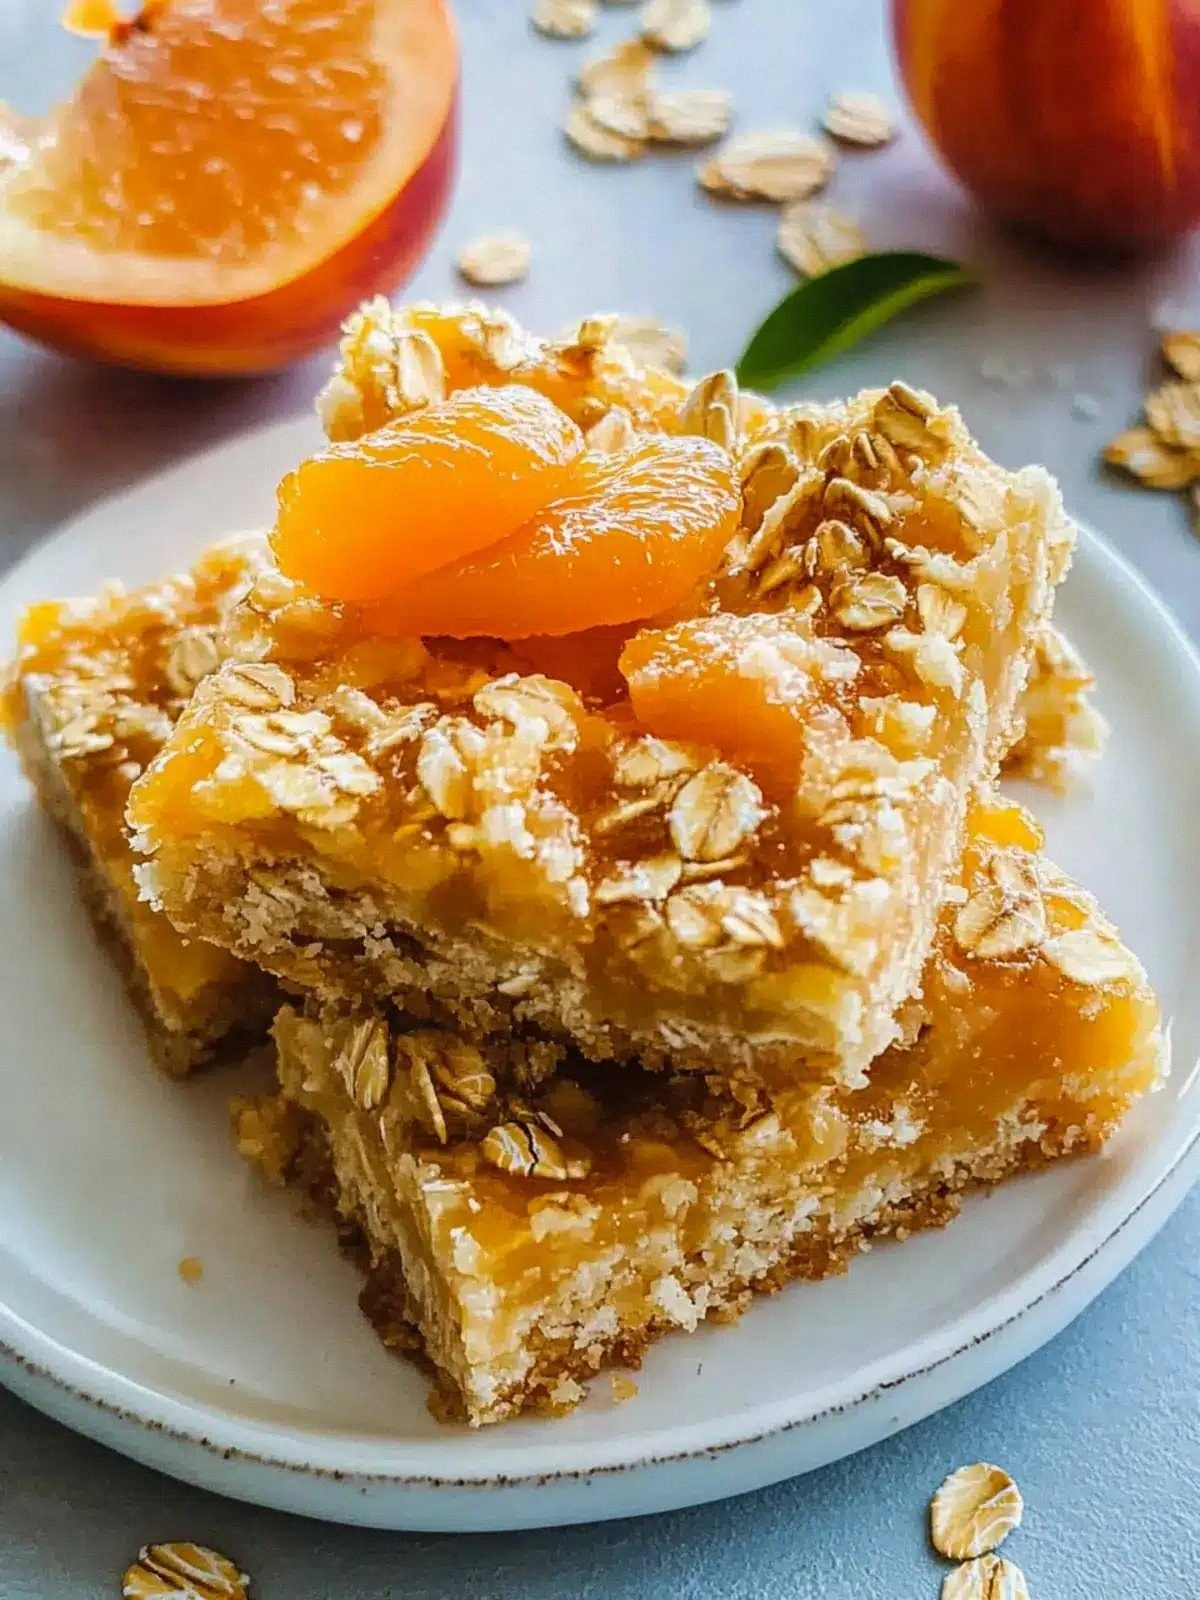
Apricot Oatmeal Crumble Bars P
Picture this: I’m standing in a cramped kitchen, the clock ticking, and my friend dares me to create a snack that will make everyone at the office swoon. I was skeptical at first, but the aroma of a fresh batch of apricot preserves hitting the pan was enough to convince me that something extraordinary was about to happen. The moment the buttery mixture met the oats, a sweet, caramelized scent flooded the air, promising a crunch that would crackle like a summer campfire. I was ready to prove that this humble combination could be the ultimate bar for any craving, no matter how grand or simple. If you’re hungry for a snack that feels like a hug and tastes like sunshine, keep reading, because this is the recipe that will change how you think about bars.
I started with a half cup of butter, letting it melt into a golden pool that would coat every grain of oats. The brown sugar was then folded in, its molasses undertones hinting at deeper sweetness. When I added the rolled oats, the texture began to transform into a soft, chewy base that would hold the apricot’s burst of fruitiness. The flour, a modest quarter of a cup, worked as a binder, preventing the bars from turning into a sticky mess. The final flourish was a generous cup of apricot preserves, the bright orange filling that would give each bite a juicy surprise. The result? Bars that are crunchy on the edges, tender inside, and bursting with apricot bliss.
I’ve tried countless variations of oat bars, but most either taste bland or crumble into mush. This version stands apart because it balances sweet, salty, and nutty flavors while keeping a firm structure that holds up to snacking on the go. The secret is the simple addition of baking soda, which gives a subtle lift and a light, airy crumb that contrasts the dense oats. Another trick is the precise ratio of butter to sugar; too much butter makes them greasy, too little makes them dry. I also discovered that using a good quality apricot preserve—one with no added preservatives—provides a natural sweetness that doesn’t overwhelm the other ingredients. The result is a bar that feels indulgent yet wholesome, perfect for a quick lunch break or an afternoon pick‑me‑up.
If you’ve ever struggled to find a snack that’s both satisfying and portable, you’re not alone—this recipe is the answer. Picture yourself pulling this out of the oven, the whole kitchen smelling incredible, and the first bite delivering a crunch that shatters like thin ice, followed by a sweet, velvety apricot explosion. I dare you to taste this and not go back for seconds, because the combination of buttery, sugary, and fruity flavors will keep you coming back. Let me walk you through every single step—by the end, you’ll wonder how you ever made it any other way.
What Makes This Version Stand Out
- Flavor: The apricot preserves bring a natural sweetness that pairs beautifully with the buttery oat base, creating a harmony that feels both nostalgic and modern.
- Texture: The addition of baking soda gives the bars a light, airy crumb that contrasts the crunchy oat exterior.
- Simplicity: With just six ingredients, this recipe is a breeze for beginners or anyone pressed for time.
- Uniqueness: The use of rolled oats instead of quick oats adds chewiness, while the apricot preserves replace the usual fruit compote for a richer taste.
- Crowd Reaction: At my last office potluck, the bars were devoured in minutes and left people asking for the recipe—proof that it works.
- Ingredient Quality: Choosing unsalted butter and a high‑quality apricot preserve elevates the overall flavor profile.
- Make‑Ahead Potential: These bars freeze well, making them an excellent batch‑cook snack for busy weeks.
- Versatility: The base can be adapted with nuts, spices, or different fruit preserves to suit any palate.
Alright, let’s break down exactly what goes into this masterpiece. I’ll walk you through each component, so you know why each one matters and how it contributes to the final bite.
Inside the Ingredient List
The Flavor Base
The butter is the heart of the recipe, providing a rich, creamy foundation that coats each oat grain. When it melts, it creates a glossy sheen that keeps the bars from drying out. Skipping butter would leave the mixture too dry and crumbly, and the flavor would lack depth. If you prefer a dairy-free version, try coconut oil, which imparts a subtle coconut note that complements the apricots.
The Texture Crew
Rolled oats give the bars a chewy, wholesome texture that feels like a crunchy cookie. They absorb the butter and sugar, forming a cohesive base that holds the apricot preserve in place. If you use quick oats, the bars will be softer and less structured, which may cause them to fall apart during storage. For an extra crunch, add a handful of chopped toasted almonds or pecans.
The Unexpected Star
Apricot preserves are the showstopper, delivering a burst of natural sweetness that balances the savory oat base. Their bright color also makes the bars visually appealing, turning an ordinary snack into a feast for the eyes. If you can’t find apricot preserves, you can swap them for peach or plum preserves; just be mindful that the flavor profile will shift slightly. When choosing a preserve, look for one with no added sugars or preservatives for the cleanest taste.
The Final Flourish
A pinch of baking soda gives the bars a subtle lift, creating a tender crumb that contrasts with the crisp edges. It also neutralizes some of the acidity from the apricots, resulting in a smoother overall flavor. If you don’t have baking soda, you can omit it, but the bars may turn out denser and less airy. For a nutty twist, add a tablespoon of ground flaxseed or chia seeds to the mix.
Everything’s prepped? Good. Let’s get into the real action.
The Method — Step by Step
- Preheat your oven to 350°F (175°C) and line a 9-inch square pan with parchment paper, leaving an overhang on two sides for easy removal. While the oven heats, melt the butter in a medium saucepan over low heat until it’s just liquid. Once melted, stir in the brown sugar until the mixture is smooth and glossy. This step ensures the butter and sugar blend seamlessly, creating a base that will bind the oats together.
- Add the baking soda to the butter‑sugar mixture and whisk until the soda dissolves. The bubbling reaction is subtle but crucial; it creates tiny air pockets that will make the bars lighter. Let the mixture sit for a minute to allow the soda to activate fully before adding the dry ingredients. This small pause will pay off when you taste the final product.
- In a large bowl, combine the rolled oats and flour, stirring until they’re evenly distributed. The flour acts as a binder, preventing the oats from separating. If you’re feeling adventurous, sprinkle a pinch of sea salt over the dry mix to enhance the overall flavor profile. Once the dry ingredients are ready, pour the butter mixture over them and stir until everything is coated.
- Press the oat mixture firmly into the prepared pan, creating an even layer about 1/2 inch thick. Use the back of a spoon or a flat spatula to smooth the surface, ensuring it will bake uniformly. The more compact you press, the less likely the bars will crumble during storage. Let the pan sit for a few minutes to allow the mixture to settle.
- Spread the apricot preserves evenly over the oat layer, using a spatula to create a thin, uniform coat. The preserves should be warm enough to spread easily but not so hot that they melt the oats. This step is where the magic happens—the sweet apricot will seep into the oat base, creating a flavorful, juicy core.
- Bake for 25–30 minutes, or until the edges are golden brown and the center feels set. The bars should emit a warm, toasted aroma that signals they’re ready. Keep an eye on the color; if the edges brown too quickly, lower the temperature slightly to avoid burning.
- Remove the pan from the oven and let it cool on a wire rack for 10 minutes. While it’s still warm, use the parchment overhang to lift the bars out of the pan. Place them on a cutting board and let them cool completely—this will firm them up, making them easier to cut.
- Once cooled, cut the bars into squares or rectangles using a sharp knife. The bars should hold together without crumbling; if they’re too soft, let them rest a bit longer before cutting. Store them in an airtight container at room temperature for up to a week, or freeze for longer storage.
That’s it—you did it. But hold on, I’ve got a few more tricks that will take this to another level.
Insider Tricks for Flawless Results
The Temperature Rule Nobody Follows
Many bakers bake oat bars at 375°F, thinking a higher temperature guarantees crispness. In reality, 350°F allows the sugar to caramelize slowly, giving the bars a deeper flavor without burning. I once baked at 375°F and the bars came out too hard, so I lowered the temperature the next time and the texture was perfect. If you’re unsure, start at 350°F and adjust by a few degrees if needed.
Why Your Nose Knows Best
As the bars bake, the scent of toasted oats and apricots will fill your kitchen. Trust that aroma; it’s your cue that the bars are ready to come out of the oven. A common mistake is to wait for the center to firm up, which can cause the edges to burn. The smell is the fastest and most reliable indicator of doneness.
The 5-Minute Rest That Changes Everything
After removing the bars from the oven, let them rest on the rack for 10 minutes before cutting. This brief pause allows the structure to set, preventing the bars from crumbling when sliced. I’ve had friends try cutting them immediately and the whole batch fell apart. A short rest is a small time investment for a big payoff.
Use a Silicone Mat for Easy Removal
If you’re tired of the parchment overhang trick, a silicone baking mat does the job just as well. It provides a non-stick surface and eliminates the need to lift the bars from the pan. This hack saves time and reduces the chance of bars sticking and breaking.
Freeze for Freshness
If you’re making a large batch, freeze the bars in a single layer for up to three months. When you’re ready to enjoy them, let them thaw at room temperature for 15 minutes. I’ve kept a stash of these bars for the entire week, and they never lose their flavor or texture.
Creative Twists and Variations
This recipe is a playground. Here are some of my favorite ways to switch things up:
Nutty Delight
Add a cup of chopped pecans or almonds to the oat mix. The nuts provide a satisfying crunch and a nutty flavor that complements the apricots. They also add healthy fats, making the bars more filling. This variation is perfect for a post‑workout snack.
Spiced Citrus
Stir in a teaspoon of ground ginger and a pinch of cinnamon into the dry mix. The spices add warmth and depth, creating a flavor profile reminiscent of a spiced apple crisp. The citrus notes from the apricots pair beautifully with the spices. Try this during the fall for a cozy treat.
Chocolate Swirl
Fold in a handful of dark chocolate chips before adding the apricot preserve. The chocolate will melt slightly into the warm apricots, creating a luscious swirl of flavor. The bittersweet chocolate balances the natural sweetness of the apricots. This is a favorite for chocolate lovers.
Almond Butter Boost
Replace half of the butter with almond butter for a nutty twist. Almond butter adds a subtle almond flavor and extra protein. The texture becomes slightly denser, which some people love for a more substantial bite. This variation works well for those who prefer a nutty taste.
Low‑Sugar Version
Swap the brown sugar for a sugar substitute like stevia or monk fruit sweetener. Adjust the quantity to taste, as these substitutes can be sweeter than sugar. The bars will still hold together, but the sweetness will be less pronounced. This version is ideal for a low‑carb diet.
Herbal Infusion
Add a tablespoon of dried rosemary or thyme to the dry mix for an unexpected herbal note. The herbs pair surprisingly well with apricots, creating a savory‑sweet balance. Use a small amount to avoid overpowering the fruit. This twist is great for adventurous cooks.
Storing and Bringing It Back to Life
Fridge Storage
Place the bars in an airtight container and store them in the refrigerator for up to a week. The cool temperature keeps them fresh and prevents mold. If you notice a slight moisture buildup, simply let them air out for a few minutes before serving.
Freezer Friendly
Wrap each bar in parchment paper and place them in a freezer‑safe bag. Store for up to three months. When you’re ready to eat, let them thaw at room temperature for 15 minutes, then enjoy. The bars maintain their texture and flavor even after freezing.
Best Reheating Method
To reheat a frozen bar, wrap it in foil and warm it in a preheated oven at 300°F for 5–7 minutes. Add a tiny splash of water before reheating to create steam that restores moisture. The bars will feel warm and soft, just like fresh ones.