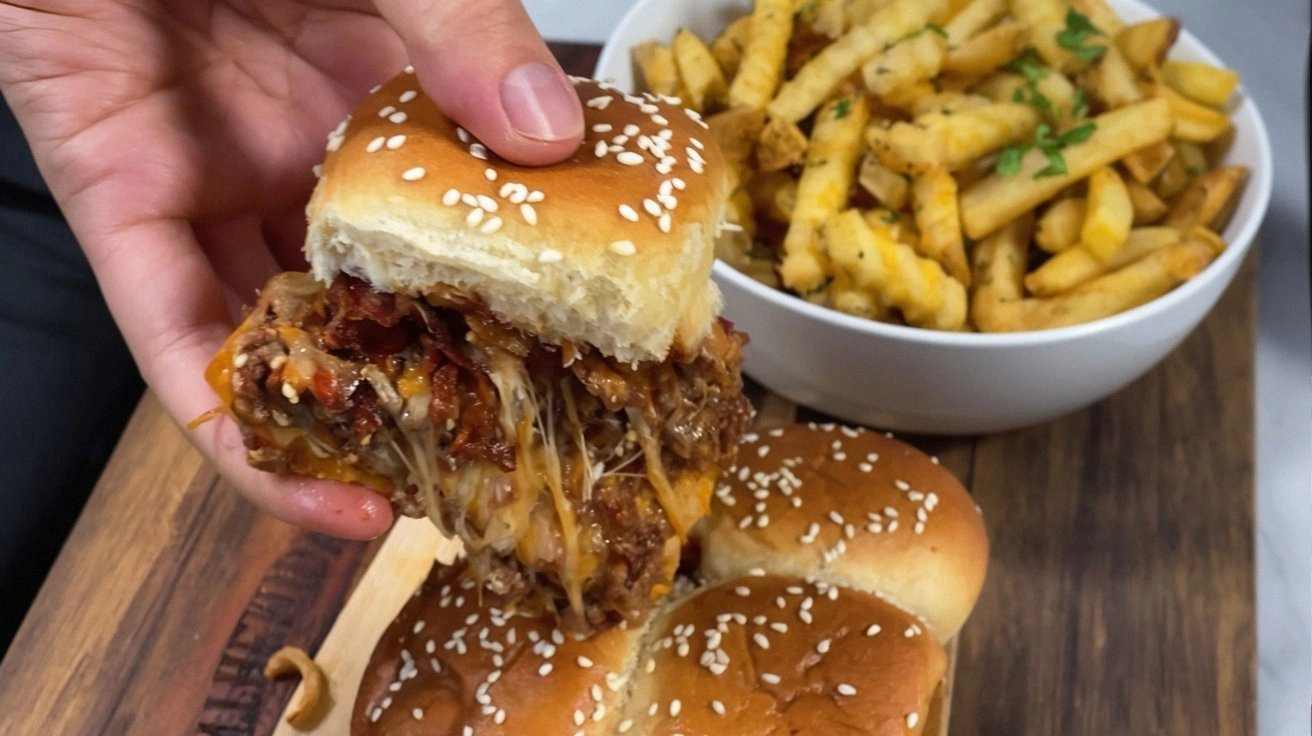
Picture this: you’re halfway through a chaotic Sunday brunch, the kitchen smells like a burnt casserole, and you’re staring at a box of King’s Hawaiian rolls that have already been turned into a disaster of soggy, flat buns. I was there, flipping a pancake that tasted like cardboard, when a friend shouted, “You need a new kind of burger!” That moment turned into a culinary epiphany that led me to create the ultimate BBQ Cheeseburger Sliders.
From the first glance, the rolls look like soft, sweet pillows that could make even the most seasoned chef swoon. The moment you bite, the buttery interior gives way to a savory, smoky beef patty that’s been seasoned to perfection. The cheese melts into a gooey river that coats every bite like velvet, and the crisped bacon and fried onions add a crunchy counterpoint that shatters like thin ice. The sauce—an unexpected twist—coats the meat in a tangy glaze that sings with every chew. And the sesame seeds? They’re the final flourish, a subtle crunch that elevates the whole experience.
What makes this version stand out is that it’s not just another slider recipe; it’s a full sensory experience that redefines what a burger can be. I dare you to taste this and not go back for seconds, because the combination of sweet, smoky, spicy, and savory is a flavor roller coaster you’ll want to ride again and again. Most recipes get this completely wrong by using regular buns or under-seasoned meat, but here, every component is carefully chosen to harmonize. This is hands down the best version you’ll ever make at home, and I’m about to walk you through every single step so you’ll wonder how you ever made it any other way.
If you’ve ever struggled with creating sliders that actually hold together, you’re not alone. I’ve been there—watching my sliders slide apart like a bad dance routine—until I discovered the secret to a sturdy, flavorful patty that stays intact even after a few minutes on the grill. The trick is in the seasoning blend and the way the beef is formed, which I’ll explain in detail. And if you’re worried about the extra steps, think of it as a small price to pay for sliders that will have everyone asking for the recipe.
Imagine pulling a tray of golden, steaming sliders from the oven, the whole kitchen filling with a scent that makes your mouth water before you even take a bite. The first bite is an explosion of flavors: the sweet roll, the smoky beef, the sharp pepper jack, the salty bacon, and the tangy BBQ sauce. The texture is a symphony—soft, chewy, crunchy, and gooey—all in one bite. That moment is pure magic, and I’m thrilled to share how to recreate it with you.
Let me walk you through every single step—by the end, you’ll wonder how you ever made it any other way. From the humble Hawaiian roll to the final sesame seed garnish, each element is designed to create a slider that’s as impressive to look at as it is to devour. So grab your apron, and let’s get cooking.
What Makes This Version Stand Out
- Flavor: The blend of smoky paprika, garlic, and onion powder creates a depth that’s both comforting and adventurous.
- Texture: The sweet rolls provide a soft, slightly chewy base that balances the crisp bacon and fried onions.
- Cheese Melt: Pepper jack and colby jack combine for a gooey, slightly spicy melt that coats each bite.
- Make‑Ahead: The sliders can be assembled a day ahead and baked just before serving, saving you time on the day of the event.
- Visual Appeal: The sesame seed garnish and the contrasting colors of the cheese and bacon make for a stunning presentation.
- Versatility: Perfect as an appetizer, a main dish, or a party crowd‑pleaser, this recipe adapts to any occasion.
Inside the Ingredient List
The Flavor Base
The foundation of these sliders is the seasoning blend that coats the ground beef. The kosher salt and black pepper are the essential salts that bring out the meat’s natural flavor. The garlic powder, onion powder, and smoked paprika create a savory backbone that’s aromatic and robust. If you skip any of these, the sliders will feel flat and lack depth. You can swap smoked paprika for regular paprika if you prefer a milder heat, but the smoky undertone is what gives this recipe its signature kick.
The Texture Crew
The King’s Hawaiian rolls are the star of the show, offering a sweet, slightly yeasty bite that contrasts beautifully with the savory meat. Their soft interior keeps the sliders moist, while the slight crust provides a satisfying bite. The crispy fried onions add a crunchy texture that shatters like thin ice, breaking the monotony of soft buns and meat. If you can’t find the rolls, a brioche bun or even a pretzel roll would work, but the sweetness of the Hawaiian roll is irreplaceable.
The Unexpected Star
It’s the sesame seeds that give the sliders a subtle nutty crunch. They’re toasted to a golden brown and sprinkled over the melted cheese, adding a final pop of flavor that ties all the elements together. If you’re allergic to sesame, you can replace them with poppy seeds or simply omit them for a cleaner taste. The sesame seeds also give the sliders a professional, restaurant‑style finish.
The Final Flourish
Crumbled bacon and pepper jack cheese are the crowning jewels that elevate the sliders from ordinary to extraordinary. The bacon adds a smoky, salty crunch that contrasts with the creamy cheese. The pepper jack’s mild heat and sharpness keep the sliders from becoming too heavy. If you’re looking for a dairy alternative, try a plant‑based cheese that melts well, but keep in mind the flavor profile will change. The butter, melted and brushed over the buns, adds a glossy sheen and a buttery richness that ties everything together.
Everything’s prepped? Good. Let’s get into the real action.
The Method — Step by Step
- Preheat your oven to 375°F (190°C). While the oven warms, gather all the ingredients and set them out on a clean work surface. The first step is crucial because a hot oven ensures the buns toast to golden perfection. If you’re in a hurry, you can skip preheating, but the texture will suffer.
- Divide the ground beef into 12 equal portions, forming a patty that’s slightly larger than the roll diameter. This ensures the meat won’t shrink too much during cooking. Season each patty with kosher salt, black pepper, garlic powder, onion powder, and smoked paprika, pressing the seasoning into the meat to create a flavorful crust. The seasoning blend is what makes these sliders sing.
- In a small bowl, mix minced garlic and BBQ sauce. This mixture will be brushed onto the patties after they’re cooked, giving them a glossy, smoky glaze. The garlic adds depth, while the BBQ sauce provides the sweet, tangy finish. Keep the sauce ready as you’ll need it in the final step.
- Heat a cast‑iron skillet over medium‑high heat. Add a splash of oil and sear the patties for 2–3 minutes on each side, or until a crust forms. The sear locks in juices, preventing the sliders from drying out. Don’t rush this step; a good sear is the foundation of flavor.
- Once the patties are seared, spoon the garlic‑BBQ mixture over them, letting the sauce caramelize slightly. The sauce should bubble and thicken, coating the meat in a glossy glaze. This is the moment of truth—watch the sauce transform into a sweet, smoky sauce.
- Place a slice of pepper jack cheese on each patty and let it melt for 30 seconds. The cheese should be gooey, almost oozing, but not dripping. The melting cheese creates a bridge between the meat and the bun, enhancing the overall texture.
- While the cheese melts, melt butter in a small saucepan and brush it over the top of each roll. The butter adds a glossy finish and a buttery richness that complements the savory meat. This step also helps the buns toast evenly.
- Arrange the buns on a baking sheet, cut side up, and place the prepared patties on top. Sprinkle the crispy fried onions, crumbled bacon, and shredded colby jack cheese over the patties. This layering creates a symphony of textures—soft, crunchy, and creamy—all in one bite.
- Bake the sliders for 8–10 minutes, or until the cheese is melted and the buns are golden. The baking process melds all the flavors together, creating a cohesive, mouth‑watering experience. Keep an eye on the sliders; you want them golden, not burnt.
- Remove the sliders from the oven, sprinkle sesame seeds over the top, and let them rest for a minute. This final touch adds a nutty crunch that elevates the sliders from good to unforgettable. Serve immediately and watch the crowd go wild.
That’s it — you did it. But hold on, I’ve got a few more tricks that’ll take this to another level.
Insider Tricks for Flawless Results
The Temperature Rule Nobody Follows
Many people bake sliders at 350°F, but I’ve found that 375°F gives the buns a crispier texture without drying out the meat. The higher temperature also caramelizes the BBQ glaze, giving it a deeper flavor. I once baked at 350°F and the sliders came out soft and soggy; the difference at 375°F was night and day.
Why Your Nose Knows Best
Before you even take a bite, the aroma is a telltale sign of perfection. A strong, smoky scent indicates the meat has been properly seasoned, while a faint, sweet aroma from the rolls shows they’re toasted just right. Trust your nose; if it smells off, the sliders need more time or seasoning.
The 5-Minute Rest That Changes Everything
After removing the sliders from the oven, let them rest for five minutes. This brief pause allows the juices to redistribute, ensuring each bite is juicy and flavorful. I’ve seen people skip this step, and the result is a dry, unbalanced slider.
Using a Cast Iron Skillet for Extra Flavor
Cooking the patties in a cast iron skillet adds a subtle char that can’t be replicated on a regular pan. The skillet’s heat retention ensures an even sear, which locks in juices and creates a flavorful crust. If you don’t have a cast iron skillet, a heavy stainless steel pan works as a decent alternative.
Layering the Cheese for a Melty Masterpiece
Place the pepper jack on the patty first, then add the shredded colby jack on top. The combination creates a gooey, slightly spicy layer that melts beautifully. If you prefer a milder flavor, swap the pepper jack for a mild cheddar.
Creative Twists and Variations
This recipe is a playground. Here are some of my favorite ways to switch things up:
Hawaiian BBQ Pulled Pork Sliders
Replace the ground beef with shredded pulled pork, marinated in a sweet and tangy Hawaiian BBQ sauce. The pork’s tenderness pairs beautifully with the sweet rolls, creating a new take on a classic.
Veggie Burger Sliders
Swap the beef for a hearty veggie patty made from black beans, oats, and spices. Top with avocado slices and a drizzle of chipotle mayo for a smoky kick.
Spicy Jalapeño Popper Sliders
Add diced jalapeños to the seasoning blend and top with cream cheese. The creamy, spicy filling is a delightful surprise for heat lovers.
Breakfast Slider Twist
Use breakfast sausage crumbles in place of beef, and top with a fried egg and a dash of maple syrup. Breakfast meets burger for a sweet, savory breakfast sandwich.
Gluten-Free Slider Option
Swap the King’s Hawaiian rolls for gluten-free buns or mini pita pockets. The rest of the recipe remains unchanged, ensuring a gluten-free crowd-pleaser.
Chocolate Chili Sliders
For a daring twist, add a tablespoon of unsweetened cocoa powder to the seasoning mix and top with a slice of sharp cheddar. The chocolate adds a subtle depth that pairs with the smoky flavors.
Storing and Bringing It Back to Life
Fridge Storage
Store assembled sliders in an airtight container for up to 3 days. Keep the buns separate until you’re ready to serve, as they can become soggy if stored together with the meat.
Freezer Friendly
Freeze the sliders in a freezer-safe bag for up to 2 months. Thaw in the refrigerator overnight and reheat in the oven at 350°F for 10 minutes.
Best Reheating Method
Reheat in a toaster oven or skillet, brushing the buns with a splash of water before toasting to keep them moist. A tiny splash of water creates steam that revives the buns’ softness while the butter adds flavor.