I was in the middle of a frantic Tuesday night when my roommate dared me to create something that would make her forget about the pizza she was about to order. I stared at a half‑empty fridge, a lonely bag of rice, and a stubborn block of beef that had been waiting for a purpose. The kitchen was humming with the low‑grade buzz of the fridge, the timer on the microwave ticking like a metronome, and my mind was already racing through a dozen half‑baked ideas. Then, like a flash of neon in a dim hallway, the memory of a Korean street stall hit me – the smell of caramelized meat, the sweet‑spicy perfume of gochujang, and the comforting crunch of kimchi. I grabbed the beef, tossed it into a bowl, and let the sauce do its magic. The result? A bowl that could convince even the most skeptical pizza lover to surrender without a fight.
Picture this: the first bite hits you with a caramel‑deep sweetness that slides into a gentle heat, then erupts into a bright, tangy finish that makes your taste buds do a little happy dance. The rice underneath is fluffy, each grain perfectly seasoned by the sauce that clings like a silk scarf. The fried egg on top adds a buttery richness that melts into the bowl, while the kimchi provides that essential crunch and acidity to cut through the richness. The whole thing is a symphony of textures – the tender, slightly charred beef, the soft rice, the runny yolk, and the crisp kimchi – all playing together in perfect harmony.
Most recipes I've tried either drown the beef in a syrupy mess or leave it dry and flavor‑less. This version stands out because it respects the beef’s natural juiciness while layering it with a sauce that’s both sweet and umami‑packed, thanks to the combination of soy sauce, light brown sugar, and a dash of sesame oil. The secret weapon? A modest splash of chili garlic sauce that adds depth without overwhelming the palate. I’m telling you, this is hands down the best version you’ll ever make at home, and I dare you to taste it and not go back for seconds.
Okay, ready for the game‑changer? I’m about to walk you through every single step – from selecting the perfect cut of beef to mastering that glossy glaze that makes the meat look like it’s been kissed by a Korean street vendor. By the end, you’ll wonder how you ever made this dish any other way. Let’s dive in and turn your kitchen into a bustling Seoul night market.
What Makes This Version Stand Out
- Flavor Depth: The marriage of soy sauce and light brown sugar creates a caramel base that’s richer than any store‑bought glaze, while the sesame oil adds a nutty whisper that lingers on the palate.
- Texture Harmony: Thinly sliced beef cooks in a flash, staying tender inside and developing a slight char on the edges that shatters like thin ice under a fork.
- Simplicity: Only four pantry staples are needed for the sauce, meaning you can pull this together on a weekday without a trip to the specialty store.
- Unique Heat: Chili garlic sauce (or Gochujang) provides a layered heat that builds, rather than a single punch of spiciness, keeping the dish interesting bite after bite.
- Crowd Reaction: Served at my last dinner party, the bowls disappeared faster than free samples at a grocery store – a true “wow” factor.
- Ingredient Quality: Using a well‑marbled cut like ribeye or sirloin ensures the meat stays juicy, and the soy sauce’s umami amplifies the beef’s natural flavor.
- Cooking Method: A quick high‑heat sear locks in juices, while the finishing glaze coats every strand of meat like a glossy, savory varnish.
- Make‑Ahead Potential: The sauce can be prepared ahead of time and stored, allowing you to assemble the bowls in minutes when hunger strikes.
Inside the Ingredient List
The Flavor Base
Soy sauce is the backbone of this glaze. Its salty umami acts like a culinary amplifier, turning the beef’s natural flavors up to eleven. If you skimp on it, the dish will taste flat and the caramelization will be uneven. For a gluten‑free version, swap regular soy sauce with tamari; the taste stays authentic while catering to dietary needs.
The Sweet Whisper
Light brown sugar adds a deep, molasses‑like sweetness that doesn’t cloy. It’s the secret that gives the sauce its glossy sheen and a subtle crunch when it caramelizes on the pan. If you prefer a less sweet profile, reduce the amount by a tablespoon – the sauce will still have that caramel kiss.
The Unexpected Star
Sesame oil is the surprise element that most home cooks overlook. A single tablespoon is enough to infuse the sauce with a toasted, nutty aroma that makes the whole bowl feel upscale. Skip it, and you’ll lose that luxurious finish; use toasted sesame oil for an even richer note.
The Heat Engine
Chili garlic sauce or Gochujang brings the heat, but more importantly, it adds a complex layer of fermented depth that pairs beautifully with the sweet‑salty base. If you can’t find Gochujang, a mix of sriracha and a splash of rice vinegar mimics the flavor profile without the fermentation nuance.
The Bowl Foundations
Cooked rice is the neutral canvas that lets the beef shine. Use short‑grain rice for a stickier texture that holds the sauce, or opt for jasmine for a fragrant lift. Fried eggs bring a silky yolk that, when broken, creates a luscious sauce that melds with the glaze. Kimchi adds a tangy crunch that cuts through the richness – think of it as the bright, acidic counterpoint in a musical composition.
Everything's prepped? Good. Let's get into the real action…
The Method — Step by Step
Start by thinly slicing 1½ pounds of beef (ribeye or sirloin works best). Pat the slices dry with paper towels – moisture is the enemy of a good sear. Toss the beef in a large bowl with the ½ cup soy sauce, ½ cup packed light brown sugar, 1 tablespoon sesame oil, and 2 tablespoons chili garlic sauce. Let it marinate for at least 15 minutes; the sugar will dissolve and the flavors will begin to mingle, creating a glossy coating that looks like liquid amber.
While the beef marinates, cook 3 cups of rice according to package instructions. Fluff it with a fork once done, then spread it on a tray to cool slightly – this prevents the rice from becoming mushy when the hot beef is added later.
Heat a large cast‑iron skillet or wok over medium‑high heat until a drop of water sizzles and evaporates instantly. Add a thin drizzle of neutral oil (canola or grapeseed) – you only need enough to coat the surface. When the oil shimmers, add the marinated beef in a single layer, spreading it out to avoid crowding. The moment the meat hits the pan, you’ll hear a satisfying sizzle that signals caramelization is about to begin.
Let the beef sear undisturbed for about 45 seconds, then flip using tongs. You’re looking for edges that start pulling away from the pan, turning a deep mahogany color. This is the moment of truth – the sugars are caramelizing, and the sauce is thickening into a glossy glaze that clings to each slice like a lacquer.
Once the beef is nearly cooked through (about 2‑3 minutes total), add a splash of water (≈¼ cup) to deglaze the pan, scraping up the caramelized bits stuck to the bottom. This creates a thin, silky sauce that will coat the rice later. Let the liquid reduce for another minute, then turn off the heat.
In a separate non‑stick pan, fry four eggs sunny‑side‑up. The whites should be set, while the yolks remain runny – this is the buttery river that will mingle with the bulgogi glaze. Season the whites with a pinch of salt and a grind of black pepper.
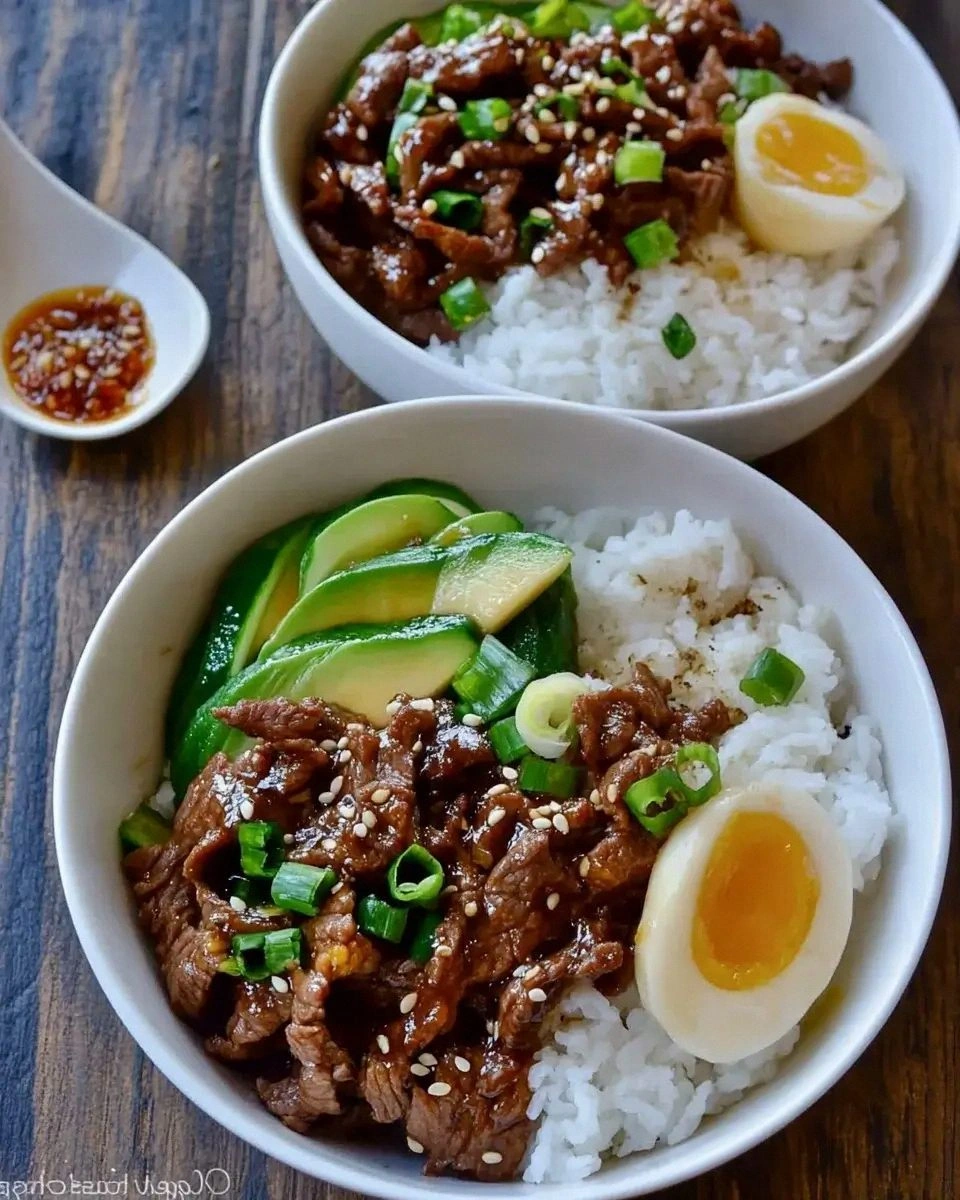
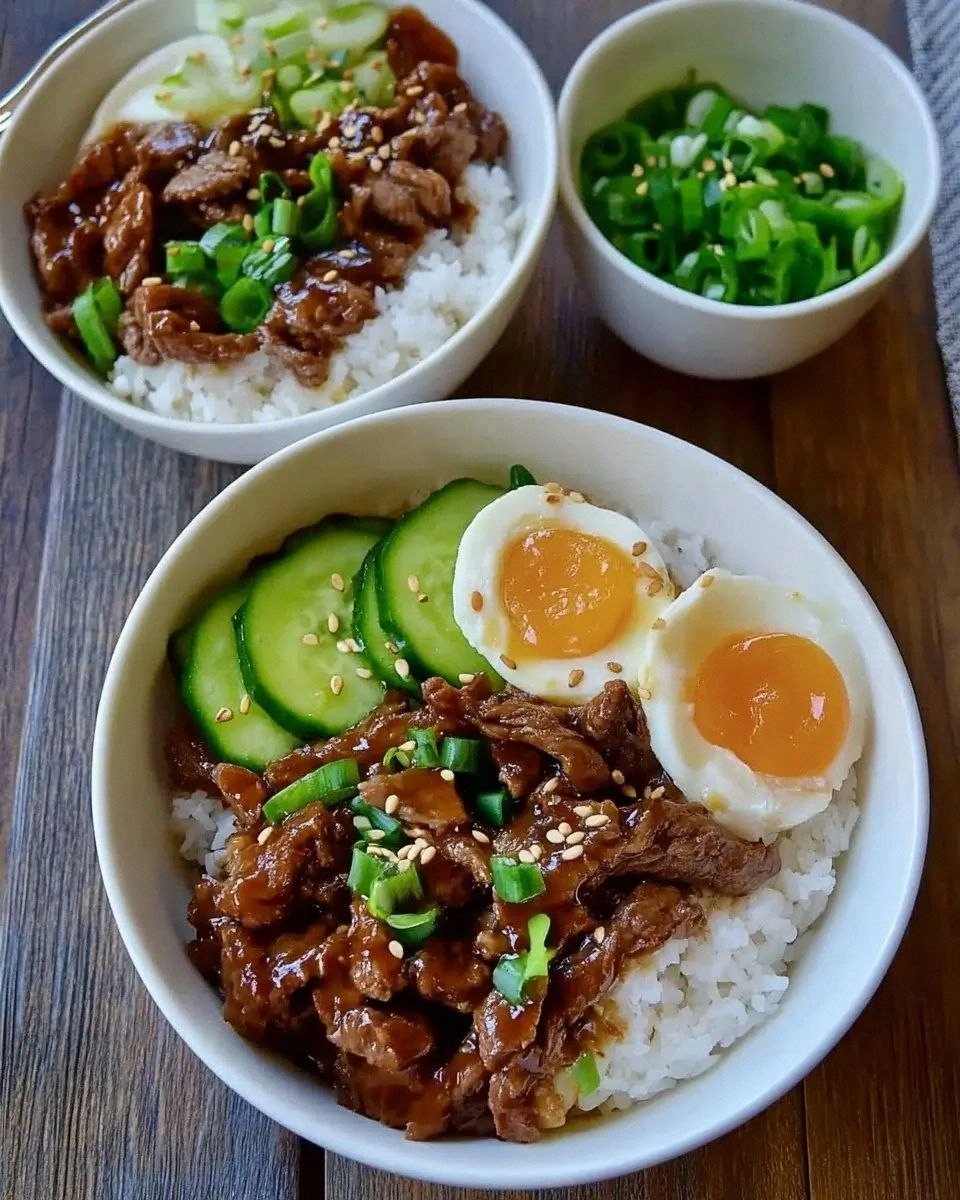
Assemble the bowls: start with a generous mound of rice, spoon the caramelized beef over the top, then place a fried egg in the center. Finish each bowl with a heaping spoonful of kimchi on the side. The kimchi’s acidity will cut through the sweet‑spicy glaze, creating a balanced bite every time.
Give the bowl a final drizzle of any remaining glaze from the pan, and sprinkle a handful of toasted sesame seeds and thinly sliced green onions for color and crunch. Serve immediately while the beef is still warm and the yolk is ready to burst.
That's it — you did it. But hold on, I've got a few more tricks that'll take this to another level…
Insider Tricks for Flawless Results
The Temperature Rule Nobody Follows
Never start with a cold pan. Let the skillet heat up for at least two minutes before adding oil. This ensures the oil reaches the optimal temperature (around 375°F) and the beef sizzles immediately, forming that coveted crust. I once tried to “save time” by adding meat to a lukewarm pan; the result was soggy, unevenly cooked beef that never developed flavor. Trust the heat, and the rest falls into place.
Why Your Nose Knows Best
Your sense of smell is the ultimate doneness gauge. When the glaze starts to smell nutty and slightly caramel, you’re on the right track. If you detect a burnt sugar scent, pull the pan off the heat instantly. This nose‑based check is more reliable than a timer because every stove and pan conducts heat differently.
The 5‑Minute Rest That Changes Everything
After searing, let the beef rest for five minutes before slicing (if you used a larger piece). This short rest allows the juices to redistribute, preventing them from spilling out onto the rice and making it soggy. A friend once skipped this rest and ended up with a bowl that tasted “wet” – a simple oversight that ruined the texture.
Kimchi Timing Trick
Add kimchi just before serving, not during cooking. The fermentation bubbles and acidity can break down the glaze if left too long, making the sauce thinner. By placing it on the side, you preserve its crunch and bright flavor, ensuring each bite hits with a refreshing contrast.
Creative Twists and Variations
This recipe is a playground. Here are some of my favorite ways to switch things up:
Spicy Pineapple Fusion
Add diced pineapple to the pan during the last minute of cooking. The fruit’s natural sugars caramelize alongside the beef, giving a tropical sweetness that balances the heat. Perfect for summer barbecues where you want a hint of island breeze.
Mushroom Medley
Swap half the beef for sliced shiitake or oyster mushrooms. The mushrooms absorb the glaze like a sponge, delivering a meaty umami punch for vegetarians or for those who love a forest‑floor twist.
Sesame‑Ginger Crunch
Stir in a tablespoon of toasted sesame seeds and a teaspoon of freshly grated ginger during the glaze reduction. The ginger adds a zingy freshness that lifts the dish, while the extra sesame seeds provide a nutty crunch.
Cheesy Fusion
Top each bowl with a sprinkle of shredded mozzarella or cheddar and place under a broiler for 30 seconds. The cheese melts into the hot beef, creating a gooey, indulgent layer that feels like a Korean‑Mexican mashup.
Low‑Carb Swap
Replace the rice with cauliflower rice or shirataki noodles. The lighter base lets the bold flavors of the bulgogi shine even more, making it a great option for low‑carb or keto diets.
Storing and Bringing It Back to Life
Fridge Storage
Store the cooked beef and sauce in an airtight container for up to three days. Keep the rice separate to maintain its texture. When reheating, add a splash of water or broth to the beef and gently stir over medium heat until steam rises – this revives the glaze without drying it out.
Freezer Friendly
Portion the marinated raw beef into freezer‑safe bags (up to one month). Freeze the sauce separately in a silicone muffin tray for easy portioning. Thaw overnight in the fridge, then follow the cooking steps as usual – the flavor actually deepens after a freeze‑thaw cycle.
Best Reheating Method
For the ultimate reheated bowl, use a skillet: add a tablespoon of oil, toss the beef and sauce, and heat over medium‑high for two minutes. Meanwhile, microwave the rice for 60 seconds, fluff, and assemble. A tiny splash of water before reheating creates steam that revives the rice’s fluffiness, while the skillet restores the beef’s caramelized edge.