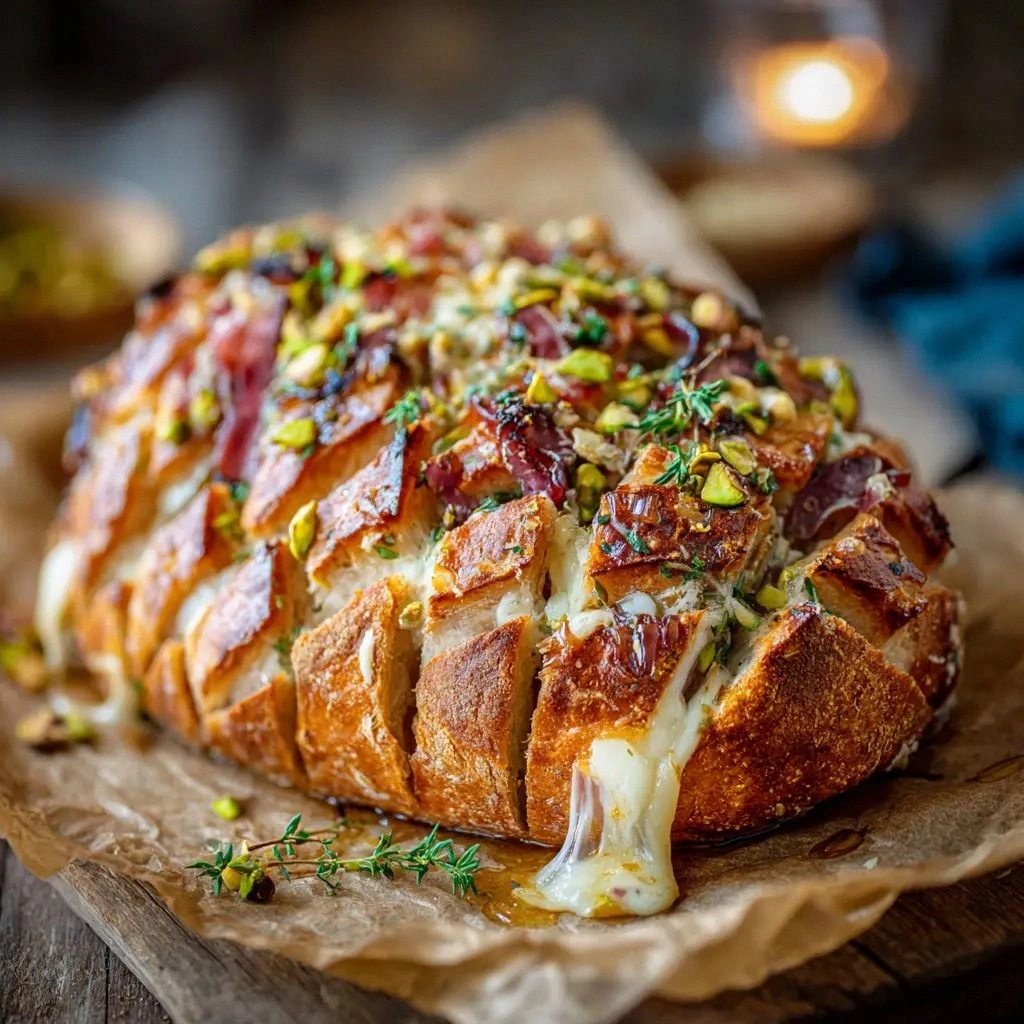
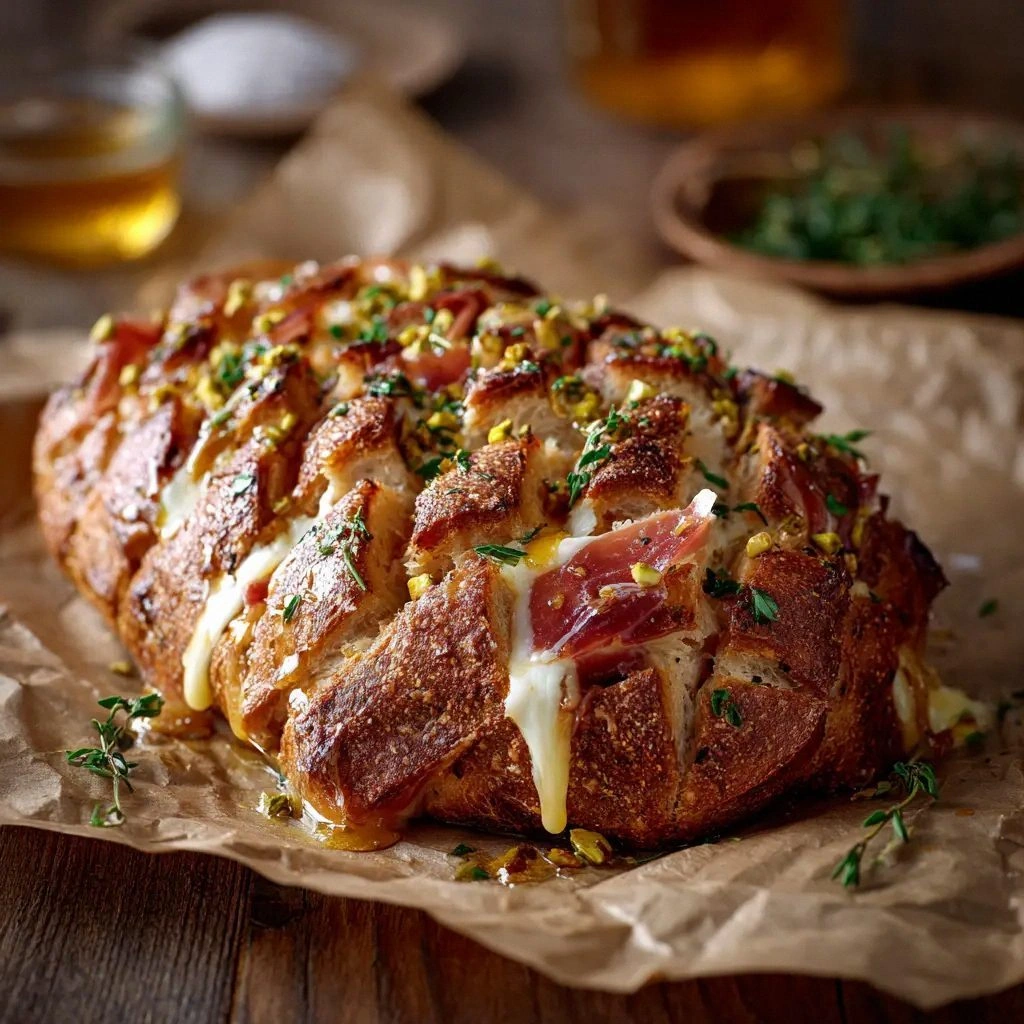
Brie Cheese Bread: The Ultimat
Picture this: I’m in a cramped kitchen, the oven pre‑heated, a loaf of crusty bread in my hand, and a wheel of brie that looks like a lazy sun. I’ve tried the classic brie bake, the gooey pull, the buttery crust, but something felt missing—like a missing beat in a favorite song. That night, after a disastrous attempt that left me with a soggy mess that tasted like regret, I decided it was time to rewrite the rules.
I was craving something that would make every bite feel like a mini celebration—flaky crust, molten cheese that drips like velvet, and a garlic‑herb aroma that lingers like a secret invitation. The kitchen was a symphony of sizzling butter, the soft pop of garlic, and the crackle of bread edges. My senses were in overdrive: the smell of melted brie, the sight of golden crust, the sound of a perfectly timed pop. And the taste—oh, the taste—was a harmonious blend of salty, buttery, and herbaceous that made me think, “This is hands down the best version you’ll ever make at home.”
I dared you to taste this and not go back for seconds, because this isn’t just a recipe; it’s a dare to elevate the humble appetizer into a moment of culinary triumph. If you’ve ever struggled with the classic brie bake—too dry, too greasy, or just plain forgettable—you’re not alone, and I’ve got the fix. Let me walk you through every single step—by the end, you’ll wonder how you ever made it any other way.
And trust me, the secret isn’t in the ingredients alone; it’s in the technique that turns a simple loaf into a showstopper. The next section will break down what makes this version stand out from every other recipe out there, and then we’ll dive into the ingredient list that’s more than just a shopping list—it’s a roadmap to flavor. Ready? Let’s get started.
What Makes This Version Stand Out
- Texture: The crust is a crunchy, caramelized shell that cracks like thin ice when you bite, while the interior is soft and airy—think a light puff that melts into a cheese cloud.
- Flavor: Garlic is sautéed until golden, releasing a nutty, almost caramel flavor that infuses the bread, and fresh parsley adds a bright, herbal counterpoint.
- Ease: No complex doughs or secret sauces—just a loaf, butter, garlic, brie, and herbs. The trick is in the timing, not the ingredients.
- Visual Appeal: The molten cheese pools into a glossy, golden lake that’s impossible to resist, and the final drizzle of parsley gives it a fresh, Instagram‑ready finish.
- Make‑ahead: You can assemble the bread a day ahead, refrigerate it, and bake it right before serving. The flavors actually deepen over time.
- Versatility: It’s perfect as an appetizer, a side for a hearty dinner, or even a quick snack that feels indulgent.
- Crowd Reaction: Friends always ask for the recipe after the first bite—because the cheese pull is a showstopper that leaves everyone begging for more.
- Ingredient Quality: Using a high‑quality brie and a crusty artisanal loaf elevates the dish from ordinary to unforgettable.
Alright, let's break down exactly what goes into this masterpiece…
Inside the Ingredient List
The Flavor Base
The butter is the unsung hero that creates a golden crust and a buttery undertone that lingers on your palate. A generous 4 tablespoons, melted and brushed, ensures each slice gets a glossy finish. Skipping the butter would leave the bread dry and unremarkable. If you’re avoiding dairy, a high‑smoke‑point oil like grapeseed can mimic the butter’s flavor profile, but the result will be slightly less decadent.
The Texture Crew
The 1 large round loaf of crusty bread is the foundation. Choose a sourdough or a rustic boule for maximum flavor and structure. The crusty exterior protects the interior from becoming soggy, while the airy crumb holds the melted cheese like a sponge. If you can’t find a loaf, a baguette works, but you’ll lose that buttery crust.
The Unexpected Star
The wheel of brie is the centerpiece, delivering a creamy, slightly tangy flavor that melts into a luscious pool. Opt for a 250‑gram wheel for a balanced ratio—too much brie and the bread becomes greasy; too little and it feels underwhelming. If you’re in a pinch, a brie‑style cheese like Camembert will work, but the texture will be slightly different.
The Final Flourish
Fresh parsley and garlic are the finishing touches that add aroma and a burst of freshness. The garlic is sautéed until fragrant, releasing a nutty note that pairs beautifully with the brie. Parsley adds a green, herbaceous lift that cuts through the richness. If you’re allergic to garlic, a pinch of dried oregano can substitute, though the flavor will shift slightly.
Everything's prepped? Good. Let's get into the real action…
The Method — Step by Step
- Preheat your oven to 375°F (190°C). While the oven heats, slice your loaf into 1‑inch thick rounds. This thickness ensures that the center stays airy while the edges crisp up beautifully. The oven should be hot enough to give a quick, golden crust without overcooking the cheese.
- Melt the butter in a small saucepan over low heat. Add the minced garlic and cook until fragrant—about 1 minute. The garlic should release a nutty aroma but not brown; that’s the sweet spot. Once fragrant, remove from heat and let cool slightly.
- Brush each bread slice generously with the garlic‑butter mixture, ensuring every surface is coated. The butter will caramelize, creating a golden, crackling crust. Don’t forget the underside of the loaf—this is where the flavor concentrates.
- Slice the brie into thin rounds, about ¼ inch thick. The thin slices melt faster and spread evenly across the bread, creating a uniform cheese layer. If you prefer a thicker melt, cut the brie into ½ inch slices, but be prepared for a slightly longer bake time.
- Arrange the brie slices on top of the buttered bread, covering each slice completely. The cheese should sit snugly, with no gaps. This step is crucial for that gooey, molten center that makes the dish irresistible.
- Place the assembled loaf on a baking sheet lined with parchment paper. This prevents sticking and makes cleanup a breeze. If you’re using a cast iron skillet, it will give a more even heat distribution and a crispier bottom.
- Bake in the preheated oven for 12–15 minutes, or until the cheese is bubbly and the crust is golden brown. The internal temperature of the cheese should reach 140°F (60°C) for a perfectly melted consistency. The first 10 minutes are the most critical—watch the cheese for that golden sheen.
- Remove from the oven and let cool for 2 minutes. This short rest allows the cheese to set slightly, preventing it from sliding off when you cut. Sprinkle fresh parsley on top for a burst of color and herbaceous aroma. Slice and serve immediately—this is when the gooey pull is at its peak.
That’s it—you did it. But hold on, I’ve got a few more tricks that will take this to another level…
Insider Tricks for Flawless Results
The Temperature Rule Nobody Follows
Many people bake at 350°F, but 375°F gives a quicker crust formation without drying out the cheese. The higher temperature also helps the butter to caramelize faster, giving that satisfying crackle. I once tried 350°F, and the cheese stayed a little too thick, making it hard to scoop out. The 375°F balance is the sweet spot for texture.
Why Your Nose Knows Best
Close your eyes, take a deep breath, and listen to the aroma. A buttery, garlicky scent that’s slightly sweet indicates the butter is caramelizing correctly. If the smell is sharp or burnt, lower the heat. Your nose is your best judge of doneness before you even touch the oven door.
The 5‑Minute Rest That Changes Everything
After baking, let the bread rest for exactly five minutes. This rest period allows the cheese to set into a cohesive, yet still gooey layer, making it easier to cut and serve. A quick rest also lets the crumbs settle, preventing a messy plate. I’ve found that the rest time is crucial for a clean slice.
Use a Cast Iron Skillet for Even Heat
A cast iron skillet retains heat exceptionally well, ensuring an even bake. If you’re using a regular baking sheet, place a small piece of foil underneath to prevent the bottom from burning. The skillet also gives the bread a more rustic, home‑cooked feel.
Keep the Cheese Covered While Cooling
Once the bread is out of the oven, cover it loosely with foil for the first minute of cooling. This traps steam, keeping the crust from drying out too quickly. After that, remove the foil to allow the crust to crisp up a bit more. It’s a small step that makes a huge difference.
Creative Twists and Variations
Smoky Chipotle Brie
Add a teaspoon of chipotle in adobo sauce to the garlic‑butter mix. The smoky heat pairs beautifully with the brie’s creaminess, creating a spicy kick that’s perfect for game day. The chipotle also gives the bread a subtle, savory depth that elevates the dish.
Herb‑Infused Ricotta Layer
Replace the brie with a dollop of ricotta mixed with chopped basil and oregano. This creates a lighter, fresher version that’s still indulgent. The ricotta’s mild flavor allows the garlic to shine, while the herbs add a burst of green.
Caramelized Onion & Goat Cheese
Swap the brie for goat cheese and top with caramelized onions. The tangy goat cheese balances the sweet onions, and the combination offers a sophisticated flavor profile. This variation is great for a brunch crowd who loves a bit of sophistication.
Truffle Oil Drizzle
Finish the bread with a light drizzle of truffle oil after baking. The earthy aroma of truffle oil complements the rich brie, creating a decadent, gourmet experience. Just a few drops are enough to transform the dish into a luxury appetizer.
Breakfast Brunch Brunch
Serve the bread with a side of scrambled eggs and a drizzle of hollandaise. The savory eggs pair beautifully with the melted cheese, turning the dish into a hearty breakfast. The hollandaise adds a silky, buttery finish that ties everything together.
Storing and Bringing It Back to Life
Fridge Storage
Wrap the cooled bread tightly in plastic wrap and store in the refrigerator for up to 48 hours. The wrap prevents moisture loss, keeping the crust crisp. When ready to serve, reheat in a pre‑heated oven at 350°F for 5–7 minutes to revive the gooey center.
Freezer Friendly
For longer storage, wrap the bread in foil and place it in a freezer bag. Freeze for up to 2 weeks. To reheat, thaw at room temperature for 30 minutes, then bake at 350°F for 10–12 minutes. The texture will be slightly different, but still delicious.
Best Reheating Method
The ideal reheating method is to place the bread on a baking sheet and bake at 350°F for 5–7 minutes. Add a splash of water to the bottom of the pan to create steam, which keeps the bread from drying out. Once reheated, drizzle fresh parsley and serve immediately for the best experience.