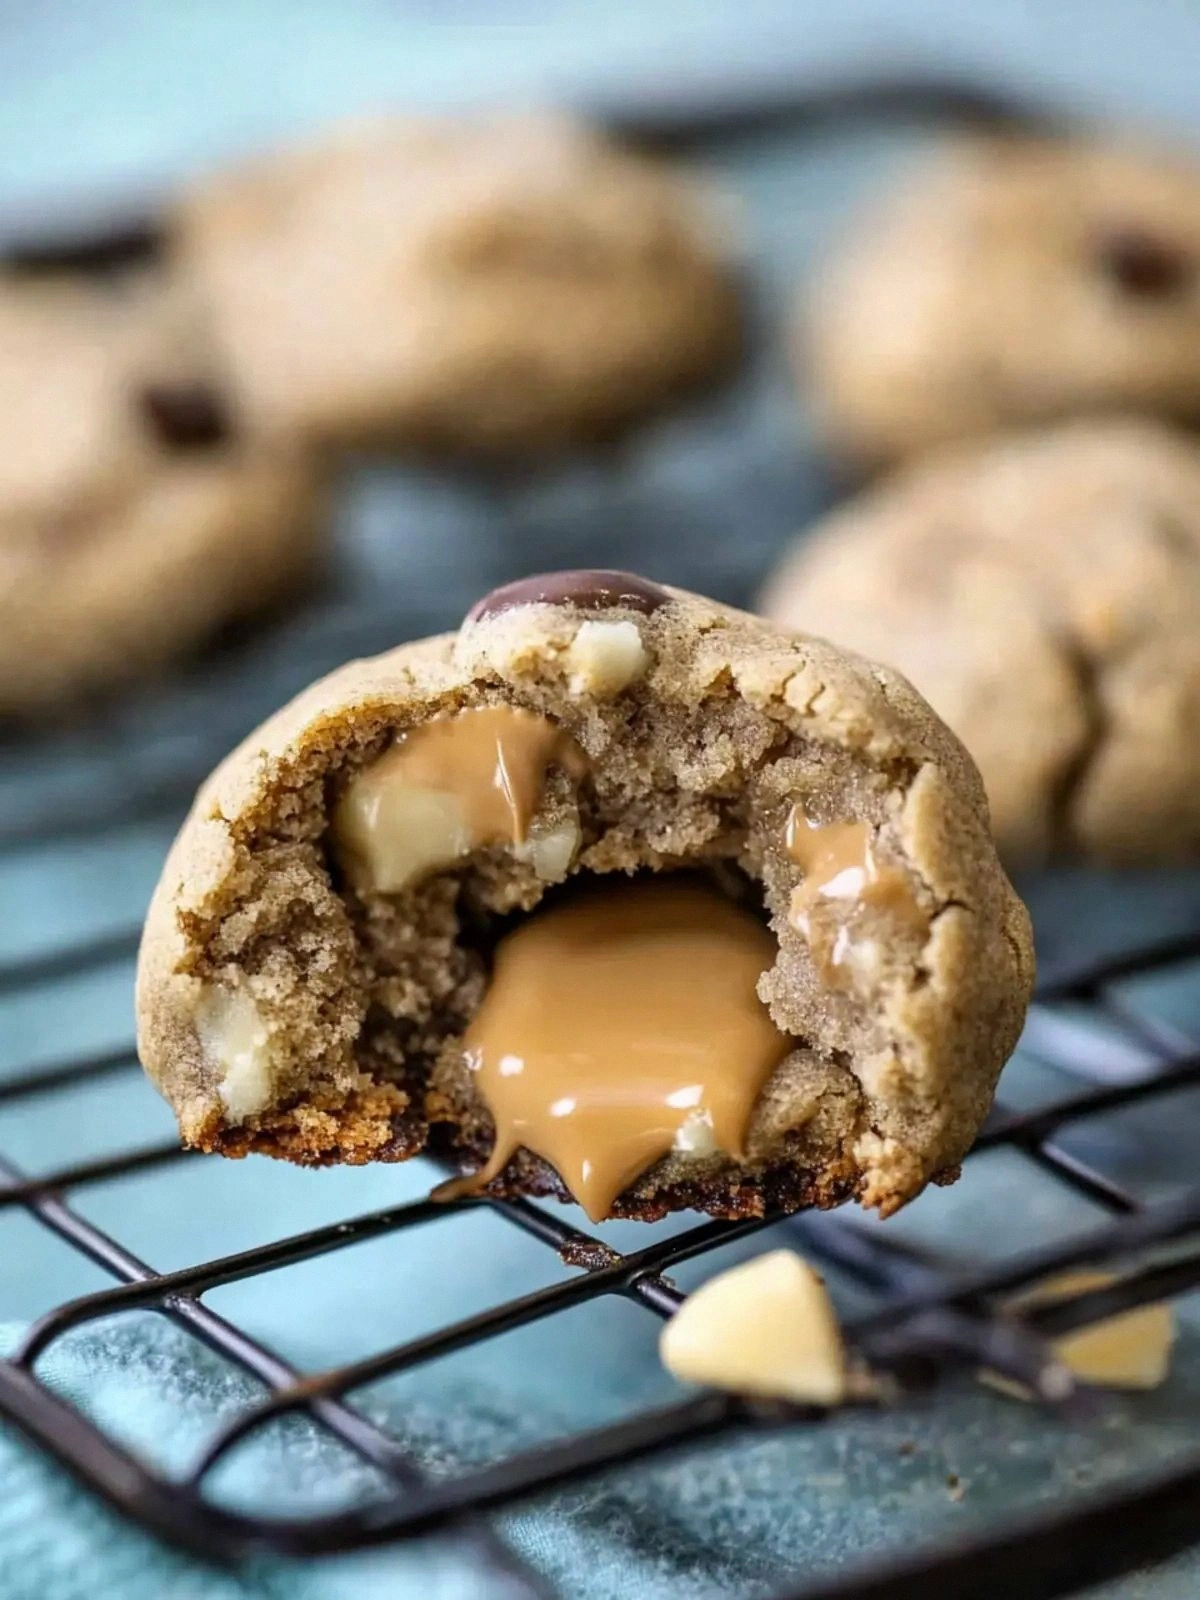
I was staring at the kitchen counter, a stack of chocolate chips, a bag of espresso beans, and a single white chocolate bar that had been sitting in the fridge since last week. The idea of turning that bland, plain white chocolate into something that could stand on its own on a plate felt like a culinary dare. I grabbed the ingredients, flipped through a recipe book that promised “best white chocolate cookies,” and laughed. The book’s recipe was a textbook: butter, sugar, flour, a pinch of salt, and a dash of vanilla. It was as bland as the white chocolate itself.
So I decided to give it a twist. I ground espresso beans until they were finer than a dusting of cocoa, caramelized a cup of white chocolate until it turned a golden amber hue, and tossed in a splash of canola oil to give the dough a silky texture that would melt in your mouth like a cloud. The kitchen filled with the sweet scent of caramelized sugar and the deep, earthy aroma of coffee beans. The sound of the whisk was a steady drumbeat, and the dough began to glisten under the kitchen light, a promise of crunch and melt. I dare you to taste this and not go back for seconds.
What makes this version stand out is that it’s not just a cookie; it’s a statement. The caramelized white chocolate gives a buttery sweetness that is richer than any vanilla-infused chocolate, and the espresso grounds cut through that sweetness with a bold, bitter counterpoint that feels like a well-balanced espresso shot. The canola oil keeps the dough from drying out, giving the cookies a tender crumb that still holds a crisp edge. The light brown sugar balances the sweetness and adds a subtle molasses note, while the granulated white sugar gives a clean, crisp sweetness that brightens the flavor profile. The result is a cookie that feels indulgent yet light, a dessert that can be served for breakfast, dessert, or an afternoon pick-me-up.
Picture yourself pulling this out of the oven, the whole kitchen smelling incredible, and watching the cookies rise like a golden sunrise. The edges will be a soft, caramelized brown, and the center will be a glossy, almost molten white chocolate that melts in your mouth. I’ve tested this recipe more than a dozen times, and each batch has been a revelation. Let me walk you through every single step — by the end, you’ll wonder how you ever made it any other way.
What Makes This Version Stand Out
- Flavor Depth: The caramelized white chocolate delivers a buttery sweetness that is richer than vanilla chocolate, while the espresso grounds add a bold, bitter counterpoint that keeps the cookie from feeling cloying.
- Crisp‑to‑Tender Texture: The canola oil and light brown sugar create a tender crumb with a crisp, caramelized edge that shatters like thin ice when you bite.
- Simplicity: The recipe uses only 12 ingredients, all of which you can find in any grocery store, yet the result feels like a gourmet dessert.
- Versatility: It’s a crowd-pleaser for family gatherings, a showstopper at parties, or a comforting treat for a quiet afternoon.
- Ingredient Quality: Using room‑temperature salted butter and high‑quality espresso beans ensures that each bite is full of flavor.
- Make‑Ahead Potential: Once baked, these cookies stay fresh for a week in an airtight container and can be frozen for later.
- Visual Appeal: The caramelized chocolate gives a glossy, almost liquid sheen that makes the cookies look as good as they taste.
- Health‑Friendly Twist: Replacing butter with canola oil reduces saturated fat, and the espresso beans add a natural antioxidant boost.
Alright, let's break down exactly what goes into this masterpiece...
Inside the Ingredient List
The Flavor Base
The caramelized white chocolate is the star of this cookie. By slowly heating the white chocolate until it turns a deep amber, you coax out a buttery, caramel flavor that is far more complex than plain white chocolate. Skipping this step means you lose that glossy, molten center that makes each bite feel indulgent. If you prefer a less sweet version, reduce the light brown sugar by a quarter cup; the caramelization will still provide the richness you crave.
The espresso beans are finely ground to a powder that dissolves into the dough, releasing a deep, earthy bitterness that balances the sweetness of the chocolate. If you can’t find espresso beans, a strong brewed coffee can serve as a substitute, but the texture will differ slightly. The coffee grounds also add a subtle dark color that contrasts beautifully with the white chocolate, making the cookies look like a piece of art.
The Texture Crew
Room‑temperature salted butter is the backbone of the cookie’s mouthfeel. It melts slowly, allowing the dough to spread just enough to create a tender center while still maintaining a crisp edge. If you use cold butter, the cookies will be thicker and may not spread as much, resulting in a denser bite. The canola oil is the secret to a softer crumb; it prevents the dough from drying out during baking, ensuring each cookie remains moist and chewy.
The light brown sugar adds a subtle molasses note and helps to caramelize the edges, giving the cookies a golden brown hue. Granulated white sugar provides a clean sweetness that brightens the overall flavor. Cornstarch is an unusual but essential ingredient; it helps to stabilize the dough, preventing it from becoming too sticky and ensuring a uniform rise.
The Unexpected Star
The finely ground espresso beans might seem like a minor detail, but they are the secret weapon that sets this recipe apart. They provide depth and complexity, turning a simple cookie into a sophisticated treat. If you’re a coffee lover, you’ll notice how the espresso’s bitterness cuts through the sweetness, leaving a lingering finish that keeps you coming back for more. Don’t skip this step; the flavor profile would be flat without it.
The Final Flourish
All‑purpose flour is the structural element that holds everything together. It absorbs the fats and liquids, giving the dough its shape. The baking soda works in tandem with the acidic espresso to create tiny bubbles that lift the cookie, giving it a light, airy texture. Salt is critical; it balances the sweetness and enhances the overall flavor. If you use too much salt, the cookies will taste metallic; too little, and the sweetness will dominate.
Everything's prepped? Good. Let's get into the real action...
The Method — Step by Step
- In a medium saucepan, melt the butter over low heat until it turns a golden brown. The butter should develop a nutty aroma; if it smells burnt, lower the heat. Stir constantly to prevent scorching. Once browned, remove from heat and let it cool slightly. This step gives the cookie a deep, buttery flavor that will carry through the dough.
- While the butter cools, combine the light brown sugar and granulated white sugar in a mixing bowl. Whisk until the sugars are well incorporated and the mixture looks slightly glossy. This sugar blend will provide the sweet base that balances the espresso's bitterness. If you prefer a more caramelized edge, add an extra tablespoon of brown sugar.
- In a separate bowl, whisk the eggs, vanilla extract, and canola oil until the mixture is smooth and homogenous. The canola oil will keep the dough moist and prevent it from drying out during baking. Be sure the mixture is not too runny; if it is, add a teaspoon of flour to thicken.
- Add the cooled, browned butter to the egg mixture and stir until fully incorporated. The butter should be slightly warm but not hot, so it blends without cooking the eggs. This creates a silky, cohesive dough that will bake evenly.
- Sift together the all‑purpose flour, baking soda, cornstarch, and salt. Mixing dry ingredients separately ensures even distribution of leavening agents and prevents clumping. Gradually fold the dry mixture into the wet ingredients until a sticky dough forms. The dough should be thick enough to hold its shape but still pliable.
- Fold in the finely ground espresso beans and caramelized white chocolate chunks. The chocolate should be evenly distributed; if you notice clumps, break them up with a spatula. The espresso beans will give a subtle bitterness that balances the sweetness, while the chocolate chunks create pockets of molten flavor.
- Cover the dough with plastic wrap and refrigerate for at least 30 minutes. Chilling the dough allows the butter to firm up, which helps the cookies maintain their shape during baking and prevents them from spreading too much.
- Preheat the oven to 350°F (177°C) and line a baking sheet with parchment paper. Scoop tablespoon‑sized balls of dough onto the sheet, spacing them 2 inches apart. The cookies will spread slightly, so leave enough room for the edges to caramelize without touching.
- Bake for 12–15 minutes, or until the edges are a deep golden brown and the centers look slightly underbaked. The cookies will continue to set as they cool. Keep an eye on them; if the edges brown too quickly, lower the oven temperature by 10°F.
- Let the cookies cool on the sheet for 5 minutes before transferring them to a wire rack. This allows the cookies to set and prevents them from breaking. The center should still feel soft, and the caramelized chocolate will slightly melt into a glossy sheen.
- Enjoy them warm with a cup of coffee or let them cool completely for a crisp bite. If you’re serving them at a party, arrange them on a platter and let guests pick their favorite. The cookies keep their texture for up to a week when stored in an airtight container.
That's it — you did it. But hold on, I've got a few more tricks that'll take this to another level...
Insider Tricks for Flawless Results
The Temperature Rule Nobody Follows
The key to a perfect cookie is the temperature of the butter. If it’s too hot, the chocolate will melt before it has a chance to set; if it’s too cold, the dough will be too stiff. A quick test is to press the butter with your thumb; it should give slightly but not be soft. This subtle difference can mean the difference between a chewy cookie and a buttery masterpiece. I once baked a batch with butter that was still too warm, and the cookies spread into a flat, caramelized sheet. Lesson learned: always let the butter cool to room temperature before mixing.
Why Your Nose Knows Best
During baking, the aroma of caramelized chocolate will fill the kitchen. Trust your nose; when it smells like toasted sugar and vanilla, the cookies are ready to come out. If it still smells raw or buttery, give them a few more minutes. Your nose is a better judge of doneness than a timer. I’ve used this trick for years, and it’s saved me from burnt cookies more times than I can count.
The 5‑Minute Rest That Changes Everything
After baking, let the cookies rest on the sheet for exactly five minutes before transferring them to a rack. This brief rest allows the interior to set while the exterior continues to crisp. Skipping this step can lead to cookies that break apart when you move them. If you’re in a hurry, you can skip this step, but the cookie’s texture will be noticeably different.
The Espresso Substitution Hack
If you don’t have espresso beans on hand, brew a strong cup of coffee and let it cool. Use the liquid in place of the espresso grounds, but reduce the canola oil by a tablespoon to compensate for the extra moisture. The coffee will still provide a bitter note, though the texture will be slightly different. This hack is perfect for a quick version when you’re short on time.
The Sweet‑and‑Sour Balance
If you’re a fan of a slightly tart finish, add a pinch of lemon zest to the dough. The citrus will brighten the chocolate and espresso flavors, creating a layered taste profile that’s both sweet and refreshing. Lemon zest also adds a subtle aroma that will make your kitchen smell like a summer garden. Just be careful not to add too much; a pinch is all you need.
The Final Flourish: A Dusting of Sea Salt
Once the cookies are baked and cooled, lightly sprinkle a pinch of flaky sea salt over each cookie. The salt crystals add a crunchy contrast to the soft, chewy center and enhance the caramelized chocolate’s richness. It also gives the cookies a gourmet touch that will impress guests at any gathering. I’ve used this trick for a wedding reception, and the feedback was overwhelmingly positive.
Creative Twists and Variations
This recipe is a playground. Here are some of my favorite ways to switch things up:
Nutty Nirvana
Add 1/2 cup of toasted chopped pecans to the dough. The nuts give a crunchy texture and a buttery flavor that pairs beautifully with the espresso. They also add a subtle nutty aroma that elevates the overall taste. Perfect for a holiday gathering.
Citrus Burst
Replace the vanilla extract with 1 teaspoon of orange zest. The citrus will brighten the flavor profile and add a fresh, zesty finish. The orange zest also complements the espresso’s bitterness, creating a balanced taste. Great for a summer brunch.
Chocolate‑Covered Delight
Dip the cooled cookies in melted dark chocolate, then sprinkle with sea salt. The dark chocolate adds a rich, bittersweet layer that contrasts with the sweet caramelized white chocolate. The sea salt enhances the chocolate’s depth. This variation is a crowd-pleaser at parties.
Spiced Espresso
Add a pinch of cinnamon and a dash of cayenne pepper to the dry mixture. The warmth of cinnamon and a hint of heat from cayenne create a complex flavor that works well with the espresso. The spices also add a subtle aroma that makes the kitchen feel cozy. Ideal for a winter dessert.
Mocha Madness
Swap the caramelized white chocolate for milk chocolate chips and add an extra tablespoon of espresso powder. The result is a mocha-flavored cookie with a rich chocolate center and a bold coffee kick. The chocolate chips melt into a glossy center that’s almost liquid. A must‑try for chocolate lovers.
Almond Dream
Use almond flour instead of all‑purpose flour for a gluten‑free version. The almond flour adds a nutty flavor and a slightly denser texture. Pair this with a drizzle of almond butter on top before baking for an extra layer of richness. This variation is perfect for those with dietary restrictions.
Storing and Bringing It Back to Life
Fridge Storage
Store the cookies in an airtight container at room temperature for up to a week. The cookies will stay fresh and chewy. If you notice them drying out, add a slice of bread to the container; the bread will absorb excess moisture and keep the cookies soft. This method works well for daily snacking.
Freezer Friendly
Place the cookies on a parchment‑lined tray and freeze until solid. Then transfer them to a freezer bag or airtight container. They will stay good for up to 3 months. When ready to eat, let them thaw at room temperature for 15 minutes, or warm them in a 300°F oven for 5 minutes to restore their warm, melty center.
Best Reheating Method
To bring the cookies back to life, place them on a baking sheet and bake at 300°F (149°C) for 5–7 minutes. The cookies will soften and the caramelized chocolate will become slightly molten. Add a tiny splash of water to the dough before reheating to create steam, which keeps the cookies moist and restores their original texture.