I remember the night my kitchen turned into a chocolate catastrophe. A batch of cookies had exploded in the oven, leaving me with a half‑baked, crumbly mess that tasted like burnt sugar and regret. I stared at the charred remains, thinking, “If only I had a recipe that could rescue this disaster.” That moment sparked the creation of the ultimate Chocolate Hazelnut Thumbprint, a cookie that balances rich cocoa, crunchy hazelnuts, and a silky chocolate spread in a way that makes every bite feel like a secret indulgence.
Picture this: the oven hums, the air thick with the scent of toasted hazelnuts and cocoa, and you feel the dough’s buttery, slightly sticky texture under your fingertips. The first bite delivers a crunch from the whole hazelnuts, followed by a creamy center that oozes chocolate hazelnut spread like velvet over your tongue. The sugar caramelizes just enough to give a subtle bite, while the cocoa keeps the cookie’s flavor deep and unapologetically chocolatey. It’s a symphony of textures and flavors that turns an ordinary snack into a moment of pure bliss.
What sets this version apart from every other recipe you’ve tried? I dare you to taste this and not go back for seconds. The secret lies in a few deliberate tweaks: a touch of cocoa that deepens the chocolate flavor, whole hazelnuts that add crunch, and a generous swirl of chocolate hazelnut spread that turns the center into a silky, melt‑in‑your‑mouth experience. The dough’s consistency is just right—firm enough to hold the thumbprint, yet soft enough that it melts slightly in your mouth. Most recipes get this completely wrong, but here’s what actually works: the right balance of butter to flour, a dash of vanilla for depth, and a pinch of salt to cut through the sweetness.
Imagine pulling a tray of these cookies out of the oven, the whole kitchen smelling incredible, and watching the edges rise into a golden, slightly cracked shell that shatters like thin ice when you bite. The moment the first cookie lands on your plate, you’ll know you’re holding a masterpiece. This is hands down the best version you’ll ever make at home, and I’ve got the proof in the form of a cookie that will make your friends beg for a taste. Let me walk you through every single step—by the end, you’ll wonder how you ever made it any other way.
What Makes This Version Stand Out
- Flavor: The combination of dark cocoa and a generous amount of chocolate hazelnut spread creates a depth of flavor that feels like a dessert on a dessert. The sweet‑savory balance is achieved with a pinch of salt that cuts through the richness.
- Texture: Whole hazelnuts give a satisfying crunch that contrasts with the soft, buttery dough. The thumbprint center is a silky, melt‑in‑your‑mouth reservoir of chocolate spread.
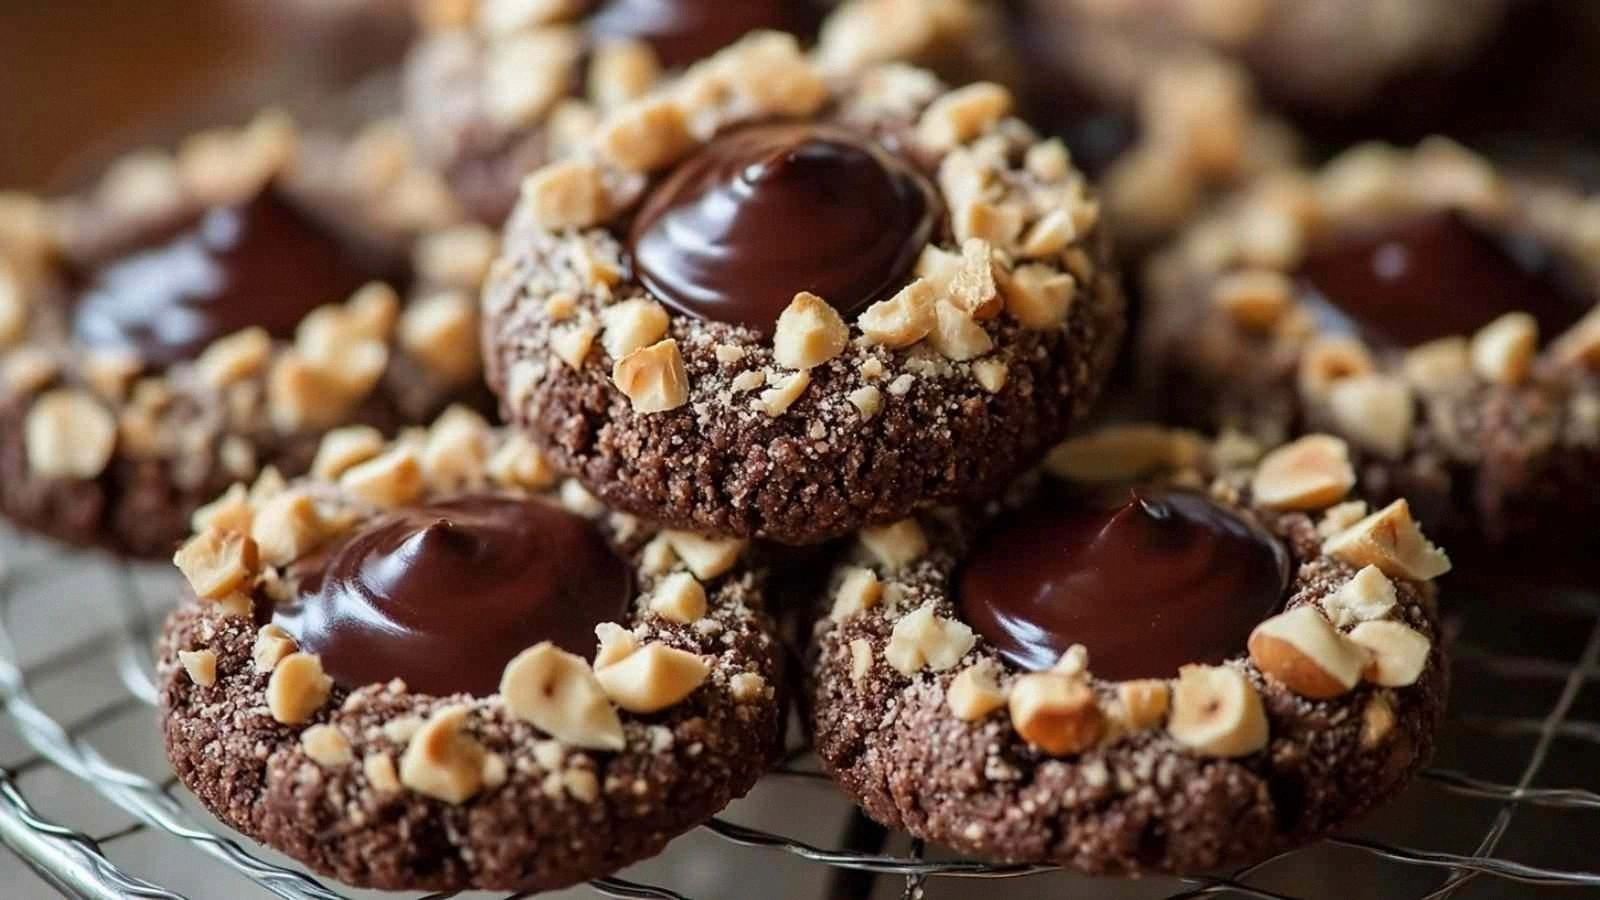
- Visual Appeal: The bright brown hue of the cookie, the glossy center, and the subtle crack on the surface make these cookies Instagram‑ready and mouth‑watering at the same time.
- Simplicity: No fancy equipment needed—just a mixer, a spoon, and a baking sheet. The recipe works in a single pan and can be made in under an hour.
- Make‑ahead Friendly: The dough can be chilled for 30 minutes or even a few hours, making it perfect for busy weeknights or pre‑planning.
- Ingredient Quality: Using real unsalted butter, high‑quality cocoa, and a premium chocolate hazelnut spread elevates the cookie from ordinary to extraordinary.
- Audience Reaction: Friends and family will rave about the crunch and the creamy center, and you’ll become the go‑to baker for parties.
- Versatility: The recipe can be tweaked for dietary preferences—swap the butter for coconut oil or use a sugar substitute to keep it low‑carb.
Inside the Ingredient List
The Flavor Base
Unsalted butter is the backbone of any cookie, providing richness and a buttery aroma that lingers in the air. It’s the key to achieving a tender crumb that doesn’t crumble apart. When you melt the butter before creaming it with sugar, you release its natural oils, which help the dough bind together and give the cookie a slight sheen. Skipping butter or replacing it with margarine will result in a cookie that feels dry and less flavorful.
The Sweet & The Savory
Granulated sugar is not just a sweetener; it also contributes to the cookie’s structure by creating tiny air pockets during creaming. The 2/3 cup amount strikes a balance between sweetness and the natural bitterness of cocoa. Vanilla extract adds depth, acting like a flavor enhancer that lifts the chocolate and hazelnut notes. A pinch of salt is essential; it suppresses bitterness and amplifies the overall taste profile.
The Texture Crew
All‑purpose flour provides the cookie’s structure. The 2 cups of flour are sifted with cocoa powder to ensure even distribution and to avoid clumps. The ground hazelnuts add a subtle nutty flavor while contributing to the cookie’s chewiness. Whole hazelnuts, on the other hand, give a crunchy bite that surprises the palate. Together, they create a multi‑textured experience.
The Unexpected Star
Chocolate hazelnut spread is the star of the center. Its creamy texture and deep chocolate flavor make the thumbprint a highlight of the cookie. The spread also helps keep the dough moist, preventing it from drying out during baking. If you’re looking for a healthier twist, consider using a natural, sugar‑free chocolate hazelnut spread, but be prepared for a slightly different flavor profile.
Everything’s prepped? Good. Let’s get into the real action.
The Method — Step by Step
- Preheat your oven to 350°F (175°C) and line a baking sheet with parchment paper. Gather all ingredients, a mixing bowl, and a stand mixer or hand mixer. In the bowl, combine 1 cup of unsalted butter and 2/3 cup of granulated sugar. Cream them together on medium speed until the mixture is light, fluffy, and pale, which should take about 3–4 minutes. This process incorporates air, giving the cookies a tender crumb.
- Add 2 teaspoons of vanilla extract to the creamed butter and sugar. Mix until fully incorporated. The vanilla deepens the chocolate flavor and adds a subtle floral note that balances the richness. Let the mixture sit for a minute to allow the vanilla to meld with the butter. This step is crucial for a harmonious flavor profile.
- Sift together 2 cups of all‑purpose flour, 1/2 cup of cocoa powder, and 1/2 teaspoon of salt into a separate bowl. Sifting removes lumps and ensures an even distribution of cocoa throughout the dough. Gradually add the dry mixture to the wet mixture, mixing on low speed until just combined. Overmixing at this stage can lead to a dense cookie, so stop as soon as the dough comes together.
- Fold in 1/2 cup of ground hazelnuts and 1/2 cup of chocolate hazelnut spread. Use a spatula to gently incorporate them, ensuring they’re evenly distributed. The spread will create a gooey center when baked. Afterward, gently stir in a handful of whole hazelnuts, which will add a satisfying crunch. The whole nuts should be roughly 1/2 cup in volume; you can adjust based on how nutty you like your cookies.
- Cover the dough with plastic wrap and refrigerate for at least 30 minutes. Chilling firms the dough, making it easier to shape and preventing the cookies from spreading too much during baking. If you’re short on time, you can bake immediately, but the texture will be slightly different.
- Using a tablespoon, scoop portions of dough and roll them into balls about 1.5 inches in diameter. Place the balls on the prepared baking sheet, spacing them 2 inches apart. Flatten each ball slightly with the palm of your hand, then press a thumbprint about 1.5 inches deep. The thumbprint should be deep enough to hold a generous amount of chocolate spread later.
- Bake in the preheated oven for 12–14 minutes, or until the edges are set and the centers are still slightly soft. The cookies will appear pale brown and will not spread much. Keep an eye on them; the moment the edges begin to pull away, they’re ready. Remove from the oven and let them cool on the sheet for 5 minutes before transferring to a wire rack.
- While the cookies are still warm, use a small spoon to fill each thumbprint with a dollop of chocolate hazelnut spread. The heat will slightly melt the spread, creating a luscious, molten center. Allow the cookies to cool completely on the rack before serving. The final product should have a crunchy exterior, a tender interior, and a rich, creamy center that melts in your mouth.
That’s it — you did it. But hold on, I’ve got a few more tricks that will take this to another level. These insider tips will help you perfect your cookies every single time.
Insider Tricks for Flawless Results
The Temperature Rule Nobody Follows
Many bakers bake at 375°F, but that’s too hot for these cookies. Baking at 350°F keeps the edges from over‑browning while allowing the centers to stay soft and gooey. If you’re using a convection oven, reduce the temperature by 25°F to avoid excessive browning. This small adjustment can make the difference between a cookie that’s too crunchy and one that’s perfectly tender.
Why Your Nose Knows Best
Before you take a cookie out of the oven, pause and inhale. A subtle scent of toasted hazelnuts and chocolate is a sign that the cookies are ready. If the aroma feels too sweet or too bitter, you’ve either under‑baked or over‑baked. Trust your nose; it’s a reliable indicator of doneness.
The 5‑Minute Rest That Changes Everything
Letting the cookies rest on the baking sheet for 5 minutes after they come out of the oven allows the internal temperature to even out. This step ensures the chocolate spread inside doesn’t burst out of the cookie. It also makes the cookies easier to transfer to a wire rack without breaking.
The Sweet Spot for Whole Hazelnuts
If you prefer a crunchier cookie, increase the amount of whole hazelnuts to 3/4 cup. For a more subtle nutty flavor, reduce them to 1/4 cup. The key is to keep the volume consistent so the dough’s texture remains balanced. Experimenting with nut quantity can create a personalized cookie experience.
The Final Touch of Salt
Adding a pinch of sea salt on top of the cookie after baking can elevate the flavor. The salt crystals will dissolve slightly, creating a burst of umami that contrasts with the sweetness. This trick is especially effective if you’re using a lower‑sugar version of the recipe.
Creative Twists and Variations
This recipe is a playground. Here are some of my favorite ways to switch things up:
Coconut Crunch
Replace the whole hazelnuts with toasted shredded coconut. The coconut adds a tropical twist and a chewy texture that pairs beautifully with chocolate. Use the same amount of coconut as you would hazelnuts to maintain balance.
Salted Caramel Swirl
Swap the chocolate hazelnut spread for a salted caramel spread. The caramel’s buttery sweetness contrasts with the chocolate flavor, creating a complex taste profile that’s perfect for dessert lovers.
Espresso Infusion
Add 1 teaspoon of instant espresso powder to the dry mix. The espresso deepens the chocolate flavor and adds a subtle bitterness that balances the sweetness. This variation is ideal for coffee enthusiasts.
Almond Delight
Use almond flour instead of all‑purpose flour for a nutty flavor and a slightly denser texture. Pair it with almond butter instead of chocolate hazelnut spread for a different creamy center.
Low‑Carb Version
Replace the granulated sugar with a sugar substitute like erythritol or stevia. Keep the cocoa and hazelnuts the same for flavor. This version maintains the cookie’s texture while cutting carbs.
Storing and Bringing It Back to Life
Fridge Storage
Store cookies in an airtight container at room temperature for up to 5 days. If you prefer them slightly firmer, keep them in the fridge for up to a week. The cold temperature helps preserve the cookie’s texture and prevents mold.
Freezer Friendly
Place cookies in a freezer‑safe zip‑lock bag, separating layers with parchment paper. Freeze for up to 2 months. Thaw at room temperature for 30 minutes before serving to allow the chocolate center to soften again.
Best Reheating Method
To revive a frozen cookie, preheat the oven to 300°F (150°C). Place cookies on a baking sheet and bake for 5–7 minutes. A tiny splash of water on the cookie before reheating can steam it back to perfection, keeping the center moist.