I remember the night I was supposed to host a casual get‑together and, in a panic, I rummaged through the pantry for a quick snack. The shelves were a chaotic jumble of boxed cereal, a half‑filled bag of mini marshmallows, and a forgotten bag of chocolate chips that had seen better days. I tossed everything into a pot, hoping for something that would taste like a childhood memory and feel like a treat. The kitchen smelled instantly like sugar and butter, and the sound of the pot clanging against the stove was a soundtrack to my culinary anxiety. I dared myself to taste this and not go back for seconds, and the first bite was a revelation—sweet, buttery, and utterly comforting.
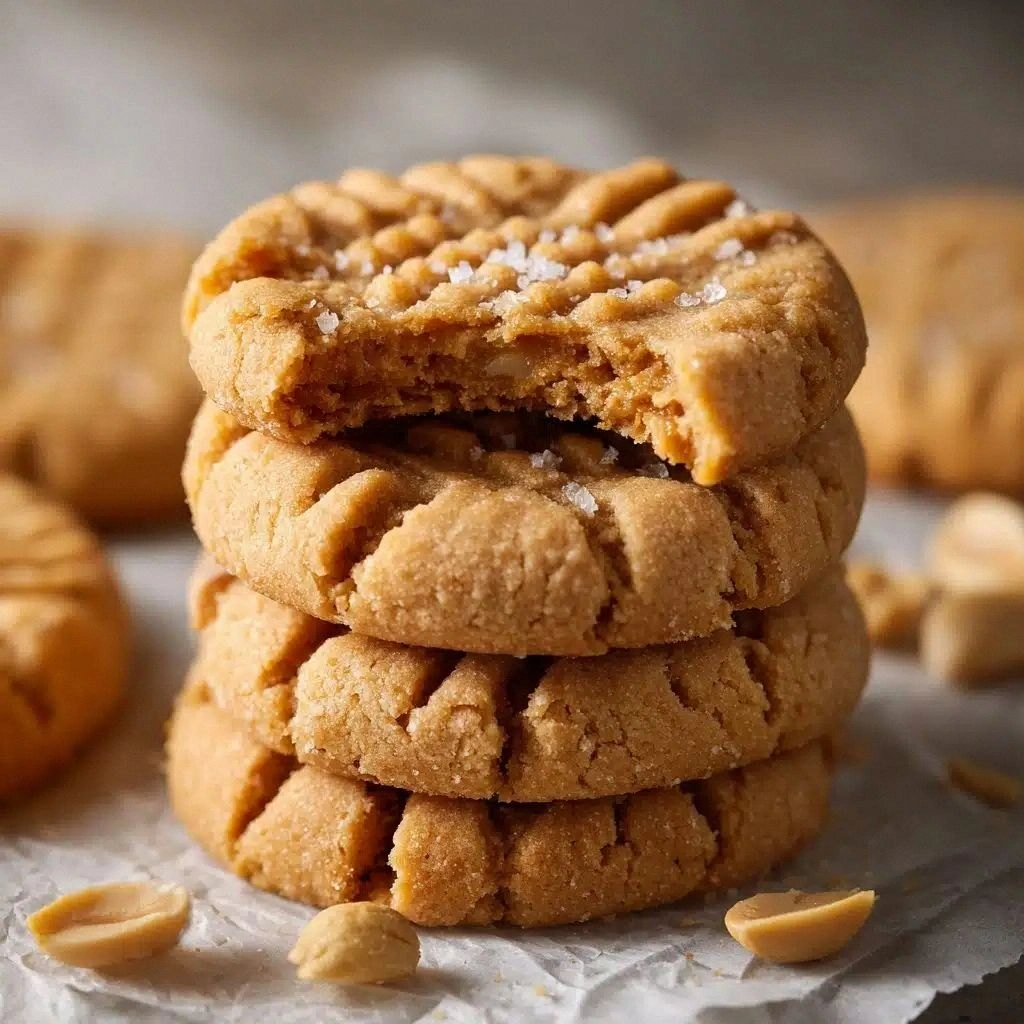
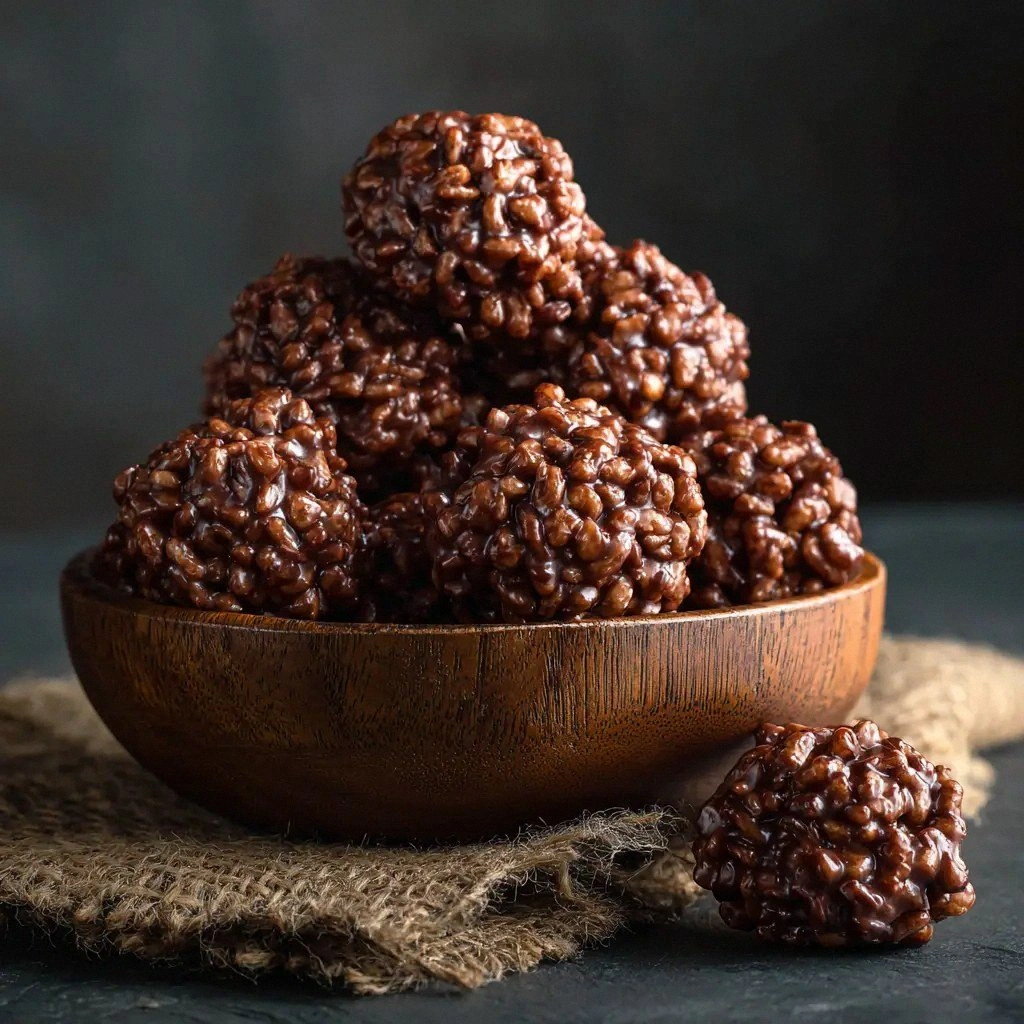
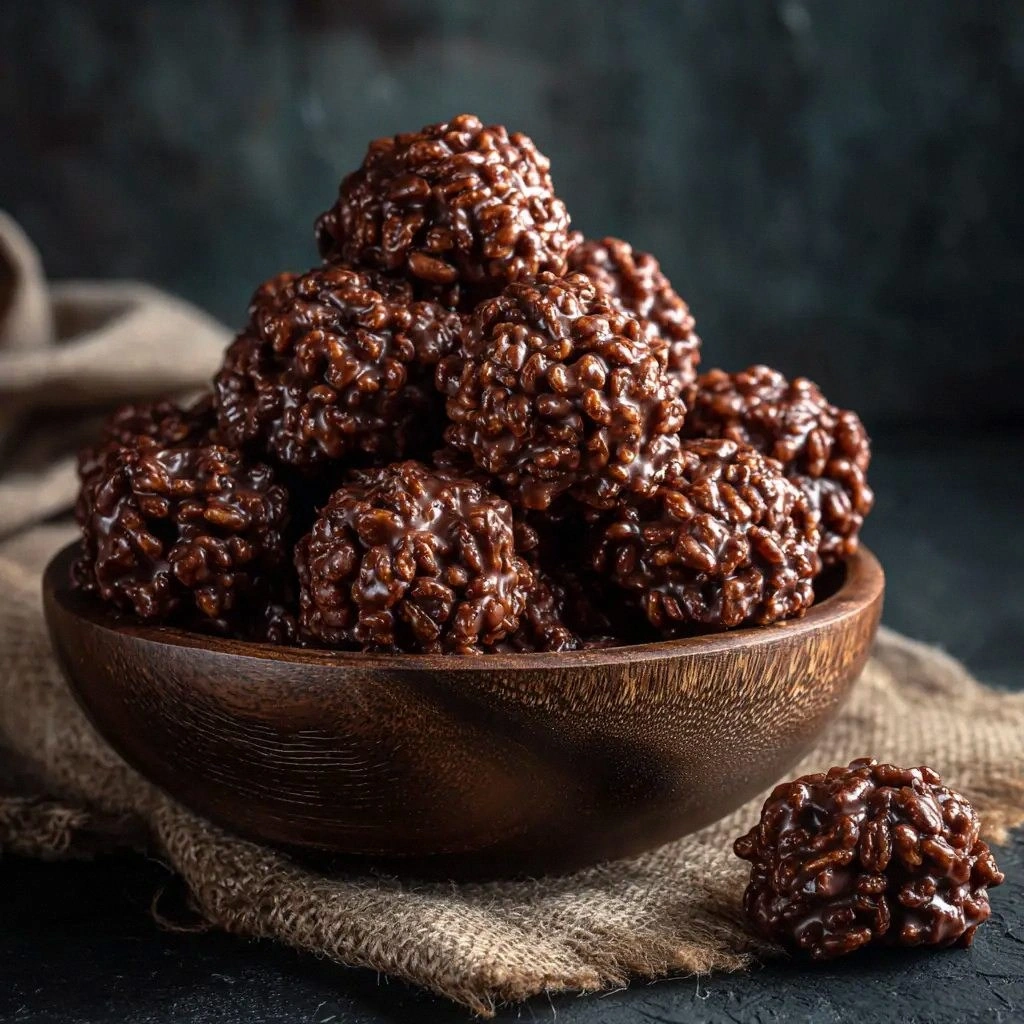
Picture the moment you lift a ball of this gooey mixture to your lips. The chocolatey glaze clings to the surface like a velvet coat, while the inside bursts with a soft, marshmallow‑marinated crunch. The aroma is a warm invitation, a promise that every bite will be a mini celebration. I swear the sizzle when the mixture hits the pan is absolute perfection; it’s the kind of sound that tells you you’re about to create something special. The texture feels like a tiny, edible hug that melts in your mouth, leaving a lingering sweetness that lingers on the tongue.
What sets this version apart from the countless variations you’ll find online is the meticulous balance of flavors and textures. I’ve tweaked the butter ratio to give the balls a buttery richness without overpowering the marshmallow sweetness. The chocolate chips are chosen for their semi‑sweet profile, which provides a subtle bitterness that cuts through the sugar, creating a complex palate. I’ve also perfected the ratio of Rice Krispies to ensure each bite is light yet crunchy, preventing the classic “cereal mush” that plagues many attempts. The result is a snack that feels indulgent but is surprisingly easy to make—no oven, no baking sheet, just a pot and a spoon.
This recipe is hands down the best version you’ll ever make at home, and I’ll be honest—I ate half the batch before anyone else got to try it. The secret lies in a technique that most recipes overlook: gently melting the butter first and letting it coat the marshmallows before the chocolate chips are added. This step locks in moisture and prevents the mixture from becoming too sticky. The final touch? A quick stir that incorporates the Rice Krispies without crushing them. The result is a treat that’s crisp on the outside and decadently chewy inside.
If you’ve ever struggled with making Rice Krispie treats that are too dense or too gooey, you’re not alone—and I’ve got the fix. I dare you to taste this and not go back for seconds, because once you experience the perfect balance, you’ll wonder how you ever made them any other way. Stay with me here—this is worth it. Let me walk you through every single step, and by the end, you’ll wonder how you ever made it any other way.
What Makes This Version Stand Out
- Butter: Using 1/4 cup unsalted butter adds a silky richness that binds the mixture together, preventing it from becoming too sticky. The butter’s melt point is just right for coating the marshmallows and chocolate, creating a smooth glaze that sets as the mixture cools.
- Marshmallows: The 10 oz of mini marshmallows provide the signature chewiness. Their small size ensures even distribution, so each bite delivers a consistent texture without any clumps of goo.
- Chocolate Chips: Semi‑sweet chips strike the perfect balance between sweet and bitter, adding depth without overpowering the marshmallow flavor. They melt into a glossy coating that hardens into a pleasant snap.
- Rice Krispies: The crunch of the cereal is essential for contrast. I use 6 cups to give a light, airy bite that offsets the dense chocolate coating.
- Simplicity: No oven, no baking sheet—just a pot and a spoon. This makes the recipe accessible to anyone, even those with minimal kitchen equipment.
- Make‑Ahead: Once formed, the balls keep well in the fridge for up to a week, and they reheat beautifully in the microwave or oven for a fresh‑from‑the‑pan feel.
- Ingredient Quality: Using high‑quality chocolate chips and fresh marshmallows elevates the flavor profile, turning a simple snack into an indulgent treat.
- Texture: The careful balance ensures that the outside is crisp while the inside remains chewy, a texture profile that satisfies both crunchy and soft cravings.
Alright, let’s break down exactly what goes into this masterpiece…
Inside the Ingredient List
The Flavor Base
Unsalted butter is the foundation that binds the mixture and adds a buttery richness. Its neutral flavor allows the other ingredients to shine without competition. If you skip butter, the mixture becomes too dry and crumbly, ruining the desired gooey consistency. For a vegan version, use a plant‑based butter with a similar fat content.
The Texture Crew
Rice Krispies cereal provides the signature crunch that contrasts the soft interior. The cereal’s lightness prevents the treat from becoming too dense. If you prefer a firmer bite, try using puffed rice or corn flakes. However, the classic Rice Krispies give the best textural experience.
The Unexpected Star
Mini marshmallows are the secret to that irresistible chew. Their small size ensures even distribution and prevents large, uneven blobs of goo. If you’re craving a different flavor, try adding a splash of flavored syrup to the marshmallow mixture. The result will still maintain the chewy center but with an added twist.
The Final Flourish
Semi‑sweet chocolate chips melt into a glossy coating that hardens into a pleasant snap. The bitterness of the chocolate balances the sweetness, creating a complex flavor profile. If you prefer a sweeter treat, switch to milk chocolate chips, but be prepared for a sweeter finish.
Everything’s prepped? Good. Let’s get into the real action…
The Method — Step by Step
- Step 1: Melt the Butter — Place the butter in a medium saucepan over low heat. Stir constantly until it’s fully melted and starts to bubble gently. The butter should have a clear, golden hue, not a brown tint. This low‑heat melt preserves the buttery flavor and prevents a bitter aftertaste. Let it sit for a minute before adding the marshmallows.
- Step 2: Add the Marshmallows — Pour the mini marshmallows into the pot with the melted butter. Stir until all the marshmallows are completely coated and start to soften. The mixture will begin to thicken and become translucent. Keep the heat low; if it’s too hot, the marshmallows will burn. The goal is a glossy, even consistency.
- Step 3: Introduce the Chocolate Chips — Sprinkle the semi‑sweet chocolate chips over the marshmallow mixture. Stir continuously until the chips melt into a smooth glaze. The chocolate should coat the surface of the mixture, creating a glossy finish. If you notice any lumps, continue stirring until the glaze is silky. This step locks in moisture and gives the balls their signature snap.
- Step 4: Remove from Heat — Once the chocolate has melted, remove the pot from the stove. This prevents the mixture from cooking further and becoming too hard. Let the mixture sit for 30 seconds to cool slightly, making it easier to handle. The mixture should still be warm enough to shape but not hot enough to burn your fingers.
- Step 5: Fold in Rice Krispies — Add the 6 cups of Rice Krispies to the pot. Gently stir until the cereal is fully coated, ensuring every bite has that crisp crunch. The cereal should be evenly distributed, with no clumps of chocolate or marshmallow. This is the moment where the texture really comes together. The mixture will begin to thicken as the cereal absorbs the moisture.
- Step 6: Shape the Balls — Use a spoon or your hands (gloved if you’re worried about stickiness) to scoop out portions of the mixture. Roll each portion between your palms to form a smooth ball about the size of a golf ball. If the mixture is too sticky, dampen your hands slightly with water. Each ball should be firm but still slightly pliable.
- Step 7: Chill the Balls — Place the formed balls on a parchment‑lined tray or plate. Refrigerate for at least 30 minutes, or until the coating sets and the balls firm up. The cold temperature helps the chocolate glaze harden, giving the balls a satisfying snap when bitten. If you’re in a hurry, you can use a freezer for 15 minutes.
- Step 8: Store and Serve — Store the chilled balls in an airtight container at room temperature for up to a week. For longer storage, keep them in the freezer and thaw at room temperature before serving. When you’re ready to eat, let them sit for a few minutes to soften slightly. The texture will be just as delightful as when they first cooled.
- Step 9: Optional Dusting — For an extra touch of elegance, dust the finished balls with powdered sugar or cocoa powder before serving. This adds a subtle flavor contrast and a visual pop. Make sure to dust lightly so the coating remains intact. This step is optional but highly recommended for special occasions.
- Step 10: Enjoy — Serve immediately or keep them chilled until you’re ready to indulge. The flavor is best when the chocolate is slightly melted but still firm. The combination of buttery, sweet, and slightly bitter notes will have you coming back for more. This is pure, uncomplicated bliss in every bite.
That’s it — you did it. But hold on, I’ve got a few more tricks that’ll take this to another level…
Insider Tricks for Flawless Results
The Temperature Rule Nobody Follows
Many people heat the mixture until it’s boiling, but this can scorch the chocolate. Keep the heat low and let the butter melt slowly. This gentle approach preserves the chocolate’s silky texture and prevents bitterness. I’ve seen friends who let the mixture boil and end up with a hard, uneven coating.
Why Your Nose Knows Best
Before adding the Rice Krispies, give the mixture a quick sniff. If it smells like toasted marshmallows, you’re on the right track. A sweet, buttery aroma indicates proper melting. If it smells off or burnt, lower the heat immediately. Your nose is the best guide to avoid over‑cooking.
The 5-Minute Rest That Changes Everything
After removing the pot from heat, let the mixture rest for exactly five minutes. This pause allows the chocolate to set slightly, making the mixture easier to handle. It also helps the flavors meld together for a richer taste. Skipping this step can lead to a sticky mess.
Use a Silicone Mat
Instead of parchment paper, try a silicone mat for shaping the balls. The mat provides a non‑stick surface that’s easy to clean. It also gives a slightly firmer base for the balls, preventing them from sliding off the tray. Many people overlook this simple tool, but it makes a big difference.
The Secret to a Perfect Snap
If you want the outer coating to crackle when you bite, chill the balls for 15 minutes longer than the minimum. The extra chill helps the chocolate set harder, creating a satisfying snap. This is a small tweak that elevates the overall experience.
The Final Touch
Just before serving, drizzle a thin line of melted chocolate over the top. This adds a glossy finish and a touch of elegance. It also seals the edges, keeping the balls from drying out. This optional step is perfect for parties or gift boxes.
Creative Twists and Variations
Nutty Crunch
Add 1/2 cup chopped walnuts or almonds to the mixture before folding in the Rice Krispies. The nuts provide a satisfying crunch and a nutty flavor that complements the chocolate. They also add a subtle earthy note, balancing the sweetness. This variation is perfect for those who love a bit of extra texture.
Spiced Delight
Stir in 1/2 teaspoon of cinnamon or a pinch of cayenne pepper before adding the Rice Krispies. The cinnamon adds warmth, while the cayenne introduces a subtle heat. This contrast creates a complex flavor profile that’s both sweet and spicy. It’s a great way to spice up a classic treat.
Citrus Twist
Incorporate 1 tablespoon of orange zest or a splash of lemon juice into the marshmallow mixture. The citrus brightens the flavor, cutting through the sweetness. It also adds a refreshing aroma that makes the treat feel lighter. This version is ideal for summer gatherings.
Vegan Version
Swap the unsalted butter for coconut oil or a plant‑based butter. Use marshmallows made from coconut milk or vegan marshmallows. Choose dark chocolate chips to keep the treat vegan. The result is a delicious, dairy‑free treat that still delivers the same mouth‑watering experience.
Mini Dessert Bars
Press the mixture into a baking pan lined with parchment and chill until firm. Cut into bars and dust with powdered sugar. This creates a portable, bite‑sized dessert that’s perfect for parties. The bars hold their shape well, making them easy to serve.
Gluten‑Free Option
Use gluten‑free Rice Krispies or a puffed rice cereal to keep the treat gluten‑free. The texture remains crisp, and the flavor stays consistent. This is an excellent option for guests with dietary restrictions. The treat still feels indulgent and satisfies the sweet tooth.
Storing and Bringing It Back to Life
Fridge Storage
Keep the balls in an airtight container at room temperature for up to a week. The chocolate coating will stay firm, and the inside will remain chewy. If the balls become slightly soft, re‑refrigerate them for a few minutes to restore firmness. This method is ideal for quick snacking throughout the week.
Freezer Friendly
Place the balls in a freezer‑safe bag or container and freeze for up to three months. When ready to enjoy, let them thaw at room temperature for 10–15 minutes. The texture will be just as delightful as when freshly made. Freezing is a great way to have a ready supply for parties.
Best Reheating Method
To bring them back to their original warmth, microwave on low power for 10–15 seconds or bake at 300°F for 5 minutes. A tiny splash of water before reheating helps the mixture steam back to perfection, keeping the interior moist. Avoid overheating, or the chocolate may become too soft. This simple technique restores the treat’s original charm.