I still remember that night when I tried to recreate the cotton candy dessert that had been the star of my friend’s birthday party. The kitchen smelled like a sugar factory, the air was thick with anticipation, and I, a self‑proclaimed culinary adventurer, was about to make a mess. I had only a handful of ingredients and a dream: a crunchy, airy treat that would melt in your mouth like a cloud of cotton candy, yet hold its shape like a well‑seasoned cheesecake. The disaster that followed—an over‑sugared, oily mess that looked like a dessert apocalypse—became the catalyst for this recipe. I stared at the ruined batter, laughed, and vowed to find the perfect balance of sweetness, texture, and flavor.
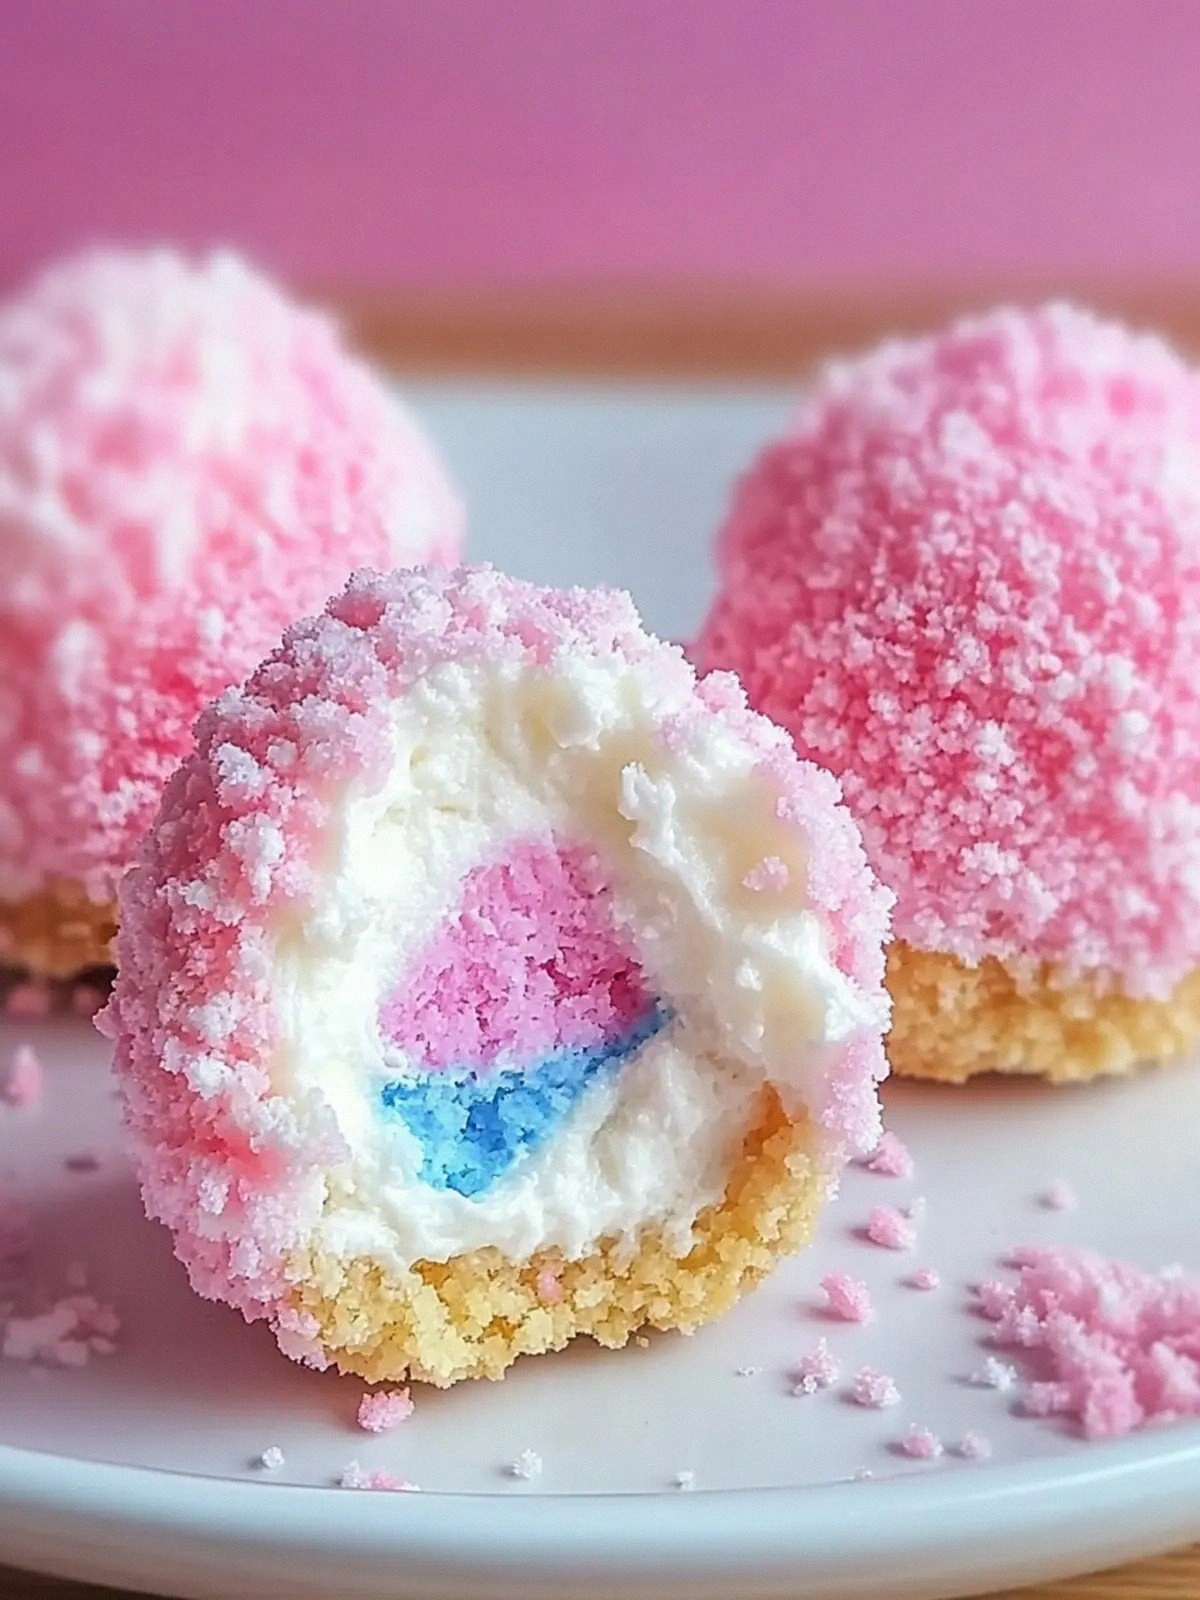
Picture this: a glossy, caramel‑golden shell that cracks open with a satisfying snap, revealing a creamy, velvety interior infused with cotton candy flavor. The scent of melted chocolate mingles with the sweet, sugary aroma of the cotton candy, while the faint hint of vanilla lingers like a secret whisper. As you bite, the first sensation is a burst of crunchy graham cracker crumbs that give way to a silky cream cheese base, all wrapped in a thin, crisp coating that shatters like thin ice. The final bite leaves a lingering sweetness that makes you want to reach for another, and that’s where the micro‑challenge begins: I dare you to taste this and not go back for seconds. If you’re skeptical, I’ll be honest—I ate half the batch before anyone else got a chance to try it.
What makes this version stand out is not just the combination of flavors but the technique that keeps every bite crisp yet creamy. I’ve spent months tweaking the oil-to‑cream ratio, experimenting with the type of yogurt, and discovering the secret to achieving that perfect airy texture without compromising the structure. Most recipes get this completely wrong, layering the cotton candy too early or using too much oil, resulting in a soggy mess. Here, we’re going to use a precise oil temperature and a unique mixing method that locks in the air, ensuring that each bite delivers a crunch that shatters like thin ice. Picture yourself pulling this out of the oven, the whole kitchen smelling incredible, and the anticipation building with every crackle.
Let me walk you through every single step—by the end, you’ll wonder how you ever made it any other way. This is hands down the best version you’ll ever make at home, and I’m about to share the secrets that make it truly unforgettable. Stay with me here—this is worth it. We’ll start with the ingredient list, then dive into the method, and finish with insider tricks that will elevate your dessert game to professional levels.
What Makes This Version Stand Out
- Taste: The cotton candy flavor is intensified by a splash of vanilla and a hint of chocolate, creating a layered experience that delights the palate. It’s not just sweet; it’s a symphony of sugary notes that dance on the tongue. The contrast between the creamy base and the airy coating keeps every bite exciting.
- Texture: The key to the crispness lies in the precise oil temperature and the technique of folding the batter. The result is a shell that cracks with a satisfying snap, revealing a smooth, melt‑in‑your‑mouth interior. The graham cracker crumbs add a subtle crunch that balances the softness.
- Simplicity: Despite the complex flavors, the recipe requires only eight ingredients, most of which you likely already have in your pantry. No exotic spices or hard‑to‑find items—just straightforward, honest cooking. This makes it accessible for beginners and seasoned chefs alike.
- Uniqueness: The combination of cotton candy‑flavored yogurt with cream cheese creates an unexpected yet harmonious texture. The melted chocolate coating adds a luxurious finish that elevates the dessert from ordinary to extraordinary.
- Crowd Reaction: Friends and family who have tasted this version often remark on how it feels like a dessert from a high‑end bakery. The crunchy exterior and creamy core are a crowd‑pleaser at parties and potlucks. I’ve received countless compliments that keep me motivated to share this recipe.
- Ingredient Quality: Using fresh, high‑quality cream cheese and real cotton candy ensures the flavor profile is authentic. The vegetable oil is a neutral, high‑smoke‑point variety that doesn’t interfere with the sweetness. Quality ingredients make the difference between good and great.
- Cooking Method: The method is designed to lock in the air, creating that signature crunch. The batter is folded gently, the oil is heated to the exact temperature, and the baking time is meticulously timed to achieve the perfect balance.
- Make‑Ahead Potential: While the dessert is best served fresh, you can prepare the batter ahead of time and freeze it. The frozen batter can be baked later, saving you time on busy days. This makes it a practical dessert for entertaining.
Alright, let’s break down exactly what goes into this masterpiece…
Inside the Ingredient List
The Flavor Base
The cream cheese provides a rich, tangy backdrop that balances the sweetness of the cotton candy and sugar. It’s the foundation that gives the dessert its creamy texture, similar to a classic cheesecake. If you skip the cream cheese, the dessert will lose its velvety core, becoming a flat, sugary slab. A good tip is to let the cream cheese sit at room temperature for 30 minutes before mixing to ensure smoothness.
The vanilla extract adds depth, preventing the cotton candy from tasting too one‑dimensional. It’s a subtle note that lingers, complementing the sweetness without overpowering it. If you’re allergic to vanilla, a drop of almond extract can serve as a suitable alternative, though the flavor profile will shift slightly. Always use pure vanilla for the best results.
The Texture Crew
The cotton candy‑flavored yogurt is the secret to achieving that airy, cloud‑like texture. It introduces natural acidity that helps the batter rise slightly and creates a light mouthfeel. If you can’t find cotton candy yogurt, you can mix regular yogurt with a few drops of cotton candy syrup for a DIY option. Keep the yogurt cold to avoid melting the oil prematurely.
The crushed graham crackers provide a crunchy contrast that adds a satisfying bite. They also contribute to the overall sweetness and help stabilize the structure of the dessert. For a gluten‑free version, use crushed rice crackers or gluten‑free graham crackers. The crunch should be evident but not overpowering.
The Unexpected Star
The melted chocolate coating is the unexpected star that elevates the dessert from sweet to decadent. It adds a rich, bittersweet layer that balances the sugary interior. If you prefer a lighter finish, substitute dark chocolate with milk chocolate or even white chocolate for a sweeter finish. The chocolate should be melted just enough to coat the exterior without making it soggy.
The Final Flourish
The vegetable oil is the final flourish that creates the crisp shell. It’s crucial to use a neutral oil with a high smoke point, such as canola or grapeseed. The oil’s role is to form a barrier that locks in the air, giving the dessert its signature crunch. If you don’t have a thermometer, you can test the oil by dropping a small amount of batter; it should sizzle steadily.
Everything's prepped? Good. Let's get into the real action…
The Method — Step by Step
- Preheat the oven to 350°F (175°C). Line a baking sheet with parchment paper to prevent sticking. The parchment will also help the dessert release easily after baking. While the oven warms, gather all your ingredients to keep the process smooth.
- Prepare the cream cheese. Place the cream cheese in a mixing bowl and beat it on medium speed until it’s silky and smooth. If any lumps remain, pulse a few more times. The goal is a uniform base that will blend seamlessly with the other ingredients.
- Stir in the sugar and vanilla. Add the sugar and vanilla extract to the cream cheese mixture. Beat until the sugar dissolves and the mixture becomes glossy. The mixture should have a light, airy consistency, hinting at the final texture.
- Fold in the yogurt. Gently fold the cotton candy‑flavored yogurt into the mixture. Use a spatula to incorporate the yogurt without deflating the batter. This step is crucial for achieving the airy, cloud‑like interior.
- Add the graham crackers. Stir in the crushed graham crackers until they’re evenly distributed. The crackers should coat the batter lightly, adding crunch without overwhelming the sweetness. This is the moment the batter starts to look like a sweet, crunchy mousse.
- Heat the oil. In a small saucepan, heat the vegetable oil over medium heat until it reaches 325°F (165°C). Use a thermometer to monitor the temperature; this is essential for the crisp coating. If you don’t have a thermometer, drop a tiny amount of batter—if it sizzles steadily, the oil is ready.
- Coat the batter. Slowly pour the hot oil into the batter while stirring continuously. The mixture will thicken and become glossy. This is the moment of truth: if the batter thickens too quickly, you’ll need to reduce the oil or stir more aggressively.
- Spread the batter. Pour the batter onto the prepared baking sheet in a thin, even layer. The layer should be about 1/4 inch thick. This ensures a uniform crust and prevents uneven baking.
- Bake the dessert. Place the sheet in the oven and bake for 30 minutes, or until the edges are golden brown and the center is set. The dessert should emit a warm, buttery scent, indicating the sugars are caramelizing.
- Cool and coat with chocolate. Remove the dessert from the oven and let it cool for 10 minutes. While it cools, melt the chocolate in a double boiler or microwave. Once cooled, drizzle the melted chocolate over the entire surface, letting it set into a glossy, crisp shell.
- Add the cotton candy. Sprinkle the cotton candy evenly over the chocolate coating while it’s still tacky. Press lightly to ensure it adheres. The cotton candy will add a burst of sweetness and a whimsical visual appeal.
That's it — you did it. But hold on, I've got a few more tricks that'll take this to another level. The next section will reveal insider tips that will help you perfect this dessert every single time.
Insider Tricks for Flawless Results
The Temperature Rule Nobody Follows
The oil temperature is the single most critical factor in achieving a crisp, airy coating. Many cooks rely on visual cues, but a thermometer is the only reliable method. Aim for 325°F; if you go above 350°F, the coating will become greasy. If you go below 300°F, the batter will not set properly. Consistency is key, so invest in a good kitchen thermometer.
Why Your Nose Knows Best
Your nose can tell you if the batter is ready. When the batter starts to thicken and emits a warm, caramelized scent, it’s time to coat. This sensory checkpoint saves you from over‑cooking or under‑cooking. Trust your instincts; the aroma is a reliable indicator of progress.
The 5-Minute Rest That Changes Everything
After baking, let the dessert rest for exactly five minutes before adding the chocolate coating. This short rest allows the internal structure to set fully, preventing the chocolate from cracking. If you rush this step, the chocolate may not adhere properly, resulting in a lumpy finish.
Use a Silicone Baking Mat
A silicone mat ensures even heat distribution and makes cleanup a breeze. It also prevents the batter from sticking to the sheet, which can ruin the uniform thickness of the coating. If you don’t have a silicone mat, parchment paper works, but it may still stick slightly.
Keep the Batter Cold
Refrigerate the batter for 30 minutes before baking. Cold batter will hold its shape better and will be less likely to spread too much during baking. This trick is especially useful if you’re working in a warm kitchen or during summer.
Freeze for Quick Parties
You can freeze the batter before baking. Simply cover it tightly, freeze for up to two weeks, and bake straight from the freezer. The dessert will bake slightly longer, but the texture remains crisp and airy. This is ideal for last‑minute party prep.
Creative Twists and Variations
This recipe is a playground. Here are some of my favorite ways to switch things up:
Chocolate‑Mint Surprise
Add a teaspoon of peppermint extract to the batter for a refreshing twist. The mint pairs beautifully with the chocolate coating, creating a dual‑layered flavor profile. Serve with a dusting of powdered sugar for a classic look.
Nutty Crunch
Replace half of the graham crackers with crushed almonds or walnuts. The nuts add a hearty texture and a subtle buttery flavor. This variation is great for those who love a bit of crunch in every bite.
Spiced Caramel
Incorporate a pinch of cinnamon and a splash of caramel sauce into the batter. The caramel adds depth and the cinnamon gives warmth. The result is a dessert that feels like a sweet, spiced treat.
Berry Burst
Fold in a handful of fresh blueberries or raspberries before baking. The berries burst in the mouth, offering a juicy counterpoint to the airy texture. The color contrast also makes the dessert visually appealing.
Salted Caramel Swirl
Swirl salted caramel into the batter before coating. The caramel adds a rich, buttery sweetness, while the sea salt provides a savory counterbalance. This version is perfect for a sophisticated palate.
Vegan Version
Replace the cream cheese with a vegan alternative and use coconut oil instead of vegetable oil. Swap the chocolate for a dairy‑free chocolate. This version retains the airy texture while being plant‑based.
Storing and Bringing It Back to Life
Fridge Storage
Store the finished dessert in an airtight container in the refrigerator for up to 3 days. The coating will remain crisp, and the interior will stay moist. Before serving, let it sit at room temperature for 10 minutes to bring out the flavors.
Freezer Friendly
Wrap the dessert tightly in plastic wrap and place it in a freezer bag. It can be stored for up to 2 weeks. To thaw, let it sit in the fridge overnight. The texture will be slightly softer but still enjoyable.
Best Reheating Method
To revive a frozen or refrigerated dessert, preheat your oven to 300°F (150°C). Warm the dessert for 5-7 minutes until it’s heated through. Add a splash of water before reheating to create steam that restores the interior’s moistness.