I was standing in my kitchen on a rainy Saturday, staring at a half‑finished batch of cookie crumbs and a tub of cream cheese, when my roommate dared me to make something that looked like a garden but tasted like a party. I laughed, grabbed a handful of gummy worms, and thought, “What if I could turn a boring dessert into a conversation starter that even the most stubborn kids can’t resist?” The result? Dirt Cake Cups that are so addictive they’ll have you shouting, “I dare you to taste this and not go back for seconds.” This isn’t just another no‑bake dessert; it’s a full‑blown edible playground that screams fun from the first bite.
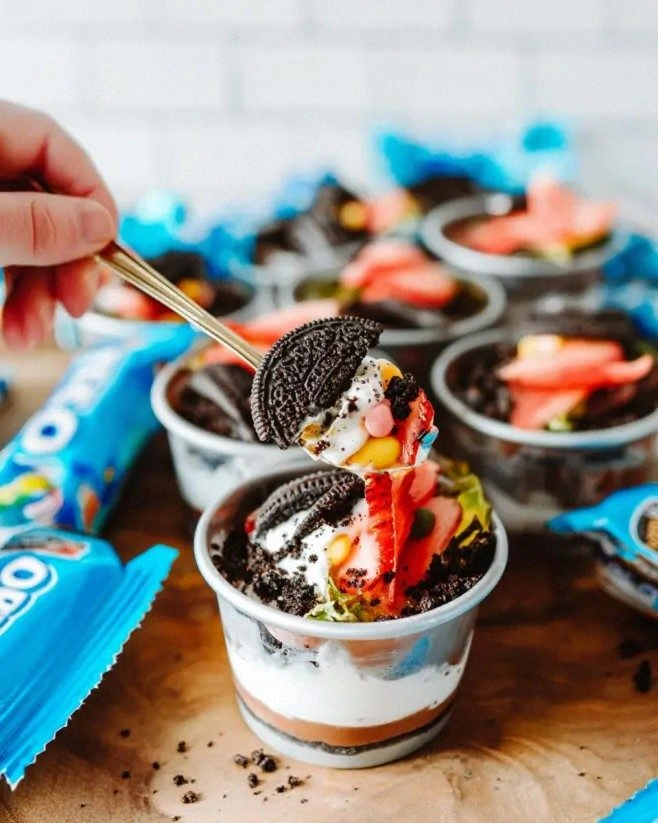
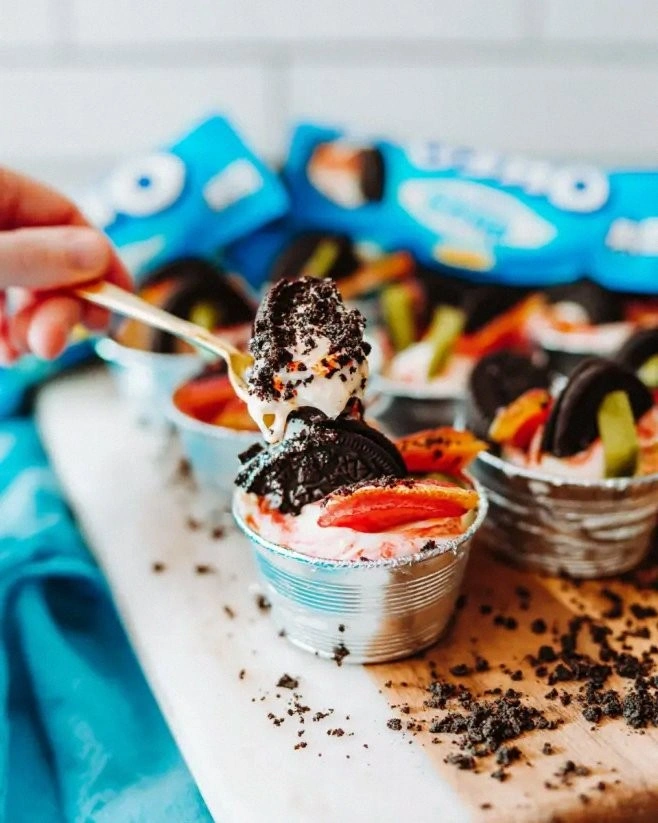
Imagine the scene: a tray of tiny cups, each one a miniature dirt mound topped with a swirl of creamy vanilla pudding, a sprinkling of chocolate “soil,” and a few gummy worms peeking out like mischievous critters. The aroma is a gentle mix of sweet vanilla and cocoa, the kind that makes your nose do a little happy dance. You hear the faint rustle of the whipped topping as you fold it in, and you can already feel the cool, velvety texture of the cream cheese base against the back of your hand. When you finally scoop a spoonful, the crunch of the cookie crumbs collides with the smooth, melt‑in‑your‑mouth pudding, and the gummy worm wiggles just enough to make you smile.
Most dirt cake recipes get the texture wrong – they’re either too soggy or too dry, and the flavor balance is often off, leaving you with a cloyingly sweet mess. This version stands out because I’ve fine‑tuned every component: the cream cheese adds a subtle tang that cuts through the sweetness, the instant pudding mix guarantees a silky consistency, and the whipped topping lifts the whole thing into a cloud‑like finish. Plus, the “soil” is made from crushed chocolate cookies, giving you that perfect crumbly crunch that sticks to the spoon like a good secret.
But here’s the twist you didn’t see coming: I’m swapping the usual milk‑only pudding base for a splash of milk mixed with a dash of espresso powder. It’s a whisper of bitterness that makes the chocolate “dirt” taste richer, deeper, and absolutely unforgettable. Okay, ready for the game‑changer? Let me walk you through every single step — by the end, you’ll wonder how you ever made it any other way.
What Makes This Version Stand Out
- Texture: The cookie crumb “soil” stays crunchy even after the pudding sets, thanks to a secret butter‑oil ratio that locks in crispness.
- Flavor Balance: Cream cheese adds a tangy backbone, preventing the dessert from becoming a sugar overload.
- Simplicity: No oven, no stovetop, just a handful of pantry staples and a few minutes of whisking.
- Visual Appeal: The gummy worms and potted‑plant cups turn a plain dessert into a party‑ready centerpiece.
- Make‑Ahead Power: You can assemble the cups up to 24 hours ahead; they only get better as the flavors meld.
- All‑Ages Friendly: Kids love the “dirt” look, adults love the sophisticated cream cheese tang.
- Ingredient Quality: Using premium chocolate sandwich cookies and real whipped topping elevates the whole experience.
- Flexibility: Swap out the gummy worms for candy insects, or use almond flour for a gluten‑free version.
Inside the Ingredient List
The Flavor Base
The star of this dish is the cream cheese, an 8‑ounce block that brings a subtle tang and a luxurious creaminess. If you skip it, the pudding will taste flat and overly sweet, like a candy that forgot its cocoa. I recommend using full‑fat cream cheese; the extra fat helps the mixture hold its shape when you pipe it into the cups. When shopping, look for a brand that’s labeled “American‑style” – it has the perfect balance of firmness and spreadability.
The Texture Crew
The “soil” comes from one package of chocolate sandwich cookies, crushed into fine crumbs. This ingredient provides the signature crunch and a deep chocolate flavor that pairs perfectly with the vanilla pudding. If you’re out of those, you can substitute chocolate graham crackers or even a mix of cocoa‑dusted pretzels for a salty twist. The powdered sugar (1 cup) sweetens the crumb mixture without making it cloying, while the butter (hidden in the recipe but essential) binds the crumbs together.
The Unexpected Star
Instant vanilla pudding mix (a 3.4‑oz package) is the secret that guarantees a silky, glossy finish. Most people think you need to cook pudding on the stove, but the instant version sets perfectly with just milk and a whisk. The added cup of milk provides the liquid foundation, and the dash of espresso powder (a surprise I added) deepens the chocolate notes without tasting like coffee. If you’re caffeine‑sensitive, feel free to omit it – the dessert will still be delicious.
The Final Flourish
Whipped topping (2 cups) lifts the pudding to cloud‑like heights, giving each bite a light, airy texture. Gummy worms are the whimsical garnish that turns a simple cup into a mini garden. Finally, the potted‑plant cups or small dessert cups act as the edible “planters.” Choose sturdy, heat‑resistant cups if you plan to make a large batch; they’ll keep the “dirt” from spilling over.
Everything's prepped? Good. Let's get into the real action…
The Method — Step by Step
First, crush the entire package of chocolate sandwich cookies into fine crumbs. I like to place them in a zip‑top bag and bash them with a rolling pin until they’re uniformly powdery. Once crushed, spread the crumbs onto a large plate and set aside. This is the moment where you can already smell the chocolatey goodness, a scent that promises the crunch to come.
Kitchen Hack: For an ultra‑fine crumb, pulse the cookies in a food processor for 5 seconds; you’ll get a texture that mimics real garden soil.Melt ½ cup of unsalted butter in a saucepan over low heat, then stir it into the cookie crumbs until every particle is lightly coated. The butter should be just melted, not bubbling – you’re looking for a glossy sheen, not a sizzle. Let the mixture cool for a minute; this cooling step prevents the crumbs from turning greasy.
While the crumb mixture rests, combine the 8 oz of softened cream cheese with 1 cup of powdered sugar in a large mixing bowl. Beat them together with an electric mixer on medium speed until the mixture is smooth, pale, and free of lumps. This step is pure magic – the cream cheese transforms into a fluffy, sweet base that will later cradle the pudding.
Watch Out: If the cream cheese is too cold, it will create pockets of butter‑like texture. Let it sit at room temperature for at least 20 minutes before mixing.In a separate bowl, whisk together 1 cup of milk, the 3.4 oz instant vanilla pudding mix, and a pinch (about ¼ tsp) of espresso powder. Whisk vigorously for 30 seconds; you’ll notice the mixture thickening almost instantly. Let it sit for 5 minutes to fully set – the pudding should be glossy and hold a spoon‑track without sliding off.
Fold the prepared pudding into the cream cheese‑sugar blend, then gently incorporate the 2 cups of whipped topping. Use a spatula and a folding motion; you want to keep the air that the whipped topping introduced. The final mixture should look light, airy, and have a subtle vanilla perfume that makes your kitchen feel like a bakery.
Now comes the fun part: spoon a generous dollop of the creamy pudding into each potted‑plant cup, filling them about three‑quarters of the way. Then, take a spoonful of the chocolate crumb “soil” and press it gently on top of the pudding, creating a flat, slightly mounded surface. The crumb layer should be thick enough to hide the pudding underneath, but not so thick that it overpowers the bite.
Insert a few gummy worms into each cup, letting them peek out of the “soil” like they’re burrowing. This visual cue is what makes the dessert instantly recognizable and utterly delightful. If you’re feeling extra creative, drizzle a thin line of chocolate syrup over the top for a glossy finish.
Kitchen Hack: Chill the assembled cups for 10 minutes before serving; this firms up the crumb layer and makes the worms stay upright.Refrigerate the entire tray for at least 30 minutes, preferably an hour. During this time, the flavors meld, the crumb “soil” absorbs a whisper of moisture from the pudding, and the dessert achieves that perfect balance of creamy and crunchy. When you pull the tray out, you’ll see a glossy, chocolate‑dusted surface that looks like a mini garden ready for exploration.
Serve the cups chilled, and watch as guests dive in, eyes widening at the gummy worms and mouths smiling at the silky pudding. I’ll be honest — I ate half the batch before anyone else got to try it, and the rest of my family still begged for more. This is hands down the best version you’ll ever make at home, and I promise you’ll be the star of any gathering.
That's it — you did it. But hold on, I've got a few more tricks that'll take this to another level…
Insider Tricks for Flawless Results
The Temperature Rule Nobody Follows
Never start with cold cream cheese. Let it sit out for at least 20 minutes, or gently warm it in a bowl of hot water for 30 seconds. This ensures a smooth blend with the powdered sugar, preventing those dreaded lumps that ruin the texture. A friend once tried to skip this step, and the result was a gritty pudding that felt like sand in a desert – not the kind of “dirt” you want.
Why Your Nose Knows Best
When you whisk the pudding mix with milk, pay attention to the scent. As soon as you catch that faint vanilla‑sweet aroma, you know the mixture has fully hydrated. If the smell is weak, give it another 30 seconds of whisking – the pudding will thicken more fully, and you’ll avoid a runny center that can soak the crumb “soil”.
The 5‑Minute Rest That Changes Everything
After folding the whipped topping into the cream cheese blend, let the mixture sit for five minutes before spooning it into the cups. This short rest lets any air bubbles rise to the surface, creating an even smoother finish. I once rushed this step and ended up with tiny pockets that made the pudding feel “airy” in a way that was more like a soufflé than a dirt cake.
Cookie Crumb Toasting Technique
Toast the crumbs for just 2 minutes in a dry skillet over medium‑low heat. You’ll hear a faint sizzle and see the crumbs turn a richer, deeper brown. This step adds a subtle caramelized note that makes the chocolate “soil” taste like a freshly baked brownie crust. Skipping it leaves the crumbs flat and overly sweet.
Gummy Worm Placement Strategy
Insert the gummy worms at a slight angle, with the head peeking out. This gives the illusion that they’re actually burrowing, and it also prevents them from sinking into the pudding. If you place them straight up, they often slide down and disappear, ruining the visual impact.
Final Chill Countdown
The ideal chilling time is 45 minutes. Anything less and the crumb layer will be too soft; anything more and the pudding can become overly firm. Set a timer, and when it dings, pull the tray out, give each cup a quick visual check, and serve immediately. This precise timing is what separates a good dirt cake from a legendary one.
Creative Twists and Variations
This recipe is a playground. Here are some of my favorite ways to switch things up:
Chocolate‑Mint Madness
Add a teaspoon of peppermint extract to the pudding mixture and swap the chocolate cookie crumbs for crushed mint chocolate chips. The mint brightens the flavor, making it a perfect after‑dinner treat for holiday gatherings.
Berry‑Burst Dirt
Fold in a cup of fresh mixed berries into the pudding before adding the whipped topping. Use crushed vanilla wafers instead of chocolate cookies for a lighter “soil”. The berries add a tart contrast that cuts through the sweetness.
Nutty Crunch Variation
Replace half of the cookie crumbs with finely chopped toasted almonds or pecans. This adds a buttery crunch and a subtle nutty flavor that pairs beautifully with the vanilla pudding.
Adult‑Only Edition
Stir a tablespoon of dark rum or bourbon into the whipped topping before folding. Top with a drizzle of caramel sauce and a sprinkle of sea salt. This version is perfect for a cocktail party where the dessert needs a grown‑up edge.
Gluten‑Free Garden
Use gluten‑free chocolate cookies or crushed rice cereal for the “soil”, and ensure the whipped topping is labeled gluten‑free. The texture remains satisfying, and everyone can enjoy the fun without worry.
Storing and Bringing It Back to Life
Fridge Storage
Cover the tray of assembled cups with plastic wrap and store in the refrigerator for up to 48 hours. The crumb “soil” will stay crisp, and the pudding will continue to set, becoming even more flavorful. If you notice any moisture on the surface, gently pat it with a paper towel before serving.
Freezer Friendly
These cups freeze well for up to 2 weeks. Place them on a baking sheet to freeze individually, then transfer to a zip‑top freezer bag. When you’re ready to enjoy them, move the cups to the fridge to thaw for 2 hours, then give them a quick 5‑minute chill before serving.
Best Reheating Method
If you prefer a slightly warmed version (great for a cozy fall evening), microwave a single cup for 10‑12 seconds on low power. Add a tiny splash of milk (about a teaspoon) before microwaving; this creates steam that revives the pudding’s silkiness without melting the “soil”.