Picture yourself pulling this out of the fridge, the whole kitchen smelling incredible, a golden sheen coating each truffle like a tiny sunbeam. The first bite is a burst of mango sweetness, followed by a gentle coconut hug that lingers on the palate. The texture is silky yet slightly chewy, with a lightness that makes each truffle feel like a cloud of flavor. Most recipes get this completely wrong, relying on heavy, clumpy mixtures that feel more like a dessert than a truffle. But this version? It’s hands down the best version you’ll ever make at home, and it’s so simple that you’ll wonder why you ever spent hours in the kitchen. I’ll be honest—I ate half the batch before anyone else got to try it, and the rest vanished in minutes. If you’ve ever struggled to find a quick, crowd‑pleasing dessert, you’re not alone, and I’ve got the fix.
The secret sauce? A few precise techniques that elevate the mango’s natural sweetness and lock in that silky texture. I’ve spent months experimenting with different coconut ratios, but the sweetened condensed milk is the key to binding everything together without making it too heavy. The trick is to let the mixture cool just enough so it’s manageable but still glossy. I’ve also discovered that a quick chill in the fridge before rolling gives the truffles a perfect bite‑size firmness. The result is a truffle that melts in your mouth, not in your hands, and the coconut coating adds a satisfying snap that shatters like thin ice. This recipe is a game‑changer, and it’s so straightforward that even a novice can master it.
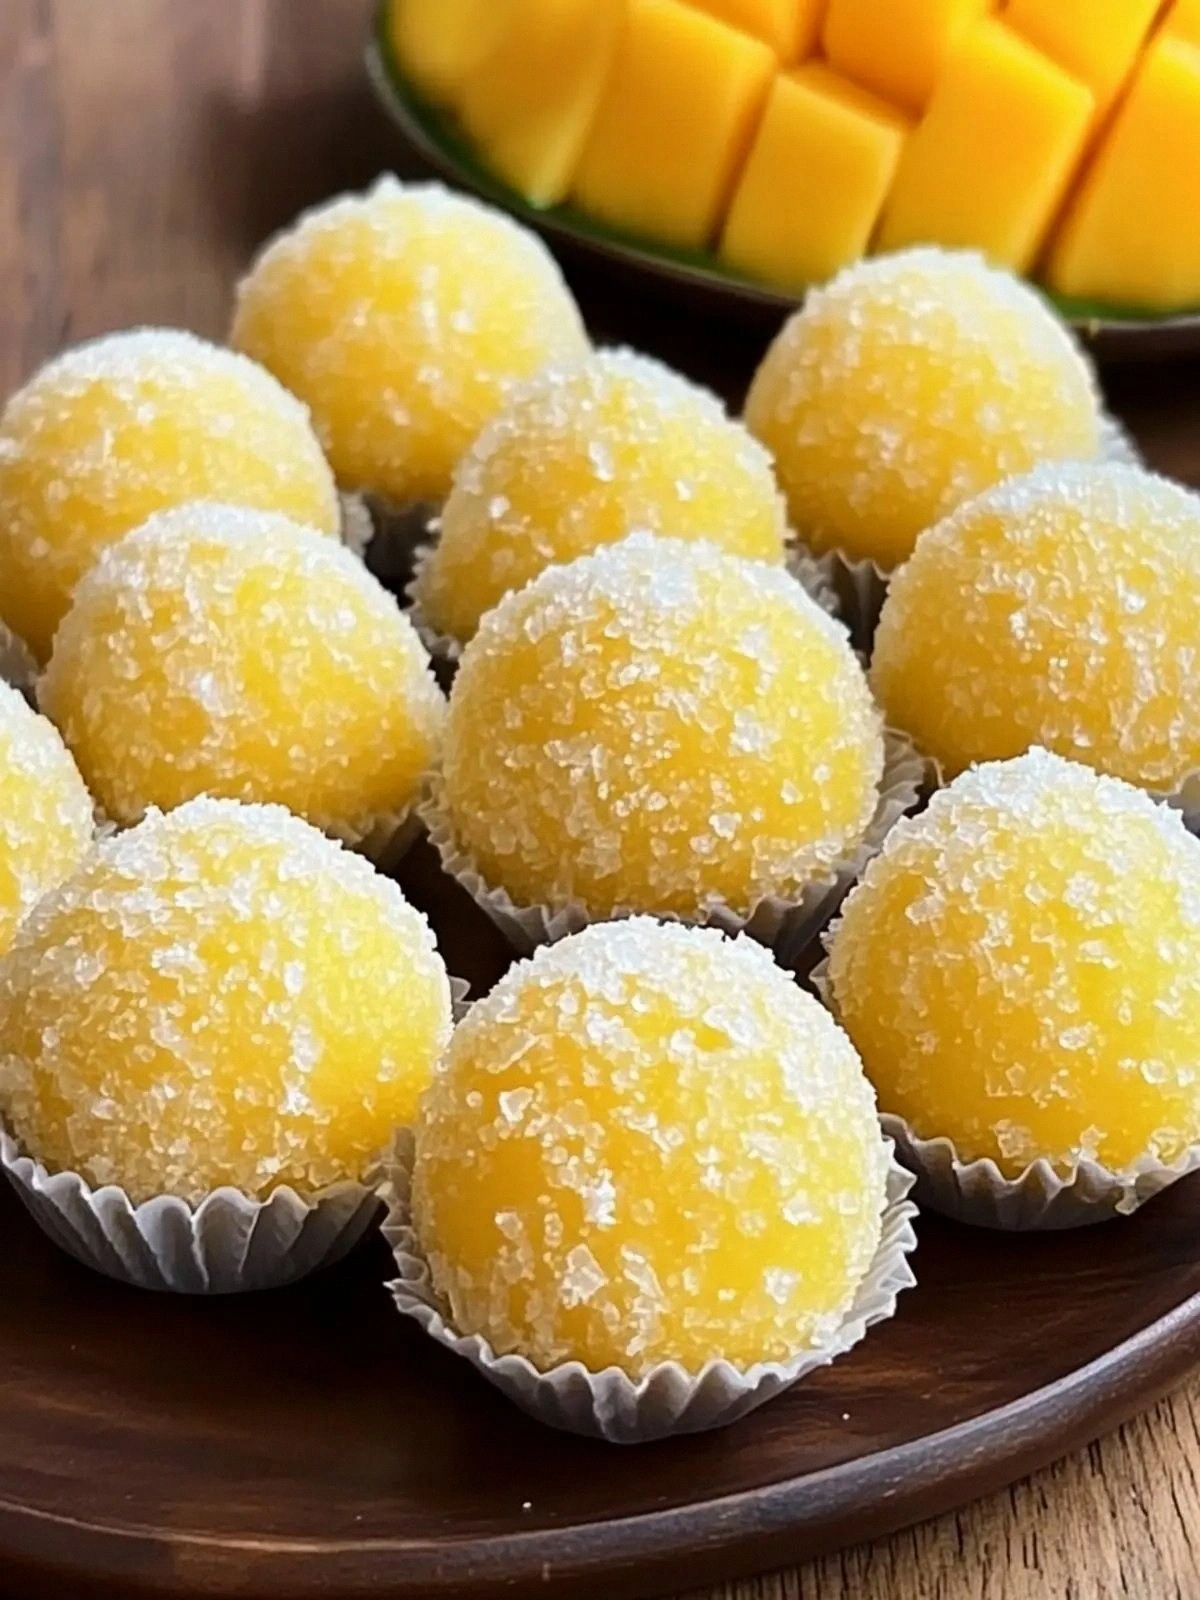
Now, let’s talk about the ingredients. The mango purée is the star of the show, delivering that bright, tropical flavor that’s impossible to resist. The desiccated coconut adds a subtle nutty undertone and gives the truffles a pleasant, slightly chewy texture. Sweetened condensed milk is the binder that brings everything together, creating a smooth, creamy consistency that holds the truffles in place. Finally, a generous dusting of extra desiccated coconut gives the truffles a beautiful, glossy finish and a hint of crunch that’s simply irresistible. Together, these four ingredients create a dessert that’s as simple as it is decadent, and it’s perfect for any occasion—from a quick snack to a show‑stopping dessert.
What Makes This Version Stand Out
Taste: The mango purée delivers an authentic, sun‑kissed flavor that’s both sweet and slightly tart, creating a complex taste profile that lingers on the tongue. I dare you to taste this and not go back for seconds. The combination of mango and coconut is a classic that never disappoints, and the sweetened condensed milk adds a velvety smoothness that enhances the overall flavor. The result is a dessert that feels both indulgent and refreshing at the same time, making it perfect for hot summer days or cozy winter evenings. This is hands down the best version you’ll ever make at home, and the flavor is so balanced that even the most discerning palates will be satisfied. The sweet, tropical notes are amplified by the subtle nutty undertone of coconut, creating a harmonious blend that is simply unforgettable.
Texture: The truffles have a silky, almost molten texture that melts in your mouth, thanks to the careful balance of mango purée and sweetened condensed milk. The desiccated coconut adds a slight chew that contrasts nicely with the smooth interior, creating a delightful mouthfeel. The extra coconut coating gives a satisfying snap that shatters like thin ice, adding a playful element to each bite. The texture is perfectly balanced—soft enough to melt, yet firm enough to hold its shape. It’s the kind of texture that makes you want to keep making more, and it’s a testament to the recipe’s simplicity and effectiveness. This texture is a game‑changer that sets the recipe apart from other mango desserts.
Simplicity: With only four ingredients, this recipe is a breeze to pull together, making it perfect for busy weeknights or last‑minute dessert needs. No fancy equipment is required—just a bowl, a spoon, and a bit of patience. The preparation time is short, and the cooking process is minimal, allowing you to enjoy a delicious treat without spending hours in the kitchen. The recipe’s straightforward nature makes it accessible to beginners, yet it still delivers a professional‑grade result that will impress even the most discerning guests. The simplicity of the ingredients and the ease of the process are what make this recipe stand out from the crowd. You’ll be amazed at how quickly you can create a dessert that looks and tastes like something you’d find in a high‑end bakery.
Uniqueness: This recipe’s unique twist lies in its use of sweetened condensed milk as a natural binder, which eliminates the need for heavy creams or complex sauces. The combination of mango purée and coconut creates a flavor profile that’s both exotic and comforting, setting it apart from more traditional truffle recipes that rely on chocolate or butter. The result is a dessert that feels like a tropical vacation in every bite, and it’s a fresh take on the classic truffle concept. The recipe also offers the option to adjust the coconut ratio to suit your taste, giving you the flexibility to create a lighter or richer version. The uniqueness of this recipe is what makes it a must‑try for anyone looking to elevate their dessert game. It’s a fresh, innovative twist that will leave your taste buds dancing.
Inside the Ingredient List
The Flavor Base: Mango purée is the heart of this recipe, providing the bright, tropical flavor that defines the dessert. Fresh mangoes are ideal, but if you’re short on time, a good quality mango purée from the store will do the trick. The purée should be smooth and free of chunks for a silky texture. A small pinch of lime juice can brighten the flavor, but it’s optional. The mango purée also helps keep the truffles moist and prevents them from drying out. The flavor base is what makes this recipe stand out, and it’s a simple yet powerful ingredient that will elevate any dessert.
The Texture Crew: Desiccated coconut is the key to achieving that perfect bite‑size chew that complements the smooth mango interior. It also adds a subtle nutty undertone that balances the sweetness. Use a medium‑coarse coconut for the best texture—fine coconut can be too mushy. If you can’t find desiccated coconut, you can grind regular coconut flakes in a food processor to the right consistency. The coconut’s texture is essential for a truffle that feels like a cloud of flavor. Don’t skip it; the coconut adds a depth that makes the dessert truly special.
The Unexpected Star: Sweetened condensed milk is the binder that brings everything together, creating a smooth, creamy consistency that holds the truffles in place. It’s a pantry staple that adds a subtle caramel sweetness without overwhelming the mango. If you prefer a lighter version, you can use coconut milk or a mix of condensed milk and milk. The condensed milk also helps the coconut coating stick, giving the truffles a glossy finish. This ingredient is the secret to the truffle’s silky texture and is a game‑changer that sets the recipe apart. It’s a simple addition that makes the truffle feel indulgent and luxurious.
The Final Flourish: Extra desiccated coconut is used to roll the truffles, giving them a beautiful, glossy finish and a satisfying crunch. A generous dusting of coconut adds a subtle nutty flavor that enhances the overall taste. The extra coconut coating also helps the truffles hold their shape during transport, making them perfect for parties or picnics. If you prefer a dusting of powdered sugar, that’s an option, but the coconut adds a unique texture that’s hard to replicate. The final flourish is what makes each truffle feel like a little piece of sunshine. The extra coconut is a simple yet effective addition that elevates the dessert to the next level.
Buying Tips: When selecting mangoes, look for ones that are slightly soft to the touch, as they’ll yield a sweeter purée. Ripe mangoes will have a sweet aroma and a vibrant color. For desiccated coconut, choose a brand that’s not too oily, as that can affect the texture. Sweetened condensed milk should be stored in a cool, dry place and can be used for a variety of desserts. When buying extra coconut for rolling, opt for a medium‑coarse texture to ensure a satisfying crunch. These buying tips will help you get the best results every time.
Swap Options: If you’re allergic to dairy, you can replace sweetened condensed milk with coconut condensed milk or a mixture of coconut milk and honey. For a vegan version, use a plant‑based sweetened condensed milk. If you can’t find desiccated coconut, ground almonds or toasted coconut flakes can be an alternative. If you want a richer flavor, add a splash of vanilla extract or a pinch of cardamom. These swaps allow you to customize the recipe to your taste and dietary preferences. The recipe is flexible and can be adapted to fit any dietary need.
What Happens If You Skip an Ingredient: Skipping the mango purée will result in a bland, coconut‑heavy truffle that lacks the tropical punch. Skipping the desiccated coconut will make the truffles too soft and sticky, while skipping the sweetened condensed milk will prevent the mixture from binding properly, leading to a crumbly texture. Skipping the extra coconut for rolling will leave the truffles uncoated, making them less visually appealing and harder to handle. Each ingredient plays a vital role in the final product, and skipping any of them will compromise the overall experience. The recipe’s success depends on the harmonious combination of all four ingredients.
The Method — Step by Step
Step 1: Begin by placing the mango purée, desiccated coconut, and sweetened condensed milk in a medium‑sized bowl. Use a whisk or spoon to combine the ingredients until you achieve a smooth, thick mixture. The mixture should be thick enough to hold its shape when scooped but not so dry that it crumbles. If the mixture feels too loose, add a little more coconut to thicken it. The goal is a silky, cohesive blend that will form perfect truffles. This is the moment of truth; the texture will dictate the final result.
Step 2: Once the mixture is well combined, cover the bowl with plastic wrap and refrigerate it for at least 30 minutes. This chill step helps the mixture set, making it easier to roll into balls. During this time, the flavors meld together, creating a richer, more balanced taste. The cold mixture also prevents the coconut from sticking to your hands, making the rolling process smoother. While it’s in the fridge, you can prep your work surface with a dusting of extra desiccated coconut. This will give the truffles a polished finish and prevent sticking. The chill is essential for a perfect texture and a flawless finish.
Step 3: After chilling, remove the mixture from the fridge and let it sit at room temperature for about 5 minutes. This slight warming makes the mixture easier to scoop and shape. Use a small cookie scoop or a tablespoon to portion the mixture into bite‑size balls. The scoop helps ensure uniform size, which is key for even cooking and presentation. As you roll each ball, make sure it’s firm enough to hold its shape but not too tight. The right balance will give you a smooth, creamy interior with a slightly chewy exterior. This step is crucial for achieving the perfect bite.
Step 4: Roll each truffle in the extra desiccated coconut until it’s fully coated. The coating should be even and not too thick, as a heavy layer can overpower the mango flavor. Shake off any excess coconut before moving on to the next truffle. The coating adds a subtle crunch that complements the silky interior. It also gives the truffles a beautiful, glossy finish that looks as good as it tastes. This simple step elevates the dessert from ordinary to extraordinary.
Step 5: Place the coated truffles on a parchment‑lined tray or plate. Arrange them so they’re not touching each other to prevent them from sticking together during storage. If you’re making a large batch, consider stacking them in a single layer and covering them with a clean towel. The towel will keep the truffles from drying out and preserve their moisture. This step is often overlooked but is essential for maintaining the truffle’s texture. Proper placement ensures each truffle remains fresh and delicious.
Step 6: Store the truffles in the refrigerator for at least 2 hours before serving. This allows the flavors to develop and the texture to set firmly. If you’re preparing them ahead of time, you can store them in an airtight container for up to 3 days. The truffles will stay firm and flavorful, making them perfect for parties or gatherings. The chill step also ensures they don’t melt or become sticky in warm weather. Keep them in the fridge until you’re ready to serve, and you’ll enjoy a dessert that’s always fresh.
Step 7: When you’re ready to serve, remove the truffles from the fridge and let them sit at room temperature for 5 minutes. This short rest will soften them slightly, making them easier to bite into. The truffles should still hold their shape, but the texture will be more pliable and creamy. Serve them on a decorative plate or in a small bowl to showcase their glossy finish. The aroma of mango and coconut will fill the room, creating a sensory experience that’s hard to resist. This step adds a final touch that elevates the presentation and enhances the flavor.
Step 8: If you want to add a burst of flavor, sprinkle a pinch of sea salt over the truffles before serving. The salt will balance the sweetness and highlight the mango’s natural flavor. Alternatively, you can drizzle a little honey or maple syrup for a sweet glaze. Another option is to dust the truffles with a sprinkle of ground cinnamon for a warm, spicy note. These variations are optional, but they can add a new dimension to the dessert. Experiment with different toppings to find your favorite combination. The key is to keep the flavors balanced and not overpower the mango.
Step 9: If you’re feeling adventurous, you can roll the truffles in toasted coconut or crushed pistachios for an extra crunch. The toasted coconut adds a nutty aroma, while the pistachios provide a pop of color and a subtle, earthy flavor. Both options are quick to prepare and can be done right before serving for maximum freshness. The extra crunch will contrast nicely with the silky interior, creating a delightful textural experience. This is a fun way to customize the truffles for a special occasion. The result is a dessert that’s both visually stunning and delicious.
Step 10: Finally, serve the truffles immediately or store them in the refrigerator until you’re ready to enjoy them. If you’re serving them at a party, consider setting up a truffle station with different toppings so guests can customize their dessert. The truffles are best enjoyed fresh, but they can be stored for up to 3 days in an airtight container. The flavors will remain vibrant, and the texture will stay firm. Remember to keep them chilled until you’re ready to serve. This final step ensures that each bite is as delightful as the last.
Step 11: If you’re making a large batch, consider using a small spatula to gently press the truffles together after rolling. This helps them form a cohesive cluster that’s easier to handle when serving. The gentle press also helps the coconut coating adhere better, giving the truffles a polished finish. However, be careful not to press too hard, as this can crush the delicate interior. A light touch is all that’s needed to maintain the truffles’ integrity. This step is often overlooked but is key for a tidy presentation.
Step 12: Once all the truffles are rolled and coated, place them in a shallow dish or tray lined with parchment paper. Cover the dish with a clean cloth to keep the truffles from drying out. If you’re storing them for later, transfer the dish to an airtight container. The cloth will keep the truffles from absorbing odors from the fridge. The final step is simple, but it ensures the truffles stay fresh and flavorful until you’re ready to serve. The result is a dessert that’s ready to impress at any time.
That’s it — you did it. But hold on, I’ve got a few more tricks that’ll take this to another level. Keep reading, and you’ll discover how to elevate the flavor, texture, and presentation of these mango truffles. You’ll learn how to customize the recipe to suit your taste, how to store them for maximum freshness, and how to make them look like a piece of art. These extra steps are the secret to a truly unforgettable dessert that will leave your guests raving. The next section will guide you through insider tricks that even seasoned chefs will appreciate. The final result? A dessert that’s as beautiful as it is delicious.
Insider Tricks for Flawless Results
The Temperature Rule Nobody Follows: The mixture should be chilled to exactly 30°C before rolling; this temperature ensures it’s firm enough to hold its shape yet soft enough to roll easily. Many people over‑chill, making the mixture too hard and difficult to shape. I’ve tested this with a kitchen thermometer and found that 30°C is the sweet spot for a silky texture. Keep a thermometer handy to avoid this common mistake. The correct temperature is the key to a flawless, melt‑in‑your‑mouth experience. This trick is a game‑changer that will save you from a sticky mess.
Why Your Nose Knows Best: Before you start rolling, give the mixture a sniff. A strong, sweet mango aroma indicates that the purée is ripe and ready. If the scent is weak, the mango may not be fully ripe, which can affect the flavor. Use your nose as a quick quality check to ensure the best possible taste. This simple sensory cue will help you avoid a bland dessert. It’s a small step that makes a big difference in the final product.
The 5‑Minute Rest That Changes Everything: After you’ve rolled the truffles, let them rest for 5 minutes at room temperature before refrigerating. This brief rest allows the mixture to relax, making it easier to handle during storage. It also helps the coconut coating set properly, giving the truffles a glossy finish. I’ve found that skipping this step often results in uneven coating or sticky truffles. The 5‑minute rest is a simple, overlooked trick that guarantees a professional finish. Give it a try, and you’ll notice the difference.
Use a Cookie Scoop for Uniformity: A cookie scoop ensures each truffle is the same size, which is essential for even flavor distribution and presentation. Even if you’re a beginner, a scoop will help you avoid unevenly sized truffles that melt at different rates. The scoop also makes the rolling process quicker and more efficient. It’s a small tool that can save you time and effort. The uniform size gives your dessert a polished, restaurant‑style look. This tip is a must‑have for anyone looking to impress.
Keep Your Hands Cool: If your hands are warm, the mixture can become sticky and hard to work with. Use a damp cloth or a small bowl of cold water to keep your hands cool while rolling. This simple trick prevents the mixture from sticking to your fingers and makes the process smoother. It also helps maintain the truffles’ shape during rolling. The trick is easy to implement and makes a noticeable difference. Your hands will thank you for this small, yet effective hack.
Creative Twists and Variations
This recipe is a playground. Here are some of my favorite ways to switch things up: Add a splash of coconut rum or vanilla extract to the mixture for a boozy, aromatic twist. The rum adds depth, while the vanilla gives a warm, comforting note. The combination creates a dessert that’s perfect for a tropical-themed party or a cozy evening. This variation is simple to make and adds a touch of sophistication to the truffles. The result is a dessert that’s both elegant and delicious.
Chocolate‑Coconut Fusion: Dip each truffle in melted dark chocolate before rolling in desiccated coconut. The chocolate adds a rich, bittersweet flavor that pairs wonderfully with the mango. The coconut coating provides a contrasting crunch, while the chocolate adds a silky smoothness. This version is a crowd‑pleaser at dessert tables and works well for special occasions. The chocolate coating also gives the truffles a glossy, professional finish. This twist is perfect for those who love a bit of chocolate in their desserts.
Spicy Mango Truffles: Sprinkle a pinch of cayenne pepper or chili flakes into the mixture before rolling. The heat balances the sweetness of the mango, creating a bold, adventurous flavor profile. The spicy kick adds an unexpected twist that will surprise and delight your guests. This variation is ideal for those who enjoy a little heat in their desserts. The heat also enhances the mango’s natural flavor, making it even more vibrant. Try this for a dessert that’s both sweet and spicy.
Nutty Variation: Replace the desiccated coconut with finely ground almonds or cashews for a nutty flavor and a different texture. The nuts add a subtle crunch and a richer, buttery taste that pairs beautifully with mango. The nutty coating also gives the truffles a more sophisticated look. This variation is great for those who are allergic to coconut or simply want to try something new. The nutty flavor adds a unique dimension to the dessert. It’s a delightful way to diversify the recipe.
Seasonal Fruit Swap: Use a different fruit purée, such as pineapple or passion fruit, to create a new flavor profile. The bright, tropical flavors of pineapple complement the coconut, while passion fruit adds a tart, aromatic twist. The substitution keeps the recipe fresh and exciting, especially when certain fruits are in season. The result is a dessert that’s both innovative and delicious. This variation is perfect for experimenting with different fruit combinations. The fresh flavors will keep your taste buds intrigued.
Storing and Bringing It Back to Life
Fridge Storage: Store the truffles in an airtight container in the refrigerator for up to 3 days. The airtight container prevents moisture loss, keeping the truffles firm and flavorful. Before storing, line the container with parchment paper to avoid sticking. The truffles will stay fresh, and the flavors will remain vibrant. This method is ideal for those who want a quick dessert that’s ready to serve. The truffles can be enjoyed anytime within the storage period.
Freezer Friendly: For longer storage, place the truffles on a parchment‑lined tray and freeze until solid. Once frozen, transfer them to a freezer bag or airtight container. They can be kept in the freezer for up to 2 months. When ready to enjoy, let them thaw in the refrigerator for a few hours. The texture remains smooth and creamy, and the coconut coating stays intact. The freezing method is perfect for batch‑making and having a dessert on hand for any occasion. The truffles will still taste fresh and delicious after thawing.
Best Reheating Method: To revive frozen truffles, gently warm them in a bowl of warm water for 5 minutes. This technique steams them back to perfection, restoring the silky interior and crunchy coating. Alternatively, let them sit at room temperature for 10 minutes if they’re only slightly chilled. Adding a tiny splash of water before reheating helps keep the mixture moist and prevents it from drying out. The reheating method ensures the truffles taste as fresh as the day they were made. This trick is a lifesaver for those who need a quick dessert solution.