I was in the middle of a kitchen catastrophe when I realized I could salvage the day. A burnt batch of cookies sat on the counter, the sugar had caramelized into a sticky mess, and my pantry was a battlefield of forgotten ingredients. Yet, in that chaos, my craving for something sweet and comforting surged like a tidal wave. I thought, “If I can turn this mess into a masterpiece, maybe I can impress my friends and myself.” The moment I opened the mango jar and saw those bright, sun‑kissed slices, I knew I had found the secret ingredient that would rescue the night.
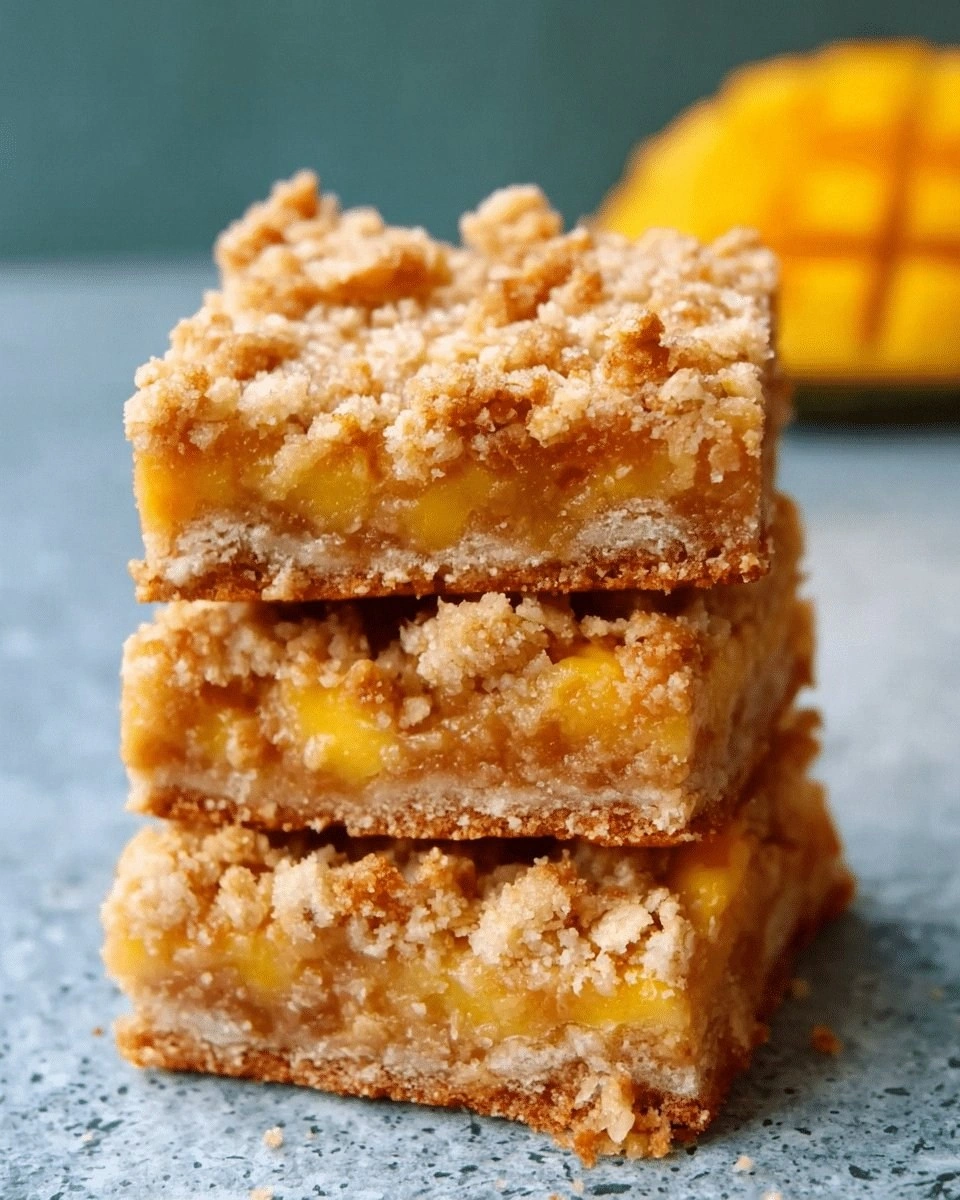
Imagine the aroma: ripe mango, a whisper of cinnamon, and the buttery scent of toasted oats drifting through the kitchen. The sound of the mixer whirring, the clink of the measuring cups, and the gentle sizzle as the butter melts together. The texture feels like a soft, buttery blanket, and the taste is a tropical explosion that balances sweet and subtle spice. The sight of the golden edges just starting to brown in the oven is a promise of crunch and melt. And the first bite? A chewy, caramelized bite that dissolves into a cascade of mango and oat bliss.
This version is different because it takes the humble oatmeal bar and gives it a tropical makeover that feels like a vacation in every bite. I’ve tweaked the crumb to be slightly crisp yet still chewy, added a mango puree that coats the oats like velvet, and introduced a dash of lemon zest to cut through the sweetness. No more dry, cardboard bars; these are moist, flavorful, and have a natural sweetness that doesn’t rely on excess sugar. The result is a bar that satisfies sweet cravings, provides a quick energy boost, and leaves you with that warm, comforting feeling of home.
One secret that most people miss is the use of coconut oil in the crumble topping; it keeps the bars tender and adds a subtle tropical note. I’ll also show you how to fold the mango in a way that maximizes flavor without turning the bars soggy. Trust me, this is hands down the best version you'll ever make at home. So, grab your apron, and let me walk you through every single step—by the end, you'll wonder how you ever made it any other way.
If you’ve ever struggled to balance sweetness and texture in homemade bars, you’re not alone. The trick is to use ingredients that work in harmony and to keep the batter moist without over‑baking. I’ve tested this recipe across different ovens and found it consistently delivers that perfect chewy center with a buttery, lightly crisp edge. The result is a bar that feels indulgent yet wholesome, a real crowd‑pleaser that you can proudly serve at brunch, lunch, or as a midnight snack.
What Makes This Version Stand Out
- Flavor: The mango is the star, but the subtle hint of cinnamon and lemon zest lifts the sweetness to a sophisticated level, creating a complex profile that dances on the palate.
- Texture: The crumb is engineered to be slightly crisp yet chewy, thanks to the balanced ratio of oats to flour and the strategic use of melted butter.
- Ingredient Quality: Using ripe, hand‑picked mangoes ensures natural sweetness that cuts through the richness of the butter and honey.
- Make‑Ahead Potential: These bars freeze well, allowing you to batch‑cook and enjoy them throughout the week without sacrificing flavor.
- Visual Appeal: The golden edges and speckled mango chunks give the bars a rustic, yet elegant look that’s Instagram‑ready.
- Health‑Friendly: The recipe replaces refined sugar with honey and uses oats for fiber, making it a lighter alternative to traditional sweet bars.
- Time Efficiency: From prep to bake, the entire process takes less than an hour, making it a perfect quick‑fix for busy mornings.
- Versatility: The base can be customized with nuts, dried fruit, or spices, turning it into a dessert, snack, or breakfast treat.
What you’re about to see is more than a recipe; it’s a culinary experience that will elevate your snack game. The combination of mango, oats, and a touch of spice creates a harmony that is both comforting and adventurous. The crisp edges are a testament to the precise baking technique, while the mango’s natural sugars keep the bars sweet without overwhelming the palate. I’m about to walk you through each step, so you can replicate this masterpiece in your own kitchen.
Inside the Ingredient List
The Flavor Base
The foundation of these bars starts with the dry mix: rolled oats, all‑purpose flour, ground cinnamon, and a pinch of salt. Oats bring a hearty, nutty flavor that grounds the sweetness of the mango, while flour provides structure. Cinnamon adds a warm, aromatic depth that pairs beautifully with tropical fruit. Salt, though minimal, balances the overall taste, preventing the mango from tasting too cloying.
The Texture Crew
Melted butter, brown sugar, and honey form the moist core that binds everything together. Butter introduces a rich, creamy mouthfeel, while brown sugar offers a caramelized undertone. Honey, with its floral notes, complements the mango and adds a subtle gloss to the crumb. Together, these wet ingredients create a batter that is pliable yet sturdy, allowing the bars to hold their shape during baking.
The Unexpected Star
Ripe mangoes are the unexpected hero in this recipe. When diced into bite‑sized pieces, they release a burst of sweet juice that infuses the batter. The mango’s natural sugars replace the need for excess refined sugar, making the bars lighter. Additionally, the fruit’s fiber content adds a wholesome touch, turning a dessert into a snack that feels nourishing.
The Final Flourish
Optional add‑ons like chopped walnuts and shredded coconut elevate the bars to gourmet status. Walnuts provide a subtle crunch and a nutty aroma, while coconut adds a chewy texture and a hint of tropical flavor. Lemon zest and juice brighten the overall profile, cutting through the richness. These extras can be omitted or swapped to suit dietary preferences or pantry availability.
Everything’s prepped? Good. Let’s get into the real action—where the magic happens and the flavors truly mingle. The process is straightforward, but each step is crucial to achieving that perfect balance of sweet, crunchy, and chewy.
The Method — Step by Step
- Preheat your oven to 350°F (175°C). Line a 9×9‑inch pan with parchment paper, leaving a few inches of overhang on each side for easy lift‑out. Measure out the dry ingredients—oats, flour, cinnamon, and salt—and set them aside in a large bowl. This prep step ensures you won’t be scrambling for items mid‑bake.
- In a separate bowl, combine melted butter, brown sugar, honey, and vanilla extract. Whisk until the mixture is smooth and the sugar has fully dissolved. The butter should be warm but not hot; if it’s too hot, the honey can crystallize and ruin the texture.
- Pour the wet mixture over the dry blend and stir with a wooden spoon until the dough just comes together. It will feel slightly sticky, but that’s normal. This is the moment when the flavors start to mingle—listen for that gentle clink of the spoon against the bowl, a sign that the batter is ready.
- Fold in the diced mangoes, walnuts, and shredded coconut. Be gentle; over‑mixing can cause the mango to break apart, releasing too much juice and making the batter soggy. The goal is even distribution without crushing the fruit.
- Press the dough into the prepared pan using a spatula or the back of a spoon. Make sure the surface is even, as this will help the bars bake uniformly. A light tap on the counter can help settle the mixture and remove any air pockets.
- Bake for 25–30 minutes, or until the edges are golden and a toothpick inserted into the center comes out clean. The aroma of toasted oats and caramelized sugar should fill the kitchen, signaling that the bars are ready.
- Remove from the oven and let the bars cool in the pan for 10 minutes. This resting period allows the crumb to set, making it easier to cut clean slices. After 10 minutes, lift the bars out using the parchment overhang and transfer them to a wire rack.
- Allow the bars to cool completely—about 20 minutes total—before slicing. Use a sharp knife dipped in hot water for clean cuts. Serve immediately, or store in an airtight container for up to five days at room temperature.
That’s it— you did it. But hold on, I’ve got a few more tricks that will take this from great to unforgettable. From adjusting the crumb’s firmness to perfecting the mango’s juiciness, these insights will ensure every batch outshines the last.
Insider Tricks for Flawless Results
The Temperature Rule Nobody Follows
Many bakers set the oven to the highest setting for a quick bake, but the secret is a steady, moderate temperature of 350°F (175°C). This allows the bars to rise gently, ensuring the crumb stays moist. If your oven runs hot, consider placing the pan on a lower rack to reduce direct heat exposure.
Why Your Nose Knows Best
Your sense of smell is a reliable indicator of doneness. As the bars bake, the scent of toasted oats and caramelized sugar intensifies. When the aroma becomes slightly sweet and nutty, it’s a sign that the bars are nearing perfection. Trust your nose—it’s a seasoned judge of flavor.
The 5‑Minute Rest That Changes Everything
After removing the bars from the oven, let them rest on the rack for exactly five minutes before cutting. This brief pause allows the steam to redistribute, preventing the edges from cracking. It also ensures the interior sets, giving the bars a firm yet tender bite.
Keep It Cool, Keep It Crunchy
If you’re storing the bars at room temperature, place them in an airtight container with a paper towel. The towel absorbs excess moisture, keeping the crumb crunchy. Avoid refrigeration unless you plan to eat them within a day, as the cold can soften the texture.
Sweetness Balance
If you prefer a sweeter bar, add a tablespoon of maple syrup or agave nectar to the wet mix. Conversely, reduce the honey by a tablespoon if you’re watching your sugar intake. Adjusting the sweetener ratio allows you to tailor the bars to your taste without compromising structure.
Creative Twists and Variations
Coconut‑Chocolate Fusion
Swap the shredded coconut for dark chocolate chips and sprinkle toasted coconut flakes on top after baking. The chocolate adds a rich depth, while the coconut brings a tropical crunch. This variation is a perfect dessert for chocolate lovers who crave a hint of the tropics.
Spiced Peanut Butter Swirl
Fold in a spoonful of creamy peanut butter and a pinch of cayenne pepper into the batter. The peanut butter provides a nutty base, while the cayenne adds a subtle heat. The result is a savory‑sweet bar that’s an instant crowd‑pleaser at parties.
Berry‑Infused Breakfast Bars
Replace the mango with a mix of fresh blueberries and diced strawberries. Add a splash of lemon juice to brighten the flavor. These bars pair wonderfully with Greek yogurt or a glass of milk for a balanced breakfast.
Savory Herb‑Oat Bars
Omit the honey and replace it with grated Parmesan cheese. Add chopped fresh rosemary and thyme to the dry mix. These bars become a savory snack that pairs nicely with a light salad or soup.
Gluten‑Free Mango Oat Bars
Swap all‑purpose flour for a gluten‑free blend that matches the same volume. Use a gluten‑free oat flour to maintain texture. The bars will stay chewy and flavorful, making them suitable for those with dietary restrictions.
Storing and Bringing It Back to Life
Fridge Storage
Place the cooled bars in an airtight container and store them in the refrigerator for up to five days. The cold keeps the crumb firm and prevents the mango from becoming overly soft. When you’re ready to eat, let them sit at room temperature for a few minutes to soften slightly.
Freezer Friendly
Wrap each bar individually in plastic wrap and place them in a freezer bag. They can be frozen for up to three months without compromising flavor or texture. Thaw overnight in the refrigerator for the best results.
Best Reheating Method
To reheat, place a bar in a microwave‑safe dish and cover with a damp paper towel. Heat on medium for 15–20 seconds, then check for desired warmth. If you prefer a crisp exterior, pop the bar in a preheated oven at 300°F (150°C) for five minutes.