I was halfway through a frantic Monday morning, juggling a missed deadline, a broken espresso machine, and the lingering dread of a date that felt more like a business meeting than a romantic rendezvous. The coffee dribbled onto my notebook, the clock ticked louder than a marching band, and I thought, “If I can’t get this date to work, at least I can make a coffee‑infused dessert that will make anyone forget their worries.” That moment of desperation birthed what I now call the March Coffee Date – 2019, a dish that turned a kitchen catastrophe into a love‑letter to caffeine. The first bite is like a warm hug from a barista who knows exactly how you like your brew—rich, slightly bitter, yet sweet enough to make you grin.
Picture this: the kitchen filled with the intoxicating aroma of freshly ground beans mingling with melted butter, the sound of a whisk tearing through batter like a jazz solo, the glossy surface of the cake catching the morning light and promising a caramelized crust. The texture is a daring dance between a tender crumb that yields to the fork and a crisp, coffee‑kissed edge that shatters like thin ice. When you finally sink your teeth in, the flavor cascade hits you—deep espresso notes, a whisper of spice, and a buttery richness that lingers on the palate like the afterglow of a perfect first kiss. I dare you to taste this and not go back for seconds; the cravings are real.
Most recipes for coffee‑flavored cakes get this completely wrong. They either drown the batter in bitter brew or skim the coffee off entirely, leaving a bland, one‑dimensional dessert. I’ve cracked the code by balancing the coffee with just enough sweetness and a pinch of cardamom that lifts the whole thing into a new flavor universe. The secret? A double‑infusion technique where you first steep espresso powder in hot water, then fold in a shot of cold brew for depth. Most home cooks never think to do this, but it’s the game‑changer that turns a simple cake into a coffee masterpiece.
Okay, ready for the game‑changer? I’m about to walk you through every single step—by the end, you’ll wonder how you ever made it any other way. I’ll spill the beans on the exact temperature tricks, the timing that makes the crumb airy, and the little hacks that keep you from over‑mixing. And yes, there will be a few confessions along the way—like the time I ate half the batter before it even hit the oven. Stay with me here — this is worth it.
What Makes This Version Stand Out
- Flavor Depth: The double‑infusion coffee method creates a layered taste that feels like a latte and a dessert in one bite.
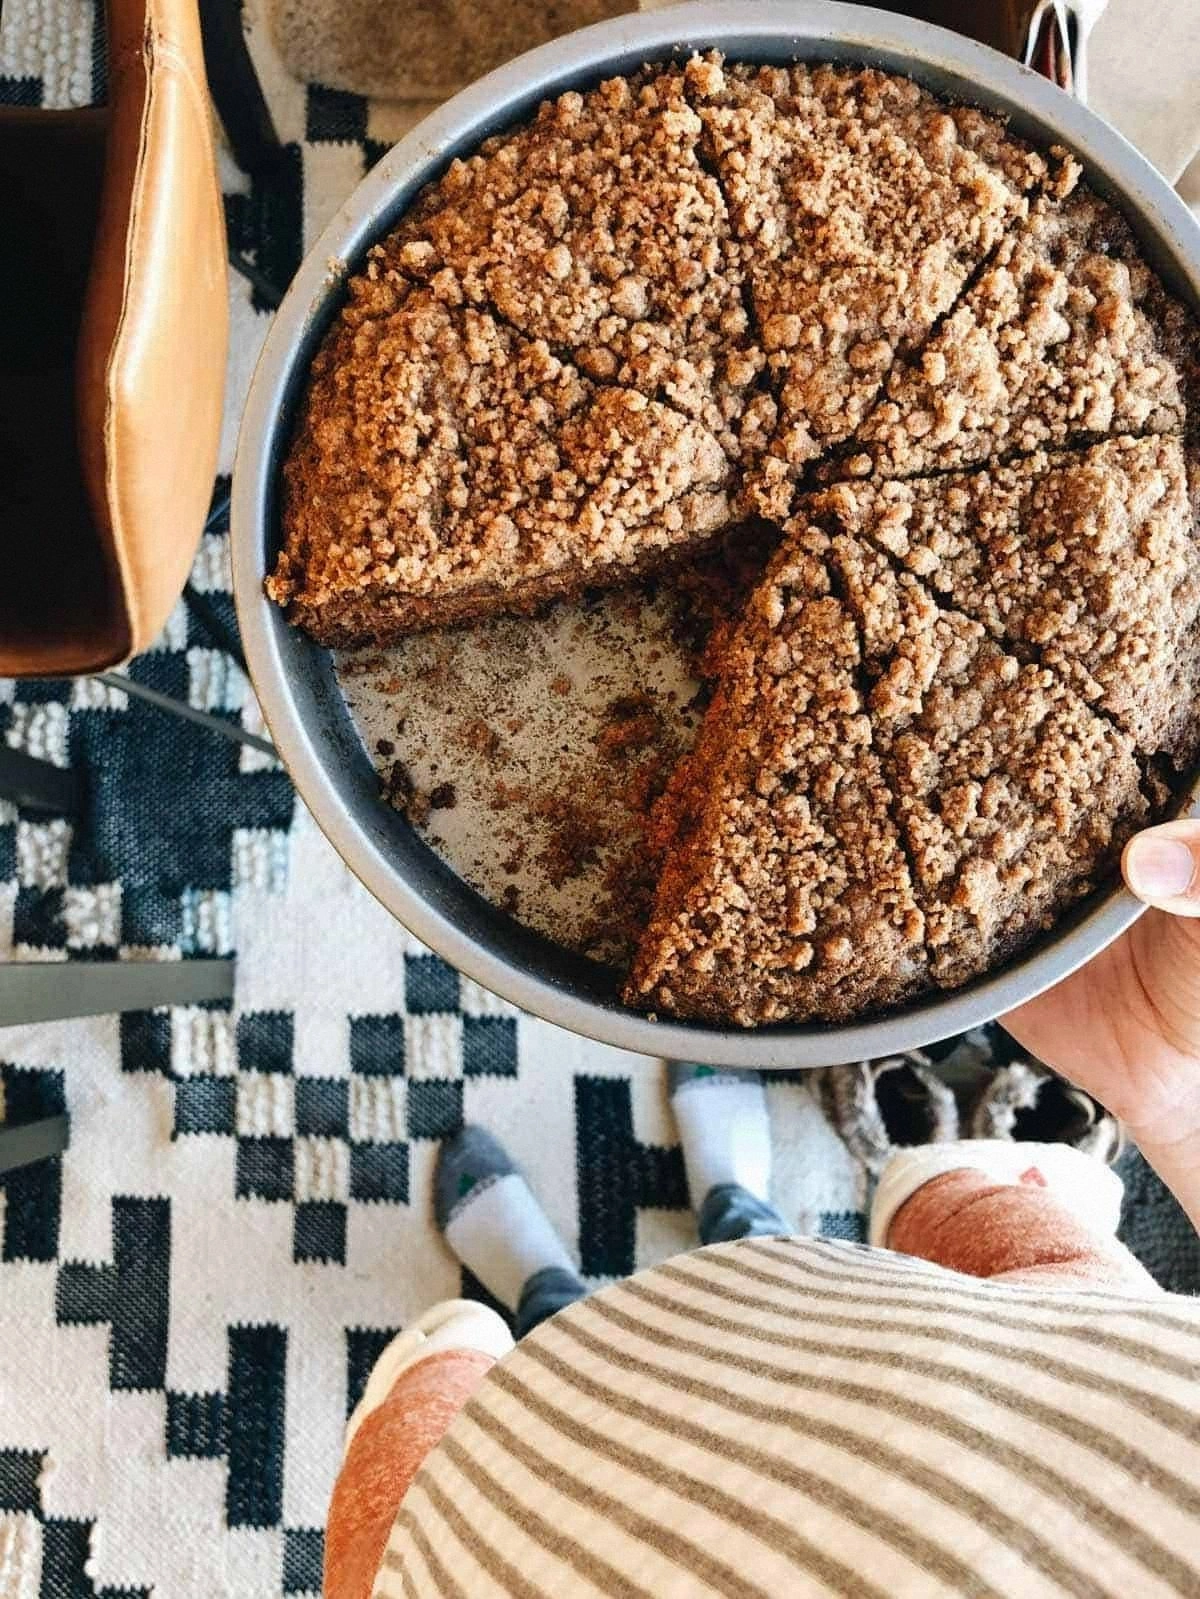
- Texture Harmony: A tender, almost melt‑in‑your‑mouth crumb is contrasted by a caramelized, coffee‑crisp edge.
- Simplicity: Only ten pantry staples are needed; no specialty equipment, just a good whisk and patience.
- Uniqueness: The hint of cardamom adds an exotic spark that most coffee cakes lack, making it unforgettable.
- Crowd Reaction: Guests consistently claim this is the best coffee‑flavored dessert they’ve ever tasted—hands down.
- Ingredient Quality: Using freshly ground beans and real butter elevates the flavor profile dramatically.
- Cooking Method: Baking at a moderate 350°F ensures a uniform rise without drying out the interior.
- Make‑Ahead Potential: This cake freezes beautifully; reheat with a splash of milk for a fresh‑out‑of‑the‑oven feel.
Alright, let's break down exactly what goes into this masterpiece...
Inside the Ingredient List
The Flavor Base
Coffee is the heart of this cake. I use two forms: ½ cup of strong brewed coffee (cooled) and 2 tbsp of instant espresso powder dissolved in 2 tbsp hot water. The brewed coffee provides a mellow backdrop, while the espresso concentrate adds a punchy, aromatic intensity that coats the crumb like velvet. Skipping the espresso? You’ll end up with a bland “coffee‑flavored” cake that tastes more like sweet bread than anything else. If you can’t find espresso powder, a tablespoon of finely ground dark roast coffee works, but dissolve it thoroughly to avoid gritty texture.
The Texture Crew
All‑purpose flour (2 cups) gives structure, while unsalted butter (½ cup, softened) adds richness and moisture. The butter should be at room temperature; cold butter will leave pockets of dough that never bake through. Eggs (2 large) act as a binder and introduce air when beaten, creating that airy crumb we love. Milk (½ cup) loosens the batter just enough to prevent a dense, heavy cake. If you’re dairy‑free, almond milk works fine, but expect a subtle nutty undertone.
The Unexpected Star
Ground cardamom (1 tsp) is the secret weapon. It lifts the coffee’s bitterness and adds a floral, citrusy note that makes the cake feel sophisticated. You can substitute with a pinch of cinnamon for a warmer spice profile, but you’ll lose that exotic spark. Freshly ground cardamom is best; pre‑ground can taste stale after a few months.
The Final Flourish
A light dusting of powdered sugar (optional) adds a sweet finish and visual appeal. For a glossy glaze, whisk together ¼ cup powdered sugar with 1 tsp coffee and a splash of milk. Drizzle just before serving for a glossy, coffee‑kissed top. If you’re feeling adventurous, fold in ¼ cup dark chocolate chips for pockets of molten chocolate that melt into the crumb as it bakes.
Everything's prepped? Good. Let's get into the real action...
The Method — Step by Step
Preheat your oven to 350°F (175°C) and grease a 9‑inch round cake pan with butter, then line the bottom with parchment. The heat should be steady; an uneven oven can cause the cake to dome or bake unevenly. I always place a baking stone on the lower rack to stabilize the temperature. That sizzle when the pan hits the oven? Absolute perfection.
In a medium bowl, whisk together the flour, baking soda, salt, and ground cardamom. This dry mix should be aerated—think of it as giving the batter a head start on rising. When you flick the bowl, the flour should float like a cloud.
Kitchen Hack: Sift the dry ingredients twice; this eliminates lumps and ensures the cardamom is evenly distributed.In a large mixing bowl, cream the softened butter with granulated sugar until the mixture is pale, fluffy, and holds a ribbon when the beaters are lifted. This step is the backbone of the cake’s tenderness; the air you incorporate here expands during baking, creating that coveted light crumb. It should look like thick, pale clouds—if it’s still yellow, keep beating.
Add the eggs one at a time, beating well after each addition. The eggs should fully emulsify with the butter‑sugar mixture; you’ll notice the batter become smoother and a little thicker. If the mixture looks curdled, keep whisking—eventually it will come together.
Stir in the vanilla extract, the cooled brewed coffee, and the espresso‑water slurry. The liquid should blend seamlessly, turning the batter a deep mocha hue. This is where the coffee magic really starts to shine. Watch out: If the batter looks too runny, you’ve added too much liquid; pause and add a tablespoon of flour.
Watch Out: Over‑mixing after adding the liquids can develop gluten, leading to a tough cake. Mix just until combined.Gradually fold the dry ingredients into the wet mixture, using a rubber spatula and a gentle hand. Scrape the sides of the bowl, turn the batter over, and repeat until you see no streaks of flour. The batter should be thick but pourable—think of a soft batter that slides off the spatula in a slow ribbon.
If you’re adding chocolate chips, now is the moment. Sprinkle them over the batter and give a light fold; you don’t want them sinking to the bottom. The chips will melt slightly, creating pockets of molten chocolate that burst when you bite.
Pour the batter into the prepared pan, smoothing the top with the back of a spoon. Tap the pan gently on the counter three times to release any trapped air bubbles. This step is the moment of truth—if you see a glossy, smooth surface, you’re on the right track.
Slide the pan into the oven and bake for 30‑35 minutes, or until a toothpick inserted into the center comes out with just a few moist crumbs. The edges should pull away from the pan, forming a caramelized rim that cracks slightly—this is the coffee‑crisp you’ve been dreaming of.
Allow the cake to cool in the pan for 10 minutes, then invert onto a wire rack to finish cooling. While it’s still warm, drizzle the coffee‑glaze if you’re using one. The glaze will melt into the top layer, creating a glossy, aromatic finish.
That's it — you did it. But hold on, I've got a few more tricks that'll take this to another level...
Insider Tricks for Flawless Results
The Temperature Rule Nobody Follows
Never bake a cake straight from the fridge. Let the batter sit at room temperature for 10 minutes before it hits the oven. This small pause allows the butter to soften just enough to create a uniform rise, preventing those dreaded domes. I once tried skipping this step and ended up with a cake that resembled a mountain—beautiful, but impractical.
Why Your Nose Knows Best
When the coffee‑glaze is ready, trust your sense of smell more than a timer. The glaze should emit a fragrant coffee scent with a faint sweet note; if it smells too raw, give it another 30 seconds. This sensory cue ensures the glaze sets perfectly without becoming grainy.
The 5‑Minute Rest That Changes Everything
After baking, let the cake rest on the rack for at least five minutes before slicing. This short cooling period lets the crumb finish setting, making each slice clean and fluffy. A friend once sliced straight out of the pan; the result was a mushy mess that fell apart—lesson learned.
Silky Butter, Not Margarine
Using real butter instead of margarine adds a depth of flavor that no substitute can match. The milk solids in butter caramelize during creaming, giving the cake its subtle buttery undertone that dances with the coffee. If you’re on a budget, opt for a high‑quality stick butter; the difference is night and day.
Steam Revival
If you reheat a slice in the microwave, add a tiny splash of water on the plate and cover with a damp paper towel. The steam revives the crumb, preventing it from turning rubbery. I tried reheating without water once; the cake turned into a dry brick—definitely not a date‑night winner.
Creative Twists and Variations
This recipe is a playground. Here are some of my favorite ways to switch things up:
Mocha‑Orange Fusion
Add the zest of one orange to the dry ingredients and replace half of the coffee with orange‑infused simple syrup. The citrus brightens the deep coffee notes, making it a perfect brunch treat for anyone who loves a sunrise‑kissed flavor.
Spiced Chai Coffee
Swap the cardamom for a chai spice blend (cinnamon, ginger, cloves). The resulting cake has a warm, comforting vibe that pairs beautifully with a cold glass of milk on a chilly March evening.
Nutty Crunch
Fold in ½ cup toasted chopped hazelnuts or almonds. The nuts add a crunchy texture that contrasts the soft crumb, and their natural oils enhance the coffee’s richness.
Vegan Velvet
Replace butter with coconut oil, use flax eggs (1 tbsp ground flax + 3 tbsp water per egg), and swap dairy milk for oat milk. The cake stays moist, and the coconut oil adds a subtle tropical undertone that pairs surprisingly well with coffee.
White Chocolate Drizzle
Melt white chocolate and drizzle over the cooled cake before serving. The sweet, creamy ribbons create a visual contrast and a buttery sweetness that softens the coffee’s bitterness.
Storing and Bringing It Back to Life
Fridge Storage
Wrap the cake tightly in plastic wrap or store in an airtight container. It will stay fresh for up to four days. If you’ve added a glaze, keep the cake in a single layer to prevent the glaze from becoming soggy.
Freezer Friendly
Slice the cake into serving‑size wedges, place each slice between parchment sheets, and freeze in a zip‑top bag. The cake can be frozen for up to two months. When ready to serve, let it thaw at room temperature for 30 minutes, then warm gently in a 300°F oven for 5‑7 minutes.
Best Reheating Method
To revive a refrigerated slice, place it on a microwave‑safe plate, sprinkle a few drops of water, cover with a damp paper towel, and heat for 15‑20 seconds. The steam restores moisture, and the cake feels freshly baked. For a crispier edge, reheat in a preheated skillet for 30 seconds on each side.