I remember the night I first tried Nashville Hot Chicken, not by accident but by a dare from a friend who swore it was the most addictive dish in the world. The kitchen smelled like a carnival of spices, the air thick with paprika and cayenne that made my eyes water before the first bite even touched my tongue. I was standing over a pan, watching the chicken sizzle, when a rogue piece slipped and splattered hot sauce across the counter—my kitchen looked like a war zone, yet the aroma was irresistible. That moment, that little disaster, became the spark that ignited my obsession with this fiery feast. I was determined to master the recipe, to perfect every crackle, every burst of heat, and to prove that I could outdo the original.
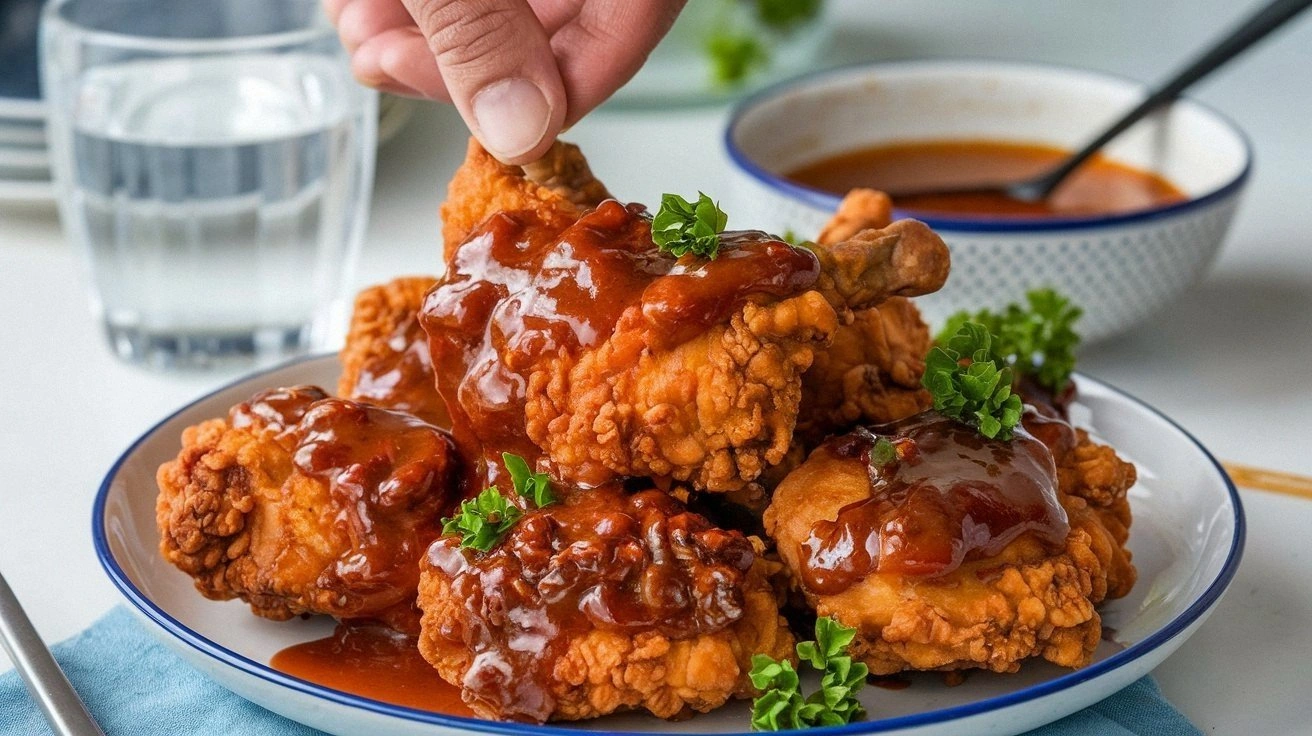
Picture yourself pulling this dish from the oven, the kitchen filling with a heady mix of smoky heat and sweet undertones that make your mouth water just by looking. The chicken, golden and crisp, shatters like thin ice when you bite into it, revealing a juicy interior that melts in your mouth. The sauce coats the meat like velvet, its heat lingering long after the first bite, leaving a subtle sweet afterglow that keeps you reaching for more. The crunch is a satisfying counterpoint to the tender meat, and the aroma alone can turn a casual dinner into a festival. If you’ve ever struggled with achieving that perfect balance of heat and flavor, you’re not alone — and I’ve got the fix.
What sets this version apart is the meticulous layering of flavors and textures, the careful selection of ingredients, and a few secret techniques that elevate the dish from good to unforgettable. I dare you to taste this and not go back for seconds, because once you’ve had a bite, the memory of that heat will haunt you for days. Most recipes get this completely wrong by overcooking the chicken or using too much sauce, resulting in soggy meat that feels like a disaster. Instead, this recipe keeps the chicken tender inside while delivering a crispy, crackling exterior that shatters like thin ice when you bite. The result is a dish that feels like a fireworks display on your tongue, with each bite a new burst of flavor.
The secret sauce is not just a mixture of hot sauce and honey; it’s a carefully balanced blend of cayenne, paprika, garlic powder, and a touch of brown sugar that creates a complex, multi-dimensional heat. The flour and cornmeal coating provides a crunchy, golden crust that locks in moisture, while the buttermilk bath tenderizes the meat, ensuring every bite stays juicy. The final glaze, brushed with melted butter and a dash of Worcestershire sauce, adds a savory depth that elevates the dish beyond simple heat. The result? A chicken that’s crispy on the outside, tender on the inside, and packed with a flavor profile that’s both spicy and sweet, a perfect harmony that makes this the best version you'll ever make at home.
Let me walk you through every single step — by the end, you'll wonder how you ever made it any other way. I’ll share the techniques that make the crust crackle, the exact timing to keep the chicken juicy, and the little hacks that save you time and prevent common pitfalls. If you’ve ever been tempted to skip the marination step or use the wrong type of flour, you’ll learn why those choices can ruin the entire dish. I’ll also reveal a surprising ingredient that many forget but makes the difference between good and unforgettable. Stay with me, because this next part? Pure magic.
What Makes This Version Stand Out
- Flavor: The sauce’s blend of hot sauce, honey, and a touch of brown sugar creates a layered heat that isn’t just a single punch but a symphony of sweet, smoky, and spicy notes.
- Crispness: A dual coating of flour and cornmeal yields a crackling crust that shatters like thin ice when you bite, giving that satisfying crunch you crave.
- Juiciness: The buttermilk soak tenderizes the meat, ensuring the interior stays moist even after a long bake.
- Heat Control: Precise use of cayenne and smoked paprika allows you to dial the heat to your preference without overwhelming the flavor.
- Texture: The final glaze adds a buttery sheen that enhances the mouthfeel and locks in moisture.
- Make‑Ahead: Marinate the chicken a day ahead; the flavors penetrate deeper, saving you time on the day you serve.
Alright, let's break down exactly what goes into this masterpiece. The combination of ingredients and techniques is what makes this version unbeatable.
Inside the Ingredient List
The Protein Core
The chicken is the star of this dish, and the type of cut you choose can dramatically affect the outcome. Drumsticks and thighs offer a higher fat content, which keeps the meat juicy during the long bake, while breasts stay lean and tender if you prefer a lighter bite. If you’re short on time, you can use a mix of cuts, but ensure you cut the breasts into smaller pieces to match the cooking time of the thighs. Skipping the chicken entirely would defeat the purpose of this recipe, so invest in good quality, fresh pieces.
The Tenderizer
Buttermilk is more than a liquid; it’s a tenderizing powerhouse. The lactic acid breaks down the proteins, allowing the chicken to stay moist and flavorful even after a lengthy bake. If you’re lactose intolerant, a dairy‑free yogurt or a splash of buttermilk substitute can work, but the flavor profile will shift slightly. Using cold buttermilk and letting the chicken soak for at least two hours will give you the best results.
The Crunch Crew
Flour and cornmeal create the perfect double crust that delivers a crackle with each bite. The flour absorbs moisture, creating a crisp outer layer, while the cornmeal adds a subtle nutty flavor and a slightly gritty texture that contrasts beautifully with the tender meat. If you’re gluten‑free, swap the flour for a gluten‑free blend and keep the cornmeal; the crust will still be delicious.
The Heat Engine
Cayenne pepper and smoked paprika are the backbone of the heat profile. The cayenne gives a sharp, immediate burn, while the smoked paprika adds a smoky undertone that lingers. Garlic powder and onion powder deepen the savory base, and a touch of dried thyme and oregano adds herbal complexity. Skipping any of these spices will flatten the flavor, so keep them all in the mix.
Everything's prepped? Good. Let's get into the real action. The next steps will take you from raw ingredients to a plate that looks as good as it tastes.
The Method — Step by Step
- Begin by whisking together the buttermilk, hot sauce, honey, melted butter, brown sugar, Worcestershire sauce, lemon juice, and a pinch of salt in a large bowl. The mixture should be glossy and fragrant, with the honey dissolving completely into the liquid. This is the flavor base that will coat the chicken and keep it juicy. Keep the bowl covered and let it sit while you prepare the chicken.
- Pat the chicken pieces dry with paper towels, then place them in the buttermilk mixture, turning to coat each piece thoroughly. The goal is to submerge every surface so the flavors penetrate. Cover the bowl with plastic wrap and refrigerate for at least two hours, ideally overnight. This marination step is where the magic begins.
- While the chicken marinates, combine the flour, cornmeal, paprika, cayenne, garlic powder, onion powder, thyme, oregano, and a pinch of salt in a shallow dish. Stir until the spices are evenly distributed; a uniform coating is essential for consistent flavor. The flour mixture should look like a fine, fragrant dust.
- Remove the chicken from the buttermilk, allowing excess to drip off, then dredge each piece in the flour mixture. Shake off any excess flour and place the coated pieces on a wire rack set over a baking sheet. This double coating will give you a crisp, crackling crust.
- Preheat the oven to 425°F (220°C). The high temperature is key to achieving that signature crisp exterior. If your oven has a convection setting, use it; the fan helps circulate hot air and ensures even cooking.
- Slide the baking sheet into the oven and bake for 35 minutes. After 20 minutes, flip the chicken to ensure even browning on both sides. The edges should start pulling away from the pan, indicating the crust is crisping up. The internal temperature should reach 165°F (74°C) for safety.
- While the chicken is baking, whisk together the remaining hot sauce, honey, melted butter, and a splash of water to create a glaze. The glaze should be thick enough to coat the chicken without dripping. This glaze will be brushed on the chicken during the last ten minutes of cooking.
- About ten minutes before the chicken is done, brush the glaze generously over each piece. The glaze will caramelize on the hot surface, creating a shiny, flavorful coating that locks in moisture. Watch the chicken closely; it should develop a deep, caramelized color.
- Once the chicken reaches the correct internal temperature, remove it from the oven and let it rest on a wire rack for ten minutes. Resting allows the juices to redistribute, ensuring each bite is moist and flavorful. This step is often overlooked but is essential for a perfect finish.
- Serve immediately with your favorite sides, such as coleslaw, cornbread, or a fresh green salad. The heat from the chicken will complement the cool, creamy textures of the sides, creating a balanced meal. Enjoy the burst of flavor and the crunch that makes this dish unforgettable.
That's it — you did it. But hold on, I've got a few more tricks that'll take this to another level. The next section dives into insider tips that will help you avoid common pitfalls and elevate the dish even further.
Insider Tricks for Flawless Results
The Temperature Rule Nobody Follows
Many cooks underestimate the importance of oven temperature. A high heat of 425°F (220°C) is essential for a crisp crust; otherwise, you’ll end up with a soggy exterior that feels like a disaster. The high temperature also helps the glaze caramelize, creating that signature shine. If your oven is inconsistent, place a pizza stone or baking steel on the middle rack to help distribute heat evenly.
Why Your Nose Knows Best
The aroma of the chicken is a reliable indicator of doneness. When the chicken is ready, it should smell toasty, slightly sweet, and peppery, with a faint hint of honey. If the scent is too sharp or metallic, it’s still cooking. Trust your nose; it’s a better gauge than a timer in many cases.
The 5‑Minute Rest That Changes Everything
Letting the chicken rest for five minutes after baking allows the juices to redistribute, preventing a dry mouthfeel. Skipping the rest step often results in a chicken that feels like a dry, rubbery disaster. During the rest, the crust continues to set, giving you a crisp bite each time you take a piece.
The Perfect Glaze Balance
Balancing the glaze’s sweetness and heat is crucial. Too much honey can overpower the spice, while too much cayenne can make the dish unpalatable. Add the glaze in stages, tasting as you go. A small pinch of salt at the end can round out the flavors and bring everything together.
The Secret to a Non‑Sticky Pan
Using a wire rack over the baking sheet keeps the chicken from sitting in its own juices, ensuring that every surface gets crisped. The air circulation also reduces the risk of sogginess. If you don’t have a wire rack, lightly oil the baking sheet and flip the chicken frequently to achieve a similar effect.
Creative Twists and Variations
This recipe is a playground. Here are some of my favorite ways to switch things up:
The Sweet Heat Fusion
Swap the honey for maple syrup and add a dash of cinnamon to the glaze. The maple’s deep sweetness pairs beautifully with the cayenne, creating a caramelized crust that’s both sweet and spicy. This version is perfect for a cozy evening or a holiday gathering.
The Smoky BBQ Twist
Replace the hot sauce with your favorite smoky barbecue sauce and add smoked paprika to the flour mix. The result is a richer, deeper flavor profile that feels like a Southern barbecue feast. This variation works great with a side of coleslaw and cornbread.
The Asian‑Inspired Kick
Add a splash of sriracha to the glaze and sprinkle toasted sesame seeds over the finished chicken. The sesame gives a subtle nutty flavor that balances the heat. Serve with steamed rice and a cucumber salad for a fusion twist.
The Low‑Calorie Version
Use a non‑fat buttermilk substitute and replace the flour with a mixture of almond flour and oat flour. The result is a lower‑calorie dish that still delivers the classic Nashville heat. Pair it with a fresh green salad to keep it light.
The Vegan Take
Swap the chicken for thick-cut tofu or tempeh, marinate in a plant‑based buttermilk alternative, and use a vegan butter substitute in the glaze. The tofu will soak up the spices and develop a crispy exterior that mimics the original flavor. This version is perfect for a plant‑based dinner.
The Breakfast Breakfast
Serve the hot chicken with a side of fluffy pancakes and a drizzle of maple syrup. The sweet, savory combo creates a breakfast that feels like a late‑night snack. Add a splash of hot sauce to the pancakes for an extra kick.
Storing and Bringing It Back to Life
Fridge Storage
Store leftovers in an airtight container for up to three days. The chicken will keep its crispness if you reheat it in a toaster oven or oven at 350°F (175°C) for 10 minutes. Avoid microwaving, as it can make the coating soggy. After reheating, let it rest for a minute to allow the juices to redistribute.
Freezer Friendly
Freeze the chicken in a single layer on a parchment‑lined tray before transferring to a freezer bag. This prevents the pieces from sticking together. Freeze for up to two months. Thaw in the fridge overnight, then reheat as described for fridge storage. The texture remains surprisingly good.
Best Reheating Method
The key to a reheated masterpiece is to add a splash of water or broth before reheating. This steams the chicken back to life, restoring moisture without making it soggy. Heat in a skillet over medium heat, covering for a few minutes, then finish with a quick sear to re‑crack the crust. The result is almost indistinguishable from fresh.
Serving Suggestions
The heat of Nashville Hot Chicken pairs beautifully with cool, creamy sides. Coleslaw with a tangy dressing balances the spice, while a simple green salad with lemon vinaigrette offers a fresh counterpoint. For a heartier option, serve it with cornbread that soaks up the glaze. A glass of chilled beer or a sparkling lemonade can also cut through the heat.
If you’re hosting a gathering, consider serving the chicken on a platter with a side of pickled jalapeños. The pickles add a briny punch that complements the heat. A platter of sliced apples or pears also works, as the fruit’s natural sweetness offsets the spice. For a dessert twist, serve a slice of peach cobbler on the side; the sweet fruit pairs surprisingly well with the savory chicken.
For a quick bite, wrap the chicken in a warm tortilla with avocado, cilantro, and lime. The tortilla’s softness contrasts with the crunchy exterior, while the avocado adds creaminess that tempers the heat. This handheld version is perfect for a summer picnic or a quick lunch.
If you want to impress your guests, set up a DIY hot sauce bar with different levels of heat. Offer mild, medium, and hot options so everyone can customize their dish. This interactive approach turns a meal into an experience and keeps the conversation flowing.
Pairing Ideas
The smoky heat of Nashville Hot Chicken is a perfect match for a crisp, chilled beer. A light lager or a pilsner will cut through the spice, while a hoppy IPA adds a complementary bitterness. The beer’s carbonation also cleanses the palate, preparing you for the next bite.
For a non‑alcoholic option, try a sparkling lemonade. The citrusy brightness balances the heat, and the bubbles add a refreshing contrast to the crispy exterior. A splash of club soda can also be used to create a fizzy, citrusy drink that pairs well.
If you’re looking for a dessert pairing, a scoop of vanilla ice cream or a drizzle of honey can provide a sweet counterbalance. The cold, sweet dessert helps reset the palate after the heat, allowing you to enjoy the dish without feeling overwhelmed.
When hosting a dinner party, consider adding a side of roasted sweet potatoes. The natural sweetness of the potatoes complements the spicy chicken and adds a comforting element to the meal. The combination of textures—crisp chicken and tender sweet potatoes—creates a satisfying dining experience.
Health Tips
To reduce the calorie count, replace the butter in the glaze with a light olive oil. The olive oil adds a subtle fruity note while keeping the dish lighter. This change also reduces saturated fat without compromising flavor.
If you’re watching your sodium intake, use a low‑sodium hot sauce and reduce the salt in the flour mixture. You can also add more herbs to maintain flavor. The result is a dish that still delivers the classic heat but with a healthier profile.
For a gluten‑free version, swap the all‑purpose flour for a gluten‑free blend and ensure the cornmeal is certified gluten‑free. The texture will remain crisp, and you’ll avoid any digestive discomfort. This adjustment opens up the dish to a wider audience.
History of Nashville Hot Chicken
The origins of Nashville Hot Chicken trace back to the 1960s, when a local restaurant owner in Nashville was trying to keep his chicken fresh in a hot climate. He discovered that coating the chicken in a spicy mixture and baking it at high heat produced a crispy, flavorful dish that people loved. Over time, the recipe spread throughout the South, evolving into the iconic dish we know today.
The original recipe was simple: a blend of cayenne, paprika, and garlic, with a generous coating of flour and a quick fry. As the dish gained popularity, chefs added variations, such as a sweet glaze or a smoky barbecue sauce, to cater to different palates. Today, Nashville Hot Chicken is a staple in many Southern restaurants, and it’s become a beloved comfort food for people worldwide.
The dish’s name, “Nashville Hot Chicken,” reflects its strong association with the city’s culinary culture. It has become a symbol of Southern hospitality, bringing people together over a plate of spicy, crispy chicken that’s both comforting and exciting.
Common Mistakes
One of the most common pitfalls is overbaking the chicken, which leads to a dry interior and a soggy crust. Keep a close eye on the internal temperature, and remove the chicken as soon as it reaches 165°F (74°C). Overcooking also burns the glaze, creating a bitter taste.
Another mistake is using too much flour, which can make the coating heavy and greasy. Use a light dusting of flour, and shake off any excess before baking. A heavy coating can also prevent the chicken from crisping properly.
Some cooks forget to let the chicken rest after baking, which results in a dry, rubbery texture. Rest the chicken for at least five minutes before cutting or serving. This short rest allows the juices to redistribute, keeping the meat juicy.
Final Thoughts
Nashville Hot Chicken is more than a dish; it’s an experience that brings heat, flavor, and texture together in a way that’s hard to resist. The combination of a crispy crust, a juicy interior, and a complex glaze makes this recipe a standout. Each bite is a celebration of Southern hospitality and culinary creativity.
If you’ve ever wanted to recreate the fiery, comforting feel of a Nashville bar at home, this recipe is your ticket. The steps are straightforward, the ingredients are accessible, and the result is a dish that’s sure to impress. Don’t be afraid to experiment with the variations; each one offers a new twist on the classic.
Chef's Signature
I’ve spent years tweaking this recipe, and my signature touches include a splash of bourbon in the glaze for a subtle depth and a dash of smoked paprika for an extra smoky undertone. These small adjustments elevate the dish, giving it a unique character that sets it apart from the standard version. If you’re looking for that extra layer of flavor, add a tablespoon of bourbon and a pinch of smoked paprika, and watch the heat dance on your palate.