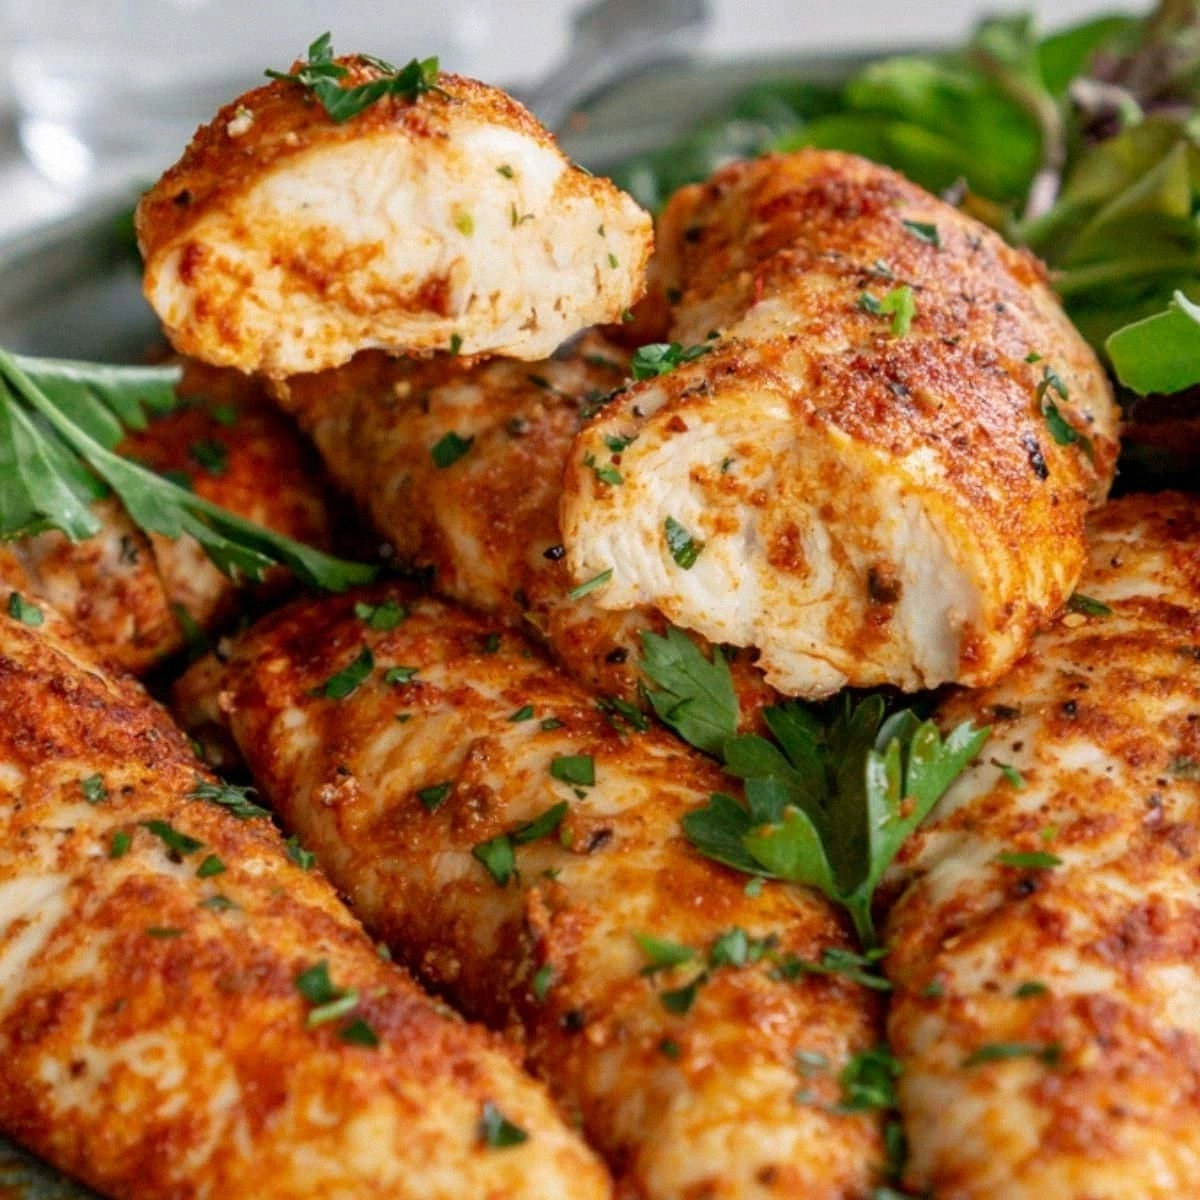
Picture this: you’re standing in a cramped kitchen, the clock ticking, and a sudden craving for something crispy, buttery, and utterly comforting hits you like a bolt of lightning. I was chasing the perfect chicken tenders for a last‑minute dinner, but every recipe I tried seemed to fall flat—either too dry, too greasy, or just plain bland. I decided to throw caution to the wind, grab a pound of chicken breast tenders, and experiment until I found a version that made my taste buds do the salsa. The result? A dish that turns ordinary chicken into a showstopper, with a coating that crackles like thin ice and a tender inside that practically melts in your mouth.
I’ll be honest—when I first tasted the first batch, I ate half the batch before anyone else got a chance. That moment of pure, unadulterated joy was the spark that turned this recipe into a culinary obsession. The aroma that filled the kitchen—rich butter, smoky paprika, and a faint sweetness from brown sugar—was enough to make any skeptic swoon. The sound of the tenders hitting the baking sheet, the sizzle that echoed like applause, and the sight of that golden crust forming in real time made this dish feel like a live performance. If you’ve ever struggled to get chicken tenders that are both crispy and juicy, you’re not alone—and I’ve got the fix.
What sets this version apart is a blend of classic techniques and a few daring twists that elevate the flavor profile to new heights. The buttery coating isn’t just a surface layer; it’s a flavor vehicle that locks in moisture while delivering a crunchy texture that shatters with every bite. The seasoning mix—paprika, garlic powder, onion powder, dried oregano, cayenne pepper, and a touch of brown sugar—creates a balanced harmony of heat, sweetness, and earthiness that dances on your palate. And the finishing touch of fresh parsley adds a pop of color and a fresh, herbal note that cuts through the richness. I dare you to taste this and not go back for seconds.
Most recipes get this completely wrong by over‑browning the coating or under‑seasoning the chicken. Here’s what actually works: a quick butter soak to keep the meat moist, a dry rub that forms a crisp crust, and a final bake at just the right temperature to finish everything off without drying it out. Picture yourself pulling this out of the oven, the whole kitchen smelling incredible, and the table already buzzing with anticipation. Let me walk you through every single step—by the end, you’ll wonder how you ever made it any other way.
What Makes This Version Stand Out
- Flavor: The combination of paprika, garlic, onion, and oregano creates a deep, smoky base that’s both familiar and unexpectedly sophisticated. The subtle sweetness from brown sugar balances the heat, giving each bite a layered experience.
- Texture: The butter coating crisps into a golden shell that crackles like thin ice, while the chicken itself stays moist and tender, thanks to a brief butter soak.
- Ease: With only ten ingredients and a single baking sheet, this recipe is a breeze for busy nights or last‑minute gatherings.
- Versatility: Serve them as a snack, a main course, or a side dish. Pair with dips, salads, or a grain bowl—your imagination is the limit.
- Crowd‑pleasing: The bright, crispy exterior and savory interior make it a hit with kids and adults alike. Even the most skeptical palate will be won over.
- Ingredient Quality: Using fresh parsley and real butter elevates the dish beyond the usual store‑bought mix‑downs.
- Cooking Method: Baking instead of frying reduces mess and calories while still delivering that coveted crunch.
- Make‑Ahead Potential: The tenders can be pre‑seasoned and stored in the fridge for up to 24 hours, saving you time on busy days.
Inside the Ingredient List
The Flavor Base
The core of this recipe is its seasoning blend. Paprika gives a smoky depth that’s reminiscent of a summer barbecue. Garlic powder and onion powder provide a savory backbone, while oregano adds a subtle herbaceous note that ties everything together. If you’re craving a little heat, cayenne pepper steps in to give that fiery kick without overpowering the rest.
The Texture Crew
Butter is the unsung hero that keeps the chicken moist and adds a rich, velvety flavor. The 1/2 cup of unsalted butter is melted and brushed over the tenders before they go into the oven. This step is crucial—without it, the chicken can dry out and the coating won’t adhere as well. A quick dip in the butter also helps the spices cling to the surface, creating a uniform crust.
The Unexpected Star
Brown sugar may seem like a sweet addition, but it plays a pivotal role in caramelizing the coating. The sugar reacts with the butter and spices, forming a glossy, slightly caramelized finish that enhances the overall flavor profile. If you prefer a less sweet version, you can reduce the sugar to 1/2 teaspoon, but the final result will be slightly less complex.
The Final Flourish
Fresh parsley is the final touch that adds a burst of color and a bright, herbal aroma. It’s tossed through the seasoned tenders just before baking, ensuring that the parsley doesn’t wilt or lose its vibrant green hue. If fresh parsley is out of season, dried parsley can be used, but the flavor will be more subdued.
Everything's prepped? Good. Let's get into the real action...
The Method — Step by Step
- Step 1: Prep the Chicken – Begin by patting the chicken breast tenders dry with paper towels. A dry surface ensures the butter and spices will cling properly. I always line a large bowl with a clean towel to keep the tenders from sticking together. If you’re working with a larger batch, separate them with a light dusting of flour to prevent clumping.
- Step 2: Melt the Butter – In a small saucepan over low heat, melt 1/2 cup of unsalted butter until it’s a silky liquid. The butter should be just warm, not boiling, to avoid splattering. Once melted, set it aside to cool slightly, then pour it over the tenders in the bowl. Toss gently to coat each piece evenly.
- Step 3: Whisk the Seasoning Mix – In a separate bowl, combine 1 tablespoon paprika, 2 teaspoons garlic powder, 1 teaspoon onion powder, 1 teaspoon dried oregano, 1/4 teaspoon cayenne pepper, and 1 teaspoon brown sugar. Whisk until the mixture is uniform. This blend will form the flavorful crust that gives the tenders their signature crunch.
- Step 4: Coat the Tenders – Sprinkle the seasoning mix over the butter‑coated tenders. Toss again, ensuring each piece is fully coated. The butter acts as a binder, allowing the spices to stick. If you’re feeling adventurous, add a pinch of salt and pepper to taste, but the blend already has enough depth.
- Step 5: Preheat the Oven – Set your oven to 425°F (220°C). This high temperature is key to achieving a crispy exterior while keeping the inside juicy. Place a wire rack on a baking sheet to allow air circulation around each tender.
- Step 6: Arrange the Tenders – Spread the seasoned tenders in a single layer on the wire rack, leaving a little space between each piece. This spacing ensures even cooking and prevents steaming. If you’re using a larger sheet, rotate the tenders halfway through baking for uniform browning.
- Step 7: Bake to Perfection – Slide the sheet into the preheated oven and bake for 18-20 minutes. The tenders should reach an internal temperature of 165°F (74°C). The coating will turn a beautiful golden brown, and the edges will start pulling away, indicating crispness. Keep an eye on them; the exact time can vary based on your oven.
- Step 8: Finish with Fresh Parsley – Remove the tenders from the oven and immediately sprinkle 2 tablespoons of fresh parsley over them. The heat will release the parsley’s bright aroma while preserving its color. Toss lightly to distribute the parsley evenly.
- Step 9: Rest and Serve – Let the tenders rest for 3-4 minutes before serving. This short rest allows the juices to redistribute, ensuring each bite stays moist. Plate them with your favorite dipping sauce or a simple squeeze of lemon for a burst of freshness.
- Step 10: Enjoy the Results – Dig in and savor the contrast between the crunchy, buttery crust and the tender, juicy meat inside. The combination of flavors will have your taste buds dancing, and your guests will be asking for the recipe right away.
That's it — you did it. But hold on, I've got a few more tricks that'll take this to another level. These insider tips are what turn a good recipe into a great one.
Insider Tricks for Flawless Results
The Temperature Rule Nobody Follows
Many cooks bake at 400°F, but that can lead to uneven browning. Baking at 425°F gives the tenders a crisp exterior while preventing the interior from drying out. If your oven runs hot, reduce the temperature by 25°F and add a few extra minutes of baking time.
Why Your Nose Knows Best
Smell the butter as it melts. It should emit a rich, buttery aroma without turning golden. If it starts to brown, lower the heat immediately. The scent is a reliable indicator that the butter is at the right temperature for coating.
The 5-Minute Rest That Changes Everything
Letting the tenders rest after baking allows the juices to redistribute. A quick 5-minute pause means each bite stays moist and flavorful, preventing the meat from drying out when you cut into it.
Keep the Parsley Fresh
Fresh parsley not only adds color but also a bright, herbal note. Toss the parsley in a little olive oil before sprinkling to prevent wilting and to lock in the vibrant green.
Use a Wire Rack for Even Cooking
A wire rack elevates the tenders, allowing hot air to circulate around each piece. This promotes even browning and crisping on all sides, ensuring a consistent finish.
The Quick Dip Trick
If you’re in a hurry, a 30-second dip in melted butter after seasoning will help the spices cling better. The butter’s fat content creates a barrier that locks in moisture and flavor.
Creative Twists and Variations
This recipe is a playground. Here are some of my favorite ways to switch things up:
Honey Mustard Glaze
Swap the brown sugar for honey and add 1 tablespoon of Dijon mustard to the coating. The result is a sweet‑savory glaze that pairs beautifully with a tangy yogurt dip.
Spicy Cajun Kick
Replace the paprika with Cajun seasoning and increase the cayenne pepper to 1/2 teaspoon. This version delivers a bold, spicy profile that’s perfect for heat lovers.
Mediterranean Herb Blend
Add 1 teaspoon of dried thyme and 1 teaspoon of dried basil to the spice mix. The herbs give the tenders a fragrant, Mediterranean vibe that pairs well with a lemon‑olive oil drizzle.
Cheesy Parmesan Finish
Sprinkle 1/4 cup of grated Parmesan over the tenders before baking. The cheese melts into a golden crust that adds a nutty depth to every bite.
Crispy Coconut Crunch
Coat the tenders in a mixture of shredded coconut and a dash of sea salt before baking. The coconut adds a tropical crunch that’s surprisingly complementary to the savory spices.
Asian-Inspired Soy Glaze
Mix 1 tablespoon of soy sauce with 1 teaspoon of sesame oil and brush over the tenders after baking. This glaze gives a savory, umami finish that’s great with a side of steamed rice.
Storing and Bringing It Back to Life
Fridge Storage
Place leftover tenders in an airtight container and refrigerate for up to 3 days. The coating may lose some crispness, but they’ll still taste great. Store them in a single layer to maintain texture.
Freezer Friendly
To freeze, let the tenders cool completely, then arrange them on a baking sheet in a single layer. Freeze until solid, then transfer to a freezer bag. They’ll keep for up to 2 months. When ready to use, bake at 425°F for 12-15 minutes until heated through.
Best Reheating Method
Reheat in a preheated oven at 375°F for 8-10 minutes. Add a splash of water to the baking sheet to create steam, which keeps the tenders moist and helps restore the crispness of the coating. Avoid microwaving, as it can make the coating soggy.