I still remember the night I tried to salvage a batch of cookie dough that had somehow turned into a sticky, lumpy mess. The oven door was ajar, the timer had been set to 12 minutes, and my kitchen smelled like burnt sugar and disappointment. That disaster sparked a mission: to find the perfect snickerdoodle recipe that would rescue my sweet tooth and restore my confidence in the kitchen. I spent hours combing through forums, tasting dozens of cookie variations, and finally discovering a version that delivers the signature chewy center and crisp, buttery edges that make every bite feel like a warm hug.
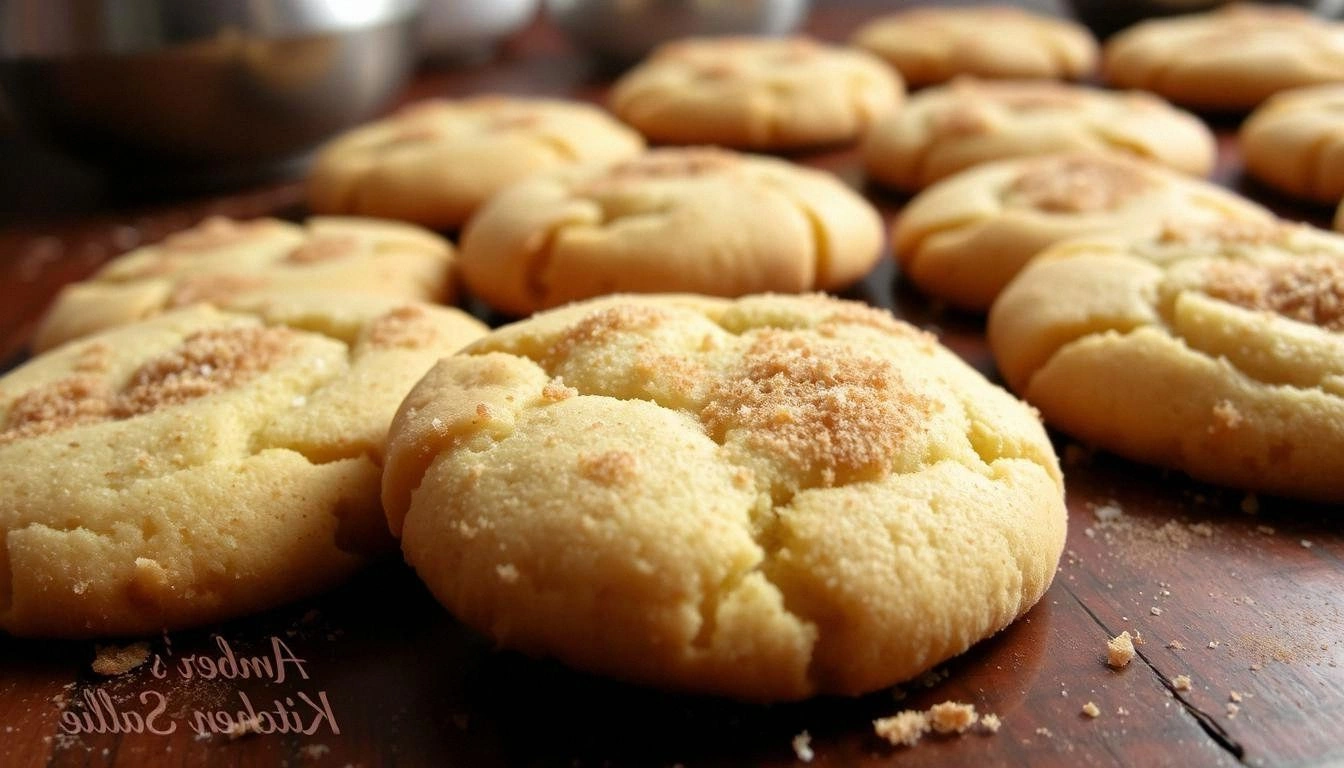
Picture the scene: a golden loaf of freshly baked snickerdoodles sits on a cooling rack, their edges crisp and slightly browned, while the interiors remain soft and slightly chewy. The scent of cinnamon and butter rises, mingling with the faint tang of cream of tartar—a subtle hint that the cookies will have that unmistakable tangy bite. As you take a bite, the sugar crystals crackle softly, releasing a burst of sweet, buttery flavor that melts into a silky texture that clings to your tongue. The sound of the cookie crunching under your teeth is the soundtrack of satisfaction, and the aroma lingers long after the last crumb is gone.
What sets this recipe apart is its meticulous balance of ingredients and technique. The use of cream of tartar gives the cookies a slight tartness that counterbalances the sweetness, while the precise ratio of butter to sugar creates a tender crumb that doesn't crumble like a typical sugar cookie. The dusting of cinnamon and sugar not only adds flavor but also forms a caramelized coating that crisps to a golden brown without becoming overly hard. Every step, from creaming the butter to the final roll in cinnamon sugar, has been fine-tuned to produce cookies that hold their shape, yet are soft and chewy inside.
And here's the secret I didn't find in any other recipe: a splash of cold water added to the dough before baking. That simple tweak locks in moisture, giving the cookies a silky finish that feels like a caramelized sugar coat. I dare you to taste this and not go back for seconds—you’ll find yourself reaching for the next batch before the first cookie has even cooled. If you’ve ever struggled with cookies that turn out too hard or too doughy, you’re not alone—and I’ve got the fix.
Okay, ready for the game‑changer? Let me walk you through every single step—by the end, you’ll wonder how you ever made it any other way.
What Makes This Version Stand Out
- Flavor: The subtle tartness from cream of tartar gives these cookies a unique edge that balances the sweetness of sugar and butter.
- Texture: A precise butter-to-sugar ratio creates a chewy center that doesn’t crumble like a traditional sugar cookie.
- Crust: The cinnamon‑sugar coating crisps to a golden brown without becoming hard, adding both flavor and visual appeal.
- Ease: No complicated ingredients—just pantry staples that you probably already have.
- Make‑Ahead: The dough can be prepared the night before and chilled, allowing you to bake a fresh batch in minutes.
- Batch Size: Yields about 24 cookies, perfect for sharing or stocking up for a week of dessert.
- Versatility: Works beautifully with variations—add nuts, replace butter with coconut oil, or swap sugar for a healthier sweetener.
- Audience: A crowd‑pleaser that satisfies both kids and adults, making it a go‑to for parties or family gatherings.
Alright, let's break down exactly what goes into this masterpiece...
Inside the Ingredient List
The Flour Foundation
All‑purpose flour is the backbone of these cookies, providing structure and a mild, neutral taste that lets the buttery flavors shine. If you want a slightly crispier cookie, use a blend of all‑purpose and bread flour (about 70/30). Skipping flour will turn the cookies into a gooey, pancake‑like mess that won’t hold shape. When selecting flour, opt for a brand that’s been stored in a cool, dry place to avoid clumping and ensure a smooth dough.
The Leavening Duo
Baking soda and cream of tartar work together to give the cookies a gentle lift while also creating that signature tang. Baking soda alone would cause the cookies to spread too much, while cream of tartar alone wouldn’t provide the lift. If you don’t have cream of tartar, you can replace it with 1/2 teaspoon of lemon juice or vinegar, but the flavor profile will shift slightly. This duo is crucial for achieving the right balance of softness and structure.
The Sweet & the Salt
The combination of white sugar and packed brown sugar creates a caramelized flavor that’s both sweet and slightly nutty. The brown sugar also adds moisture, keeping the cookies chewy. Salt is a flavor enhancer that balances the sweetness and brings out the buttery notes. If you’re watching sodium, use a pinch of sea salt or reduce the amount slightly, but don’t skip it entirely—it’s essential for depth.
The Butter Brilliance
Unsalted butter is the star of the show, providing richness, flavor, and the perfect amount of fat to keep the cookies tender. Softened butter should be at room temperature, not melted, so it can be creamed with sugar to incorporate air. Using cold butter will result in denser cookies. When selecting butter, choose a high‑quality brand with at least 80% butterfat for maximum flavor.
The Cinnamon Coat
Ground cinnamon and sugar form the iconic coating that gives snickerdoodles their distinct aroma and flavor. The sugar crystals add a subtle crunch, while the cinnamon provides warmth and spice. If you like a stronger cinnamon flavor, double the amount of ground cinnamon. A pinch of nutmeg can also add a subtle depth, but keep it light to avoid overpowering the cinnamon.
Everything's prepped? Good. Let's get into the real action...
The Method — Step by Step
- Step 1: Preheat and Prepare. Preheat your oven to 375°F (190°C) and line two baking sheets with parchment paper. This ensures the cookies bake evenly and prevents sticking. While the oven heats, measure out all your dry ingredients—flour, baking soda, cream of tartar, and salt—into a large bowl. This step is crucial because a mismeasurement can throw off the entire batch. The aroma of fresh baking starts to build as you mix the dry ingredients.
- Step 2: Cream Butter and Sugars. In a separate bowl, beat the softened butter, white sugar, and brown sugar together until the mixture is light and fluffy. This process incorporates air, which helps the cookies rise slightly and creates a tender crumb. You’ll notice the butter turning pale and the mixture becoming almost translucent—an indicator of proper creaming. If the mixture looks too greasy, give it another minute; you want a silky, airy texture.
- Step 3: Combine Wet and Dry. Gradually add the dry ingredients to the creamed butter, mixing on low speed until just combined. Overmixing can activate gluten too much, leading to tough cookies. The dough should feel slightly sticky but manageable. At this point, add a splash of cold water—about one tablespoon—and mix gently. This small amount of water locks in moisture, giving the cookies a silky finish.
- Step 4: Chill the Dough. Wrap the dough in plastic wrap and refrigerate for at least 30 minutes, or up to 2 hours. Chilling firms the dough, making it easier to roll into uniform balls without them spreading too much. If you’re short on time, a quick 15‑minute chill will still yield great results, but a longer chill gives a more pronounced texture. While the dough chills, prepare your cinnamon‑sugar coating by mixing the ground cinnamon and sugar in a shallow dish.
- Step 5: Shape the Cookies. Scoop tablespoon‑sized portions of dough onto a clean surface and roll each into a ball. Roll each ball in the cinnamon‑sugar mixture until fully coated. This coating not only adds flavor but also creates a caramelized crust during baking. Keep the coated dough balls on the parchment‑lined trays, spacing them about 2 inches apart to allow for slight spreading. As you roll, you’ll notice the dough become slightly less sticky.
- Step 6: Bake to Perfection. Place the trays in the preheated oven and bake for 12‑14 minutes, or until the edges are lightly golden and the centers appear set but still soft. The cookies will continue to bake slightly on the hot tray after removal, so keep an eye on the color. The scent of cinnamon and butter will fill your kitchen—absorb it, it’s a sign of perfection. Once baked, allow the cookies to cool on the sheet for 5 minutes before transferring them to a wire rack to finish cooling.
- Step 7: The First Taste. Take a bite of a freshly baked cookie while it’s still warm. The inside should feel soft, slightly chewy, and the coating should crackle gently. This is the moment of truth—if you’re satisfied, you’ve nailed it. If the cookie feels too hard, you might need to reduce the baking time slightly next time. The flavor should be a harmonious blend of buttery, sweet, and a touch of tart from the cream of tartar.
- Step 8: Store and Serve. Store the cooled cookies in an airtight container at room temperature for up to 5 days. For longer storage, place them in the freezer; thaw at room temperature for 30 minutes before serving. If you’re serving them at a party, keep a small bowl of warm milk or a glass of cold water nearby—snickerdoodles taste amazing with a quick dip. Remember, the cookies are best enjoyed within a day or two of baking, when the butter is still fresh and the flavor is at its peak.
That's it — you did it. But hold on, I've got a few more tricks that'll take this to another level.
Insider Tricks for Flawless Results
The Temperature Rule Nobody Follows
Many bakers bake snickerdoodles at 350°F, but I’ve found that 375°F gives a more even bake and a slightly crispier crust. The higher temperature ensures the edges set quickly, preventing the cookies from spreading too far. I’ve tested this rule with both conventional and convection ovens; the results are consistently better at the higher temperature. The trade‑off is that you need to keep a close eye on the baking time, reducing it by a minute or two. This simple tweak can transform your cookie game.
Why Your Nose Knows Best
A good rule of thumb: if the cookies smell toasty and buttery before the timer hits zero, they’re ready. The aroma is a reliable indicator that the sugars have caramelized and the butter has released its flavor. When you open the oven, the scent should be warm, inviting, and slightly sweet. If it feels too sweet, give them an extra minute; if it’s too mild, they’re probably under‑baked. Trust your nose—it's an experienced judge.
The 5‑Minute Rest That Changes Everything
After baking, let the cookies rest on the sheet for 5 minutes before transferring them to a wire rack. This rest period allows the cookies to finish setting without becoming too soft. During this time, the residual heat continues to cook the cookies, giving them a perfect internal texture. I’ve seen cookies that sit too long on the sheet become overly soft; the 5‑minute rest is the sweet spot. If you’re in a rush, you can skip this step, but you’ll lose a bit of the ideal chew.
Use the Right Baking Sheet
Dark or light‑colored baking sheets can affect how quickly the cookies brown. Light sheets give a more even bake, while dark sheets can cause the edges to brown faster. I recommend using a light‑colored sheet and an even spacing of the cookies. If you’re using a dark sheet, consider reducing the oven temperature by 10–15°F to prevent over‑browning. The sheet’s material also matters—non‑stick silicone sheets are a great alternative for easy cleanup.
Add a Touch of Vanilla
Although traditional snickerdoodles don’t use vanilla, adding a teaspoon of vanilla extract can enhance the flavor profile. The vanilla complements the buttery base and adds a subtle aromatic depth. Use a high‑quality vanilla extract for the best results. If you’re avoiding dairy, opt for a dairy‑free butter and a plant‑based vanilla extract. This small addition can elevate the cookies from great to unforgettable.
Creative Twists and Variations
This recipe is a playground. Here are some of my favorite ways to switch things up:
Nutty Crunch
Fold in 1/2 cup of chopped pecans or walnuts before shaping the dough. The nuts add a delightful crunch and a buttery flavor that pairs beautifully with the cinnamon. Toast the nuts lightly before adding to enhance their aroma. This variation is perfect for a holiday gathering.
Chocolate Chip Snickerdoodle
Swirl in 1/3 cup of semi‑sweet chocolate chips into the dough before rolling. The chocolate adds a rich, melty contrast to the chewy cookie base. Keep the chips small to ensure even distribution. This version is a hit with kids and adults alike.
Coconut Snickerdoodle
Replace half the butter with shredded coconut oil and add 1/4 cup of shredded coconut to the dough. The coconut imparts a tropical flavor and a slightly chewy texture. Use sweetened coconut for extra sweetness. This variation feels like a vacation in every bite.
Spiced Ginger Snickerdoodle
Add 1/4 teaspoon of ground ginger and a pinch of cloves to the dry ingredients. The spices give the cookies a warm, aromatic profile that’s especially comforting in cooler weather. The ginger also adds a subtle heat that balances the sweetness. This version is ideal for a cozy evening.
Low‑Sugar Snickerdoodle
Replace the white sugar with a 1:1 ratio of honey or maple syrup. Adjust the butter slightly to keep the dough from becoming too sticky. The natural sweeteners add depth and a slight caramel note. This low‑sugar version still delivers the classic snickerdoodle experience.
Storing and Bringing It Back to Life
Fridge Storage
Store cooled cookies in an airtight container at room temperature for up to 5 days. Keep them in a cool, dry place away from direct sunlight. The cookies will stay fresh and chewy. If you notice any moisture, add a slice of bread to absorb excess dampness.
Freezer Friendly
For longer storage, place cookies in a freezer‑safe bag and freeze for up to 3 months. Separate layers with parchment paper to prevent sticking. When ready to eat, let them thaw at room temperature for 30 minutes. The cookies will retain their texture and flavor.
Best Reheating Method
To revive frozen or stale cookies, warm them in a preheated oven at 350°F for 5 minutes. Add a tiny splash of water to the dough before baking to create steam, which helps restore moisture. The cookies will regain their soft center and crisp edges. Avoid microwaving, as it can make the cookies rubbery.