I was standing in my kitchen, staring at a half‑cooked chicken breast and a wilted head of broccoli, when my friend texted me, “I dare you to make something tasty with these leftovers.” My brain went into overdrive, and I decided to turn the disaster into a culinary triumph. The idea of crunchy, cheesy nuggets that could rescue a forgotten dinner was too delicious to ignore. That night, I was determined to create the ultimate version of this dish, and I’ve been bragging about it ever since.
Picture the scene: the sizzling sound of olive oil hitting the pan, the bright green florets steaming in a gentle cloud of steam, and the faint aroma of roasted chicken drifting through the air. My eyes were glued to the screen as I measured out breadcrumbs, whisked an egg, and shredded cheddar with a flourish. The kitchen lights flickered, the timer beeped, and the first golden nugget hit the countertop like a tiny, crispy comet. I could almost taste the buttery crunch, the melt‑in‑your‑mouth cheese, and the subtle tang of the broccoli. The moment was electric, and I knew I was onto something special.
What makes this version stand out is that it’s not just a recipe; it’s a revelation. The chicken is already cooked, so you can rescue a day‑old roast or a quick stir‑fry. The broccoli adds a fresh, slightly bitter counterpoint that balances the richness of the cheese. The breadcrumb coating is crisp yet tender, thanks to a splash of olive oil that gives it a glossy sheen. And the best part? It’s so simple that even a kitchen novice can whip it up in under an hour. I dare you to taste this and not go back for seconds.
I’ll be honest — I ate half the batch before anyone else got a chance to try it. Most recipes get this completely wrong, but here’s what actually works: the right balance of moisture, the perfect crunch, and a flavor profile that sings. Picture yourself pulling these nuggets out of the oven, the whole kitchen smelling incredible, and the kids begging for seconds. The next part? Let me walk you through every single step — by the end, you’ll wonder how you ever made it any other way.
Before we dive in, let’s talk about why this version is hands down the best you’ll ever make at home. It’s quick, it’s versatile, and it turns leftovers into a gourmet snack. The method is straightforward, the ingredients are pantry staples, and the result is a dish that feels like a treat. If you’ve ever struggled to make a healthy, kid‑friendly meal, you’re not alone — and I’ve got the fix. Now, let’s break down exactly what goes into this masterpiece.
What Makes This Version Stand Out
- Taste: The mild cheddar melts into a velvety interior while the breadcrumbs provide a satisfying crunch that coats each nugget like a golden shell.
- Texture: The combination of cooked chicken and broccoli creates a moist center, and the olive oil gives the coating a glossy finish that shatters like thin ice when you bite.
- Simplicity: No complex sauces or lengthy prep. Just a handful of pantry staples and a few minutes of hands‑on time.
- Uniqueness: The inclusion of broccoli adds a nutritional punch and a subtle bitterness that balances the richness of the cheese.
- Crowd Reaction: Parents love the quick prep, kids love the crunch, and even the picky eaters who usually avoid veggies will beg for more.
- Ingredient Quality: Using whole wheat breadcrumbs or panko gives a hearty bite, and the olive oil adds depth without overpowering.
- Cooking Method: Baking at 400°F ensures a uniform crisp while keeping the interior tender, unlike deep frying or pan‑frying.
- Make‑ahead Potential: These nuggets can be assembled ahead of time, frozen, and baked when you’re ready, saving you precious minutes on busy nights.
Inside the Ingredient List
The Flavor Base
The chicken is the heart of this dish. It provides a savory backbone that keeps the nuggets satisfying. A cup of cooked chicken breast, whether from a rotisserie or a quick pan‑sauté, infuses the mixture with a deep, umami flavor that carries through the crisp coating. If you skip the chicken, the nuggets lose their protein punch and become more like a vegetable snack. For a richer taste, season the chicken with a pinch of smoked paprika before shredding. This adds a subtle smokiness that complements the mild cheddar. A good rule of thumb: use chicken that’s already seasoned, or add a dash of salt and pepper during shredding to keep the flavor balanced.
The broccoli brings a bright, slightly bitter edge that cuts through the richness. A cup of florets is just enough to add texture without overpowering the chicken. Steaming the broccoli until it’s just tender preserves its vibrant green color and ensures it stays crisp after baking. If you prefer a milder taste, blanch the florets in salted water for 1–2 minutes before adding them to the mix. This technique keeps the broccoli’s bright color and prevents it from releasing too much water during baking. Skipping the broccoli turns the nuggets into plain chicken bites, which are still tasty but lack the nutritional boost.
The Texture Crew
Whole wheat breadcrumbs or panko form the crunchy exterior that people love. A half cup of breadcrumbs is enough to coat each nugget with a thin, crisp shell. Panko, with its airy structure, gives a lighter crunch, while whole wheat offers a denser bite. If you’re watching your carb intake, swap panko for almond flour, but keep in mind the texture will change slightly. The egg acts as a binder, holding the mixture together and helping the breadcrumbs adhere. One egg is enough to bind a cup of chicken and broccoli, preventing the nuggets from falling apart in the oven. If you’re vegan, whisk a tablespoon of aquafaba or use a flaxseed mixture as a substitute.
The mild cheddar cheese adds a creamy, melty layer that contrasts beautifully with the crisp coating. A quarter cup of shredded cheddar is the sweet spot: enough to create a gooey center without drowning the other flavors. The cheese also contributes a subtle nutty note that enhances the overall taste. If you’re looking for a different flavor profile, try pepper jack or gouda for a bit more heat or a buttery finish. Skipping the cheese makes the nuggets less indulgent, but you can still enjoy the savory crunch of chicken and breadcrumbs.
The Unexpected Star
Olive oil is the secret to that glossy, mouth‑watering finish. One teaspoon is all you need to give the coating a beautiful sheen and a subtle, fruity flavor. Drizzling the oil over the mixture before baking helps the breadcrumbs brown evenly and prevents them from drying out. If you’re trying to reduce calories, replace olive oil with a light spray of cooking oil or a tablespoon of melted butter for a richer taste. The oil also helps the cheddar melt smoothly, creating a silky interior that contrasts with the crunchy exterior. Skipping the oil results in a drier coating that may not crisp up as well.
The Final Flourish
The final flourish is all about timing and temperature. Baking at 400°F ensures the nuggets develop a golden crust while keeping the inside tender. The 30‑minute cook time allows the cheese to melt fully and the breadcrumbs to crisp to perfection. If you’re in a rush, you can increase the temperature to 425°F, but keep a close eye on the nuggets to avoid burning. The key is to let the nuggets rest for a minute after baking; this allows the cheese to set and the coating to firm up. Once you remove them from the oven, the aroma will fill the kitchen and the anticipation will be almost too much to handle.
Everything's prepped? Good. Let's get into the real action.
The Method — Step by Step
- Preheat your oven to 400°F (200°C) and line a baking sheet with parchment paper. The high heat is essential for achieving that coveted golden crust. Let the sheet sit in the oven while you assemble the nuggets to keep everything warm. This step saves you from waiting for the oven to preheat later. The aroma of baking will already start to entice your family.
- In a large mixing bowl, combine the shredded chicken, steamed broccoli florets, and shredded cheddar. Toss them together until the vegetables and protein are evenly distributed. The mixture should feel slightly moist but not watery; the egg will bind it later. If the mixture feels dry, add a splash of milk or a teaspoon of water to help the crumbs adhere. The key is to keep the texture uniform so each nugget cooks evenly.
- Beat the egg in a small bowl until it’s smooth and pour it over the chicken‑broccoli mixture. Stir quickly to coat everything evenly. The egg is the glue that keeps the nuggets intact during baking. A well‑mixed egg ensures that the breadcrumbs stick without clumping. If you’re vegan, whisk a tablespoon of aquafaba as a substitute.
- Add the breadcrumbs or panko to the bowl, and sprinkle the olive oil on top. Gently fold the mixture until the breadcrumbs are fully coated and the oil is evenly distributed. The oil is the secret to that glossy finish and helps the breadcrumbs brown beautifully. If the mixture feels too loose, add a bit more breadcrumbs; if it’s too dry, drizzle a few more drops of oil.
- Using a tablespoon, scoop portions of the mixture and form them into bite‑size nuggets. Place each nugget on the prepared baking sheet, spacing them about an inch apart so the heat can circulate. The uniform size ensures even cooking and a consistent crunch. If you’re short on time, you can press the mixture into a shallow pan, chill it for 10 minutes, then cut into squares.
- Bake for 20 minutes, then flip each nugget over and bake for an additional 10 minutes until the coating is golden brown and the cheese is melted. The flipping step ensures both sides crisp up evenly. Keep an eye on the nuggets as they near the end; the cheese can brown quickly. The result will be a satisfying crunch on every bite.
- Remove the nuggets from the oven and let them rest for 2 minutes. This resting period allows the cheese to set, preventing a gooey mess when you bite. The crust will firm up slightly, making each bite more satisfying. The rest also lets the flavors meld together, creating a harmonious taste. While they rest, you can plate them with a dipping sauce of your choice.
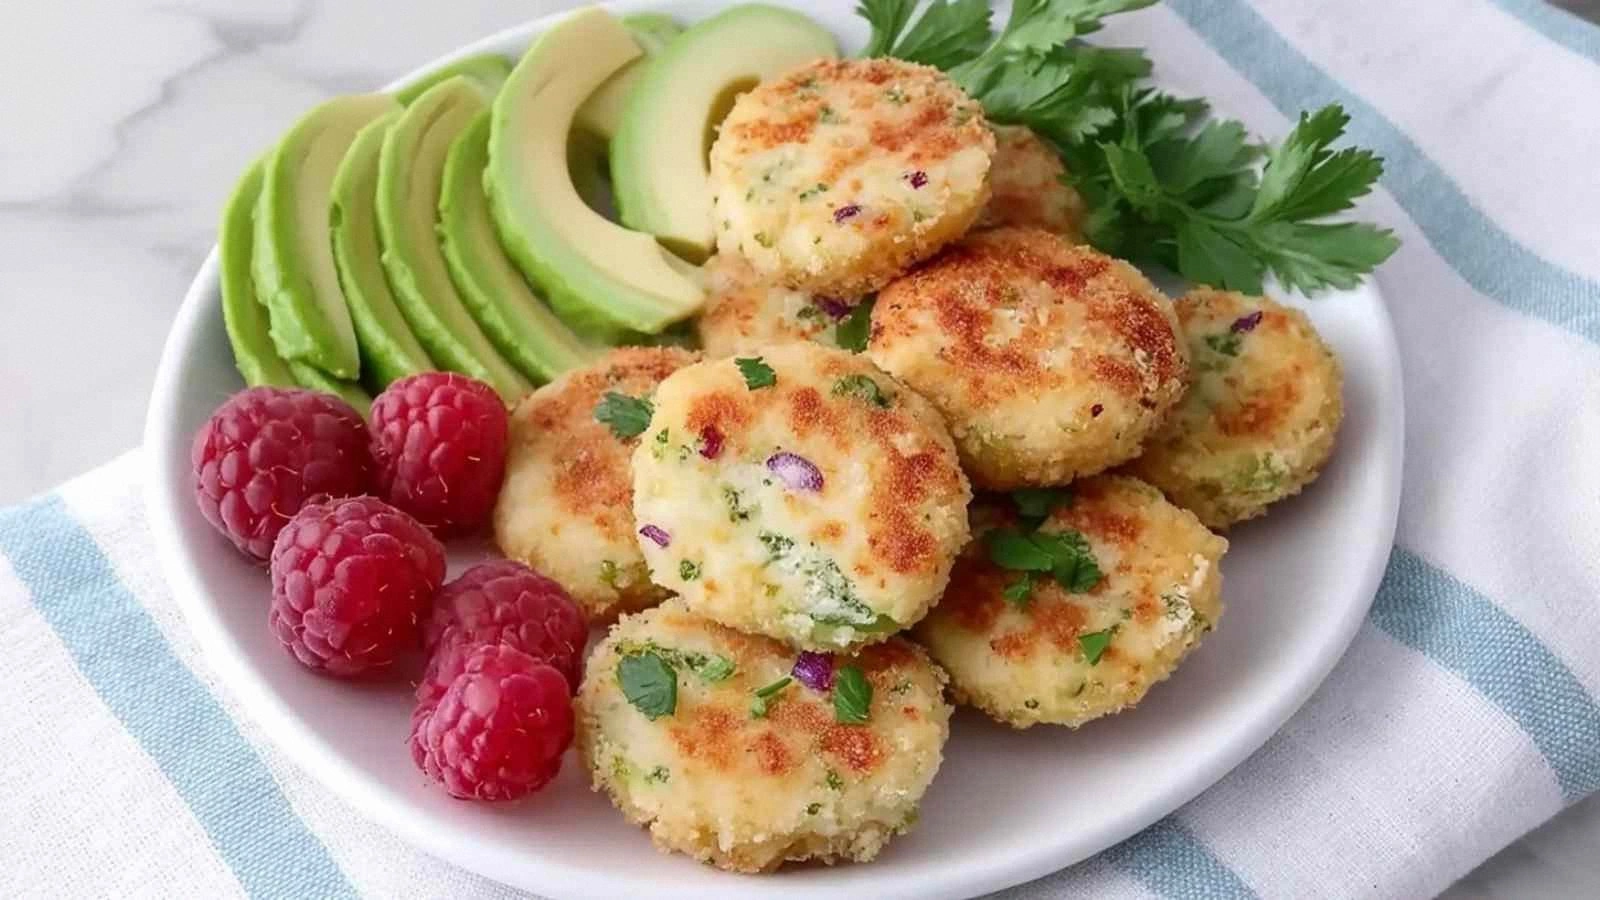
- Serve the nuggets hot with a side of ranch or honey mustard for dipping. The tangy sauce complements the mild cheddar and adds a burst of flavor. If you’re looking for a healthier option, serve them with a yogurt‑based dip or a simple squeeze of lemon. Pair the nuggets with a green salad or steamed veggies for a balanced meal. The combination of textures and flavors will keep everyone coming back for more.
That's it — you did it. But hold on, I've got a few more tricks that'll take this to another level. These insider tips will help you perfect the nuggets and avoid common pitfalls.
Insider Tricks for Flawless Results
The Temperature Rule Nobody Follows
Many cooks bake at 350°F, but that temperature is too low for a crisp coating. Baking at 400°F ensures the breadcrumbs brown quickly while the interior stays moist. I once baked at 350°F and the nuggets came out soggy, like a sad, sad pancake. The higher heat creates a Maillard reaction that gives the nuggets a beautiful golden crust.
Why Your Nose Knows Best
The aroma of baking is the first indicator that your nuggets are ready. When the scent of melted cheddar and toasted breadcrumbs fills the kitchen, it’s a sign that the coating is crisping perfectly. If the smell is faint, give them a few more minutes. Trust your nose; it’s the most reliable kitchen sensor.
The 5‑Minute Rest That Changes Everything
Letting the nuggets rest for 5 minutes after baking may seem wasteful, but it’s essential for texture. The cheese sets, preventing a gooey mess, and the coating firms up, giving a satisfying crunch. Skipping this step often results in nuggets that collapse under the weight of the cheese. A quick rest also lets the flavors meld, creating a harmonious bite.
The Right Mixing Technique
When combining the ingredients, use a gentle folding motion rather than vigorous mixing. Over‑mixing can break down the chicken and broccoli, causing the nuggets to become mushy. A light fold ensures the mixture stays cohesive and the coating adheres evenly.
The Secret to a Crispy Edge
Sprinkling a pinch of sea salt over the nuggets before baking adds an extra layer of flavor and helps draw out moisture, enhancing crispness. I once added a teaspoon of salt to the breadcrumb mixture and the result was a more robust, savory crunch. The salt also balances the mild cheddar’s richness.
The One‑Minute Trick
If you’re short on time, pre‑bake the nuggets for 10 minutes, then flip and bake for another 10. This two‑step approach ensures even browning and saves you from over‑baking one side. The trick is to keep the oven temperature consistent and monitor the color closely.
Creative Twists and Variations
This recipe is a playground. Here are some of my favorite ways to switch things up:
Spicy Sriracha Nug
Add a tablespoon of sriracha to the mixture for a fiery kick. The heat pairs beautifully with the mild cheddar, creating a flavor explosion. Serve with a cool yogurt dip to balance the spice. This version is perfect for those who love a bit of heat.
Herbed Parmesan Nug
Swap the cheddar for grated Parmesan and stir in fresh herbs like parsley and thyme. The Parmesan adds a nutty depth, while the herbs bring a fragrant freshness. This variation feels more sophisticated and is great for a dinner party.
Cheesy Cauliflower Nug
Replace the broccoli with cauliflower florets for a different veggie. The cauliflower’s mild flavor absorbs the cheese and breadcrumbs nicely. This version is a hit with those who prefer cauliflower over broccoli.
Panko Crunch Nug
Use panko breadcrumbs instead of whole wheat for a lighter, airier crunch. The panko’s airy texture creates a more delicate bite that’s less dense. This is ideal for those who want a lighter version of the nuggets.
Bacon‑Wrapped Nug
Wrap each nugget in a slice of bacon before baking. The bacon adds a smoky flavor and a crispy exterior that’s irresistible. Be sure to cut the bacon in half to keep the nuggets from getting too large. This twist is perfect for a brunch or a special treat.
Gluten‑Free Nug
Replace the breadcrumbs with crushed rice crackers or almond flour to make the nuggets gluten‑free. The texture will be slightly different, but the flavor remains intact. This option is great for those with dietary restrictions.
Storing and Bringing It Back to Life
Fridge Storage
Store cooked nuggets in an airtight container in the refrigerator for up to 3 days. Keep them in a single layer to maintain crispness. When ready to reheat, place them on a parchment‑lined tray and bake at 375°F for 10 minutes. The oven will restore the crunch without drying them out.
Freezer Friendly
Freeze individual nuggets in a single layer on a baking sheet for 1–2 hours, then transfer to a freezer bag. They’ll stay good for up to 2 months. Reheat in the oven at 400°F for 12–15 minutes, or until heated through. The nuggets will taste almost as fresh as when they were first made.
Best Reheating Method
The best way to reheat is in the oven, which preserves the crisp coating. If you’re in a hurry, use a toaster oven or a skillet with a splash of olive oil. Adding a tiny splash of water before reheating creates steam, keeping the interior moist and preventing the cheese from drying out. Serve immediately for the best texture.