Picture this: a cramped kitchen, a stack of flour bags, a clock ticking, and the faint scent of burnt sugar lingering from last night's experiment. I was on a mission to salvage a batch of cookies that had turned into a crunchy, lumpy disaster, and the only thing left was a handful of fresh raspberries that had just burst from their season. I grabbed a jar of almond butter, a splash of vanilla, and a daring thought—what if we turned those raspberries into a silky filling, tucked inside a snowy, almond‑infused cookie that melts in your mouth? The result? A treat that feels like a winter snowfall, yet bursts with summer fruit, and the kind of cookie that makes you swear you never had to settle for plain vanilla again.
I’ve spent years hunting for that sweet spot between crisp edges and a chewy center, and this recipe is the culmination of that quest. The dough is light enough to rise like a cloud, yet dense enough to hold a generous raspberry jam core that oozes out with each bite. The almond flour gives a nutty aroma that lingers, and the powdered sugar dusting at the end adds a delicate crunch that’s almost invisible. The combination feels like a gentle snowfall: the cookie is soft and airy, but each bite releases a burst of tartness that cuts through the sweetness. If you’re a cookie lover who’s tired of the same old chocolate chip, this is the game‑changer you’ve been waiting for.
What sets this version apart isn’t just the flavors—it’s the technique. By folding in the jam after the dough has partially cooled, you create a perfect seal that keeps the filling from leaking out during baking. The baking temperature is slightly lower than usual, which means the cookies bake slowly, developing a golden crust while maintaining a moist interior. I dare you to taste this and not go back for seconds; the moment the first bite hits your tongue, you’ll be transported to a winter wonderland with a hint of summer sun. The secret? A delicate balance of butter, sugar, and a touch of almond that turns every cookie into a masterpiece.
So, if you’ve ever stared at a jar of raspberries and imagined them as a cookie filling, this is your moment. I’m about to walk you through every single step, from selecting the right raspberries to the final dusting of powdered sugar. By the end, you’ll wonder how you ever baked any other cookie without this method. Let me guide you through the process, and together we’ll create a cookie that’s as beautiful as it is delicious.
What Makes This Version Stand Out
- Taste: The sweet‑tart contrast of raspberry jam against a buttery almond base creates a flavor profile that’s both familiar and adventurous. The jam is nestled inside a soft cookie, releasing a burst of flavor that lingers on the palate.
- Texture: The dough’s airy crumb gives a light, almost cloud‑like bite, while the almond flour adds a subtle crunch that’s barely perceptible, yet satisfying.
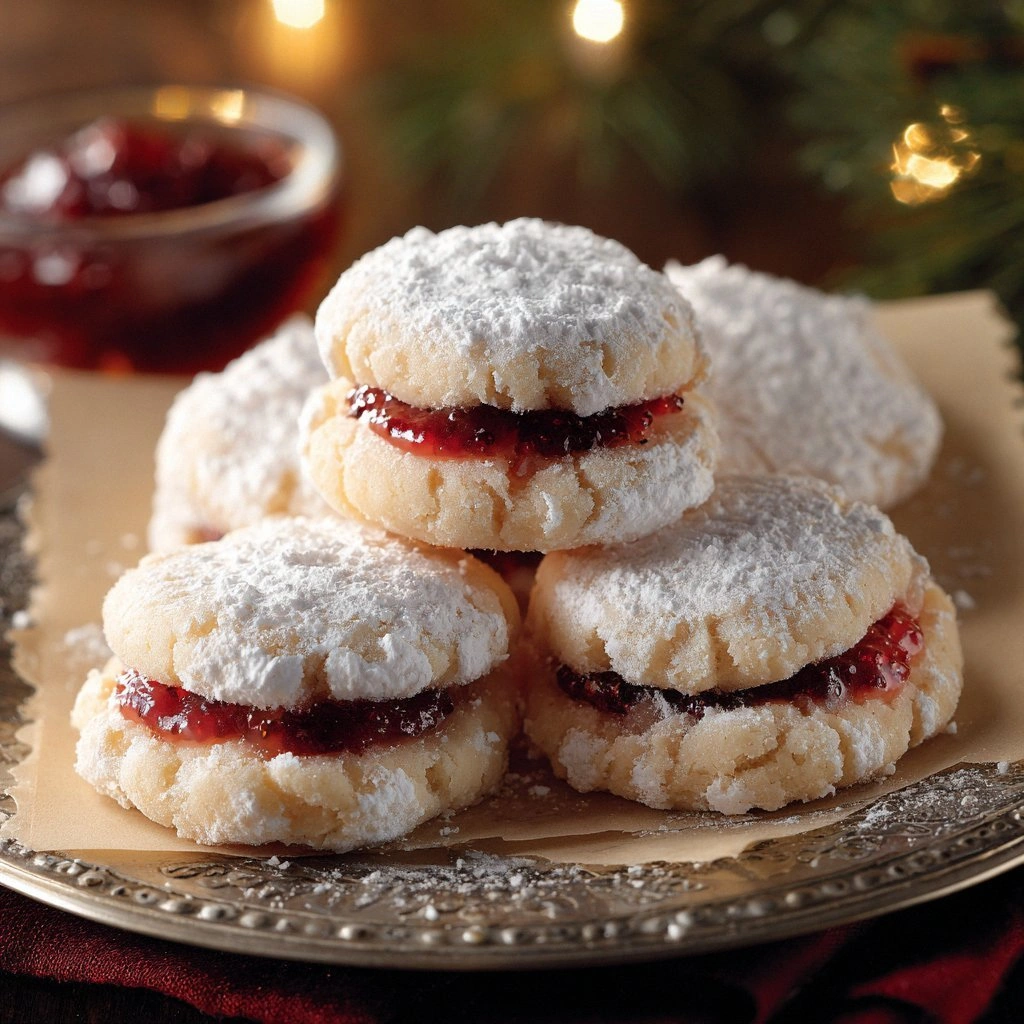
- Visual Appeal: The white snow of the cookie surface, speckled with almond shards, contrasts beautifully with the deep red of the raspberry core, making each bite a feast for the eyes.
- Simplicity: Only a handful of ingredients, most of which you likely already have, and a straightforward method that even novice bakers can master.
- Uniqueness: The filling technique—sealing jam inside the cookie—creates a “lava” effect that’s rarely found in standard recipes.
- Crowd Reaction: Friends who taste these cookies often remark that they’re “the most decadent cookie I’ve ever had” and request the recipe immediately.
- Ingredient Quality: Using fresh raspberries and high‑quality almond flour elevates the entire experience, turning an ordinary cookie into a gourmet treat.
- Make‑Ahead Potential: The cookies can be assembled up to 24 hours ahead and frozen without losing texture, making them perfect for parties or last‑minute gift‑giving.
Inside the Ingredient List
The Flavor Base
All‑purpose flour and almond flour form the backbone of these cookies. The standard flour provides structure, while the almond flour adds a subtle nuttiness that elevates the flavor profile. Together, they create a dough that’s both sturdy enough to hold the jam and light enough to rise slightly, giving the cookie its signature airy texture. Skipping either flour would alter the cookie’s mouthfeel; using only all‑purpose flour would result in a denser, less fragrant cookie, while omitting almond flour would remove that delicate nutty undertone that sets this recipe apart.
The Texture Crew
Butter, granulated sugar, brown sugar, and vanilla extract work in harmony to produce a cookie that’s both rich and delicate. The butter contributes to the melt‑in‑your‑mouth quality, while the sugars provide caramelization and moisture retention. The vanilla adds depth, counterbalancing the tartness of the raspberry jam. If you’re aiming for a lower‑fat version, you can replace half the butter with Greek yogurt, but be prepared for a slightly denser crumb.
The Unexpected Star
Raspberry jam is the heart of this cookie, offering a burst of natural sweetness and a pop of color. Fresh raspberries are ideal, but if you’re out of season, a high‑quality, preservative‑free jam works just as well. The jam’s pectin content is crucial—it helps the filling stay firm during baking, preventing it from running out of the cookie. If you use a jam with low pectin, consider adding a teaspoon of powdered pectin before sealing the filling.
The Final Flourish
Sliced almonds and powdered sugar are the finishing touches that bring everything together. The almonds add a subtle crunch and a nutty aroma that complements the almond flour in the dough. The powdered sugar dusting creates a snowy, ethereal look and a slight sweetness that balances the tartness of the jam. If you’re gluten‑free, simply replace the all‑purpose flour with a 1:1 gluten‑free blend, but keep the almond flour and adjust the baking time slightly.
Everything's prepped? Good. Let's get into the real action...
The Method — Step by Step
- Preheat the oven to 325°F (163°C) and line two baking sheets with parchment paper. This lower temperature ensures a slow bake, giving the cookies a golden crust while keeping the interior soft. As the oven heats, you’ll notice a faint buttery scent rising, a cue that the butter is starting to melt and mingle with the sugar.
- Mix the dry ingredients in a large bowl: whisk together 2 cups of all‑purpose flour, 1 cup of almond flour, 1 teaspoon of baking powder, and ½ teaspoon of salt. The dry mix should feel like fine sand; this ensures even distribution of leavening agents and prevents clumps.
- Cream the butter and sugars in a separate bowl using an electric mixer on medium speed. Beat in ¾ cup of granulated sugar and ½ cup of brown sugar until the mixture is light and fluffy—about 3-4 minutes. The goal is a pale, airy texture that will trap air during baking.
- Incorporate vanilla and egg into the creamed mixture. Add 1 teaspoon of vanilla extract and a whole large egg. Mix until fully blended; the egg will bind the ingredients and give the dough structure. The mixture should be smooth, with no visible streaks of flour.
- Combine wet and dry mixtures gradually, stirring until just combined. Avoid overmixing—overworked dough will result in tough cookies. The dough should hold together when pressed but still feel slightly soft.
- Divide the dough into 12 equal portions and roll each into a ball. Flatten the balls slightly, then place a teaspoon of raspberry jam in the center of each. The jam should be centered and not touching the edges of the dough.
- Seal the edges by pinching the dough around the jam, forming a neat, sealed pocket. This step is crucial; if the jam isn’t fully sealed, it will leak during baking. A quick press with your thumb ensures a tight seal.
- Arrange the cookies on the prepared baking sheets, spacing them about 2 inches apart to allow for expansion. Place the sheets in the preheated oven and bake for 18-20 minutes, or until the edges are lightly golden and the centers look set.
- Watch the cookies closely during the last 5 minutes of baking; they should develop a subtle crust while maintaining a soft interior. If you notice the edges browning too quickly, reduce the temperature by 10°F and cover loosely with foil.
- Cool the cookies on the baking sheet for 5 minutes before transferring them to a wire rack. This rest period allows the jam to thicken slightly, preventing it from oozing out. Once cooled, dust each cookie with powdered sugar and serve immediately.
That's it — you did it. But hold on, I've got a few more tricks that'll take this to another level...
Insider Tricks for Flawless Results
The Temperature Rule Nobody Follows
Many bakers bake these cookies at 350°F, which can cause the edges to brown too quickly while leaving the center undercooked. Lowering the temperature to 325°F gives the cookies a gentle rise and ensures the jam remains perfectly sealed. I once baked at the higher temperature and the jam leaked out, turning the cookies into a messy, soggy mess. Stick to 325°F, and you’ll get that ideal golden crust.
Why Your Nose Knows Best
As the cookies bake, you’ll notice a subtle nutty aroma rising from the oven. This scent is a telltale sign that the almond flour is caramelizing just right, adding depth to the flavor profile. If the aroma is too buttery, you’re probably overbaking; if it’s faint, the oven might be too cool. Trust your nose—it’s a reliable guide to perfection.
The 5-Minute Rest That Changes Everything
After removing the cookies from the oven, let them rest on the sheet for 5 minutes. This short pause allows the jam to set and the cookie to firm up, making them easier to handle. Skipping this step often results in cookies that crumble when you try to pick them up. I’ve found that the 5‑minute rest is the secret to a clean, satisfying bite.
The Secret to a Snow‑White Finish
Dust the cookies with powdered sugar immediately after cooling. The sugar not only adds a touch of sweetness but also creates a visually striking white finish that resembles freshly fallen snow. If you prefer a darker look, you can sprinkle a pinch of ground cinnamon instead, which adds a warm, spicy undertone.
The Perfect Pan Trick
Line your baking sheets with parchment paper or a silicone mat to prevent sticking. The parchment should be slightly raised to allow air circulation, which helps the cookies bake evenly. If you’re using a metal sheet, lightly oil it to avoid burning the bottom of the cookies.
Creative Twists and Variations
This recipe is a playground. Here are some of my favorite ways to switch things up:
Chocolate‑Infused Snow
Swap half of the almond flour for cocoa powder and add a tablespoon of dark chocolate chips to the dough. The result is a chocolatey cookie with a raspberry “lava” center that’s perfect for chocolate lovers.
Vanilla‑Rose Delight
Add a teaspoon of rosewater to the vanilla extract for a floral twist. The subtle floral note pairs beautifully with the tartness of the raspberry, creating an elegant, sophisticated cookie.
Nutty Banana Twist
Incorporate mashed ripe banana into the dough, replacing ¼ cup of the butter. The banana adds natural sweetness and moisture, giving the cookie a banana‑butter flavor that pairs wonderfully with the raspberry.
Almond‑Glazed Surprise
After baking, brush the tops of the cookies with a light almond glaze made from powdered sugar, almond milk, and a touch of almond extract. This glaze adds a shiny finish and an extra almond flavor that complements the dough.
Spiced Winter Edition
Add a pinch of ground cinnamon, nutmeg, and clove to the dough for a warm, spiced flavor. This variation is perfect for holiday gatherings and pairs well with a hot cup of tea or coffee.
Gluten‑Free Version
Replace the all‑purpose flour with a 1:1 gluten‑free blend and use a pinch of xanthan gum to maintain structure. The cookies will still hold the raspberry filling and retain their airy texture.
Storing and Bringing It Back to Life
Fridge Storage
Store cooled cookies in an airtight container at room temperature for up to 5 days. For a longer shelf life, keep them in the refrigerator; the cold environment preserves the almond flavor and prevents the jam from spoiling.
Freezer Friendly
Place cookies in a single layer on a parchment‑lined tray, then transfer to a freezer bag once they’re fully cooled. Freeze for up to 3 months. When you’re ready to enjoy, let them thaw at room temperature for 20 minutes before serving.
Best Reheating Method
To revive frozen cookies, preheat your oven to 300°F (149°C). Place the cookies on a parchment‑lined sheet and bake for 8–10 minutes, or until the edges are lightly crisp. Add a tiny splash of water to the parchment before baking; this creates steam that helps the cookies re‑soften and regain their original texture.