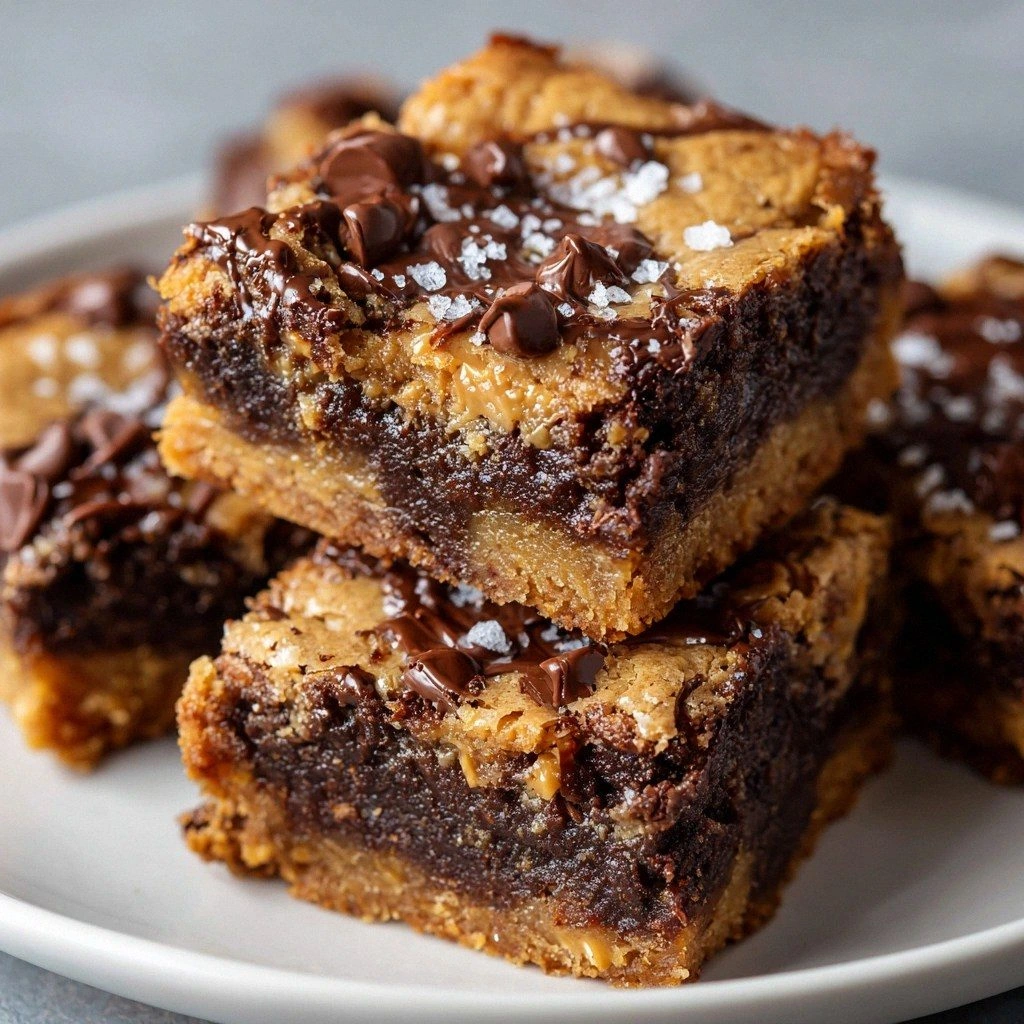
Picture this: I’m in the middle of a kitchen chaos that could only be described as a culinary apocalypse. The blender was on a wild spin, the sugar had exploded onto the counter, and my sweet tooth was screaming for something that could survive the mess. In that moment, I reached for the jar of creamy peanut butter that had been gathering dust in the pantry, and an idea sparked—what if I could merge that nutty richness with the buttery decadence of blondies, sprinkle a touch of sea salt, and add chocolate chips for that final wow factor? The result? Salted Chocolate Peanut Butter blondies that feel like a warm hug in every bite.
The first thing you’ll notice is the aroma—sweet caramel mingled with the deep, earthy scent of toasted peanuts, punctuated by the faint whisper of sea salt. As you slide the pan into the oven, the sound of the timer ticking becomes a metronome, and the heat rises like a gentle wave. By the time the blondies are golden and slightly crisp at the edges, the kitchen is filled with a comforting, buttery fragrance that could make even the grumpiest of friends smile. This isn’t just a dessert; it’s an edible experience that engages all five senses—sight, smell, sound, taste, and touch.
What makes this version stand out from every other blondie recipe is the strategic balance of flavors and textures. The creamy peanut butter acts as the base, providing a velvety mouthfeel that coats the tongue like silk. Brown sugar caramelizes into a glossy sheen, giving the blondies a chewy, melt-in-your-mouth center that’s impossible to resist. The sea salt, sprinkled just before baking, creates a subtle contrast that elevates the sweetness without overpowering it. And those chocolate chips? They’re not just add-ins; they’re bursts of rich chocolate that melt into pockets of molten goodness as you bite through. The result is a multi-dimensional dessert that feels indulgent yet surprisingly balanced.
I dare you to taste this and not go back for seconds—because once you experience the harmony between nutty, sweet, salty, and chocolatey, you’ll find yourself craving more. I’ll be honest—half the batch vanished before anyone else could even get a taste. That’s the power of a well-crafted recipe that takes simple ingredients and turns them into something extraordinary. Stay with me here—by the end of this post, you’ll wonder how you ever made blondies any other way.
What Makes This Version Stand Out
- Flavor Harmony: The combination of creamy peanut butter and brown sugar creates a sweet base that is deep and caramel-like, while the sea salt adds a savory counterpoint that elevates every bite.
- Texture Perfection: The batter’s thickness, thanks to the peanut butter, results in a chewy center and a slightly crisp edge that shatters like thin ice when you bite.
- Ingredient Simplicity: With only nine core ingredients, the recipe is straightforward yet delivers maximum flavor impact.
- Crowd-pleasing: These blondies are ideal for potlucks, family gatherings, or a midnight snack, because everyone loves a chocolate peanut butter treat.
- Make-ahead Flexibility: They hold up beautifully in the fridge for up to a week and can be frozen for longer storage.
- Visual Appeal: The glossy finish and scattered chocolate chips make them Instagram-worthy, while the sea salt sprinkle adds a gourmet touch.
Alright, let’s break down exactly what goes into this masterpiece…
Inside the Ingredient List
The Flavor Base
Creamy Peanut Butter: This is the heart of the batter, providing a rich, nutty flavor that balances the sweetness of the brown sugar. Its high fat content creates a silky mouthfeel that coats the palate like velvet. If you skip it, the blondies lose their signature depth and become more like plain brownies. For a lighter version, try using a reduced-fat peanut butter, but you’ll need to add a tablespoon of extra flour to keep the batter from becoming too loose.
Brown Sugar: Brown sugar is the sweetener that caramelizes beautifully, giving the blondies a golden sheen and a chewy center. The molasses content adds a subtle complexity that plain white sugar can’t match. If you use white sugar instead, the blondies will still be sweet but will lack the rich, caramel undertone. A good rule of thumb: use equal parts brown sugar for a balanced sweetness.
The Texture Crew
Large Eggs: Eggs bind the batter together and add moisture, ensuring the blondies stay soft and tender. The yolks provide richness, while the whites help the batter set properly. If you omit eggs, the blondies will be crumbly and dry; consider using an egg substitute like flaxseed or applesauce for a vegan version, but the texture will differ. A single extra egg will make them denser, so keep the ratio in check.
All-Purpose Flour: Flour is the backbone that gives the blondies structure and holds everything together. It also absorbs the excess moisture from the peanut butter, preventing a greasy finish. Substituting with whole wheat flour adds fiber but can make the blondies slightly denser; add a tablespoon of oat flour to lighten the texture. For a gluten-free option, use a 1:1 gluten-free blend, but adjust baking powder slightly to account for the different rise.
The Unexpected Star
Chocolate Chips: These little gems are the star of the show, providing bursts of chocolate in every bite. Dark chocolate chips give a richer, slightly bitter note that balances the sweetness, while milk chocolate offers a sweeter, creamier experience. If you’re craving a more intense chocolate flavor, try adding a tablespoon of cocoa powder to the batter. Don’t forget to choose high-quality chips—budget ones often contain artificial flavors.
The Final Flourish
Sea Salt: Sprinkling sea salt on top before baking adds a gourmet touch, creating a subtle crunch and enhancing the overall flavor profile. The salt doesn’t just taste salty; it also balances the sweetness and brings out the chocolate’s depth. If you’re watching sodium, use a fine sea salt and sprinkle sparingly. For an extra twist, add a pinch of smoked sea salt to introduce a smoky undertone.
Everything’s prepped? Good. Let’s get into the real action…
The Method — Step by Step
- Preheat your oven to 350°F (175°C) and line a 9x13-inch baking pan with parchment paper, leaving a little overhang on the sides for easy removal. This step ensures even baking and a clean finish. The parchment will also prevent sticking, so you won’t have to worry about crumbs clinging to the pan. While the oven warms, gather all your ingredients so you’re ready to roll.
- In a large mixing bowl, combine the creamy peanut butter and brown sugar until smooth. Use a silicone spatula to scrape every last crumb; the mixture should be thick and slightly glossy. This is the moment of truth—if the batter is too thick, add a tablespoon of milk to reach a spreadable consistency. If it’s too thin, add a teaspoon of flour to thicken it up.
- Beat in the eggs, one at a time, ensuring each is fully incorporated before adding the next. The batter will become glossy and slightly thick. This step helps the blondies set properly, giving them that desirable chewy center. As you whisk, you’ll notice the batter’s color deepen, a sign that the sugars are dissolving.
- Stir in the vanilla extract, baking powder, and salt until the mixture is uniform. The vanilla adds warmth and depth, while the baking powder gives the blondies a gentle lift. The salt, though small in quantity, plays a pivotal role in balancing sweetness. Mix until you see no streaks of flour.
- Fold in the all-purpose flour, ensuring it’s fully incorporated without overmixing. Overmixing can cause the blondies to become tough; you want a batter that’s just smooth enough. At this point, the batter should have a thick, yet spreadable consistency. This is the stage where the batter’s texture is set.
- Gently fold in the chocolate chips, ensuring they’re evenly distributed. The chocolate chips should be fully coated with the batter, preventing them from sinking to the bottom. If you’re using dark chocolate, you’ll get a richer flavor; if you prefer a sweeter bite, stick with milk chocolate.
- Transfer the batter to the prepared pan and spread it evenly with a spatula. Press down lightly to remove any air pockets. This ensures the blondies bake evenly and develop a uniform crust. The edges should be slightly raised, indicating they’re ready for the oven.
- Sprinkle sea salt over the top of the batter, using a fine shaker for a delicate dusting. This step is crucial for that gourmet finish. The sea salt will caramelize slightly during baking, adding a subtle crunch. Be careful not to over-salt; a light sprinkle is all you need.
- Bake for 30 minutes, or until the blondies are golden brown and set. The aroma will fill the kitchen like a warm hug. If you prefer a crunchier top, bake an extra 2-3 minutes. Keep a close eye on them—oven temperatures can vary.
- Remove from the oven and let the blondies cool in the pan for 10 minutes before transferring them to a wire rack to cool completely. This allows the structure to set and prevents them from breaking apart. While they’re still warm, you can slice them into squares for an immediate treat.
That’s it— you did it. But hold on, I’ve got a few more tricks that will take this to another level.
Insider Tricks for Flawless Results
The Temperature Rule Nobody Follows
Many bakers think room temperature ingredients are always best, but for blondies, slightly chilled batter yields a denser crumb. Chill the batter in the fridge for 30 minutes before baking, and you’ll get a richer, more cohesive texture. This trick also helps the peanut butter stay firm, preventing the blondies from becoming too greasy.
Why Your Nose Knows Best
As the blondies bake, pay attention to the aroma. When the smell turns from sweet to nutty and slightly caramelized, it’s a sign they’re almost done. If you’re a visual judge, look for the edges to pull away from the pan. Trust your senses; they’re the most reliable indicators of doneness.
The 5-Minute Rest That Changes Everything
After removing the blondies from the oven, let them rest on the pan for at least 5 minutes before cutting. This short rest allows the batter to set, making the squares easier to cut cleanly. Cutting them too early often results in crumbling, which is a sad sight for a dessert that deserves to look perfect.
Add a Splash of Water Before Reheating
When reheating leftovers, a tiny splash of water (about a tablespoon per batch) helps steam them back to their original moistness. This trick prevents the blondies from drying out and keeps the peanut butter from becoming too hard. Cover the pan with foil during reheating to trap the steam.
Use a Silicone Baking Mat
A silicone mat provides an even surface, preventing the batter from sticking to the pan and ensuring a uniform thickness. It also makes cleanup a breeze, as the mat can be wiped clean or tossed out if it’s disposable. If you’re a sustainability advocate, choose a reusable mat to reduce waste.
Creative Twists and Variations
This recipe is a playground. Here are some of my favorite ways to switch things up:
Coconut Crunch
Swap half the peanut butter with coconut butter and fold in toasted shredded coconut. The result is a tropical twist that pairs beautifully with the chocolate chips. Coconut butter adds a subtle sweetness, while the coconut crunch adds texture.
Spiced Chocolate Swirl
Add a teaspoon of ground cinnamon and a pinch of cayenne pepper to the batter. The cinnamon adds warmth, while the cayenne gives a subtle kick. This version is great for those who love a spicy-sweet combination.
Nut-Free Delight
Replace the peanut butter with sunflower seed butter and use sunflower seeds as a crunchy topping. This variation is perfect for those with nut allergies, yet it still delivers a satisfying crunch and nutty flavor.
Almond Joy
Use almond butter instead of peanut butter, and add mini marshmallows and shredded coconut to the batter. The marshmallows melt into gooey pockets, while the coconut adds a chewy texture. This version mimics the classic candy bar.
Coffee Infusion
Stir in a tablespoon of instant espresso powder to the batter. The coffee enhances the chocolate flavor and gives the blondies a subtle caffeine boost. This is a great option for an afternoon pick-me-up.
Savory Salted Caramel
Add a drizzle of caramel sauce to the batter before baking and sprinkle a pinch of smoked sea salt on top. The caramel adds a buttery sweetness, while the smoked salt provides a hint of smokiness. This twist transforms the blondies into a savory-sweet treat.
Storing and Bringing It Back to Life
Fridge Storage
Store the cooled blondies in an airtight container at room temperature for up to 4 days. Keep them in a cool, dry place away from direct sunlight. If you’re in a humid area, add a slice of bread to absorb excess moisture.
Freezer Friendly
Wrap each square tightly in plastic wrap, then place them in a freezer bag. They’ll stay fresh for up to 3 months. When you’re ready to eat, let them thaw at room temperature for 20 minutes.
Best Reheating Method
Reheat in a preheated oven at 300°F (150°C) for 8-10 minutes, or until warm. Alternatively, microwave on low for 15-20 seconds. Add a splash of water before reheating to keep them moist and prevent the peanut butter from drying out.