Last weekend I was the designated host for a game night that turned into a culinary showdown, and let me tell you, the kitchen was a battlefield of burnt popcorn, soggy chips, and a sad bowl of store‑bought dip that tasted like cardboard. I stared at the chaos, my stomach growling louder than the laughter, and thought, “If I can’t rescue this party, at least I can rescue my reputation.” That’s when I remembered a half‑finished sheet of crescent roll dough I’d bought for a lazy Sunday breakfast and a stash of deli meats that were begging for a second chance. I tossed together a quick idea: a bite‑size, layered antipasto that could be assembled in minutes, baked to golden perfection, and devoured without any forks—pure, unapologetic finger food.
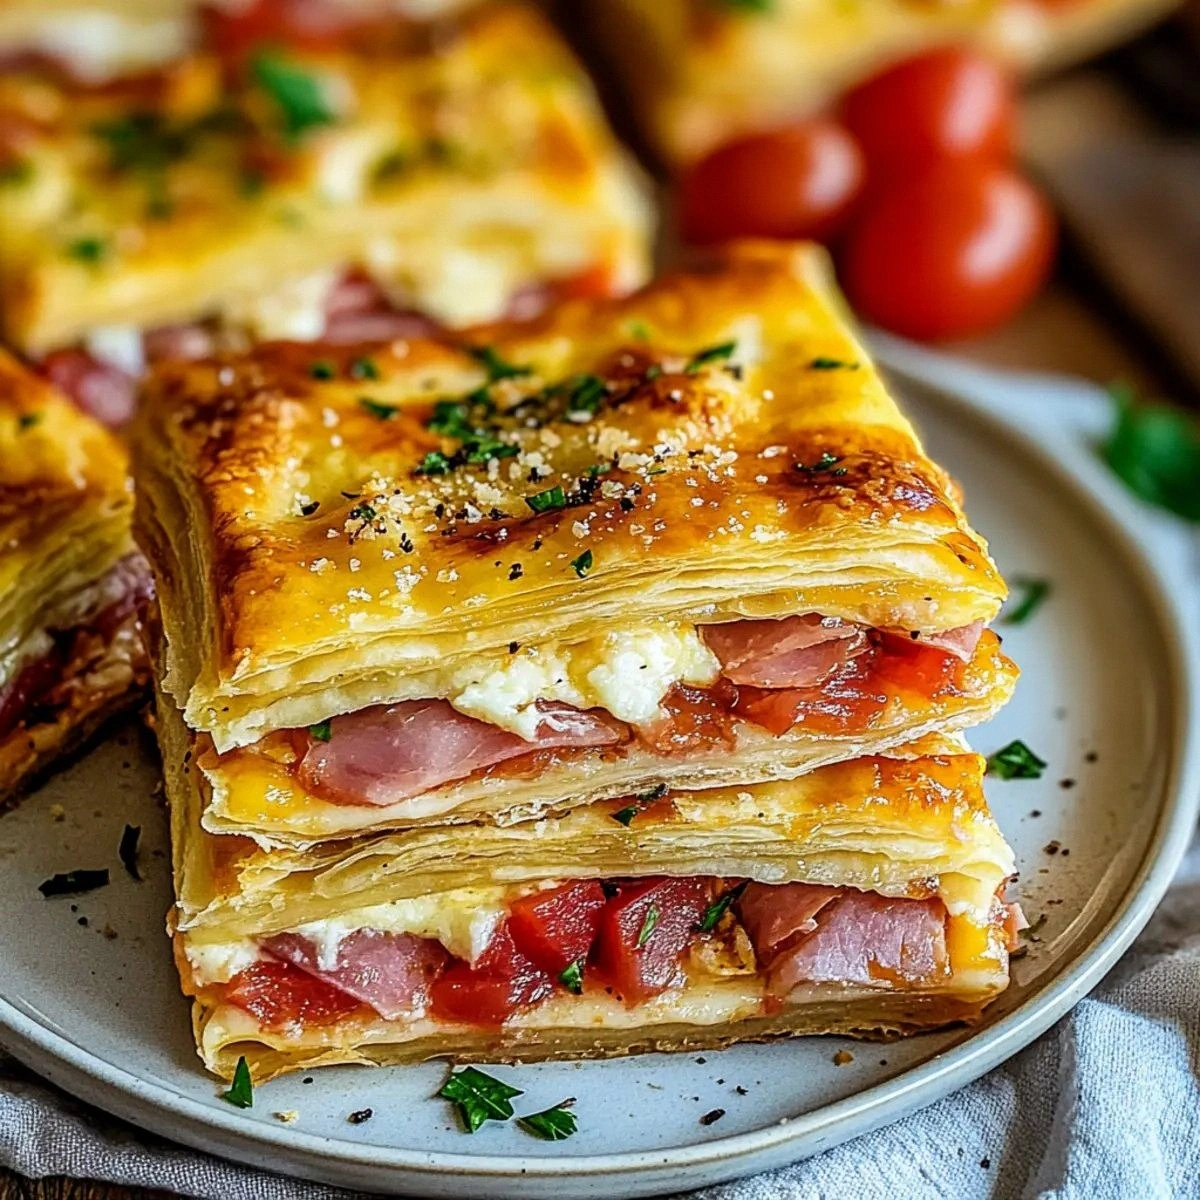
The moment I pulled the first batch out of the oven, the kitchen was hit with a scent that could have convinced a monk to break his fast: buttery dough mingling with salty capicola, peppery pepperoni, and the nutty tang of Parmesan, all crowned by a glossy drizzle of olive oil that caught the light like liquid amber. The visual was just as dramatic—crisp, golden squares studded with melty cheese ribbons, speckles of pepperoncini, and a subtle dusting of Italian seasoning that looked like confetti at a celebration. When I took a bite, the dough gave way with a satisfying crunch, the cheese stretched like a warm hug, and the meats delivered a punch of flavor that made my taste buds do a happy dance. I dared my friends to stop at one, and they all failed spectacularly; the plate was empty before anyone could even say “more.”
What makes this version the ultimate party appetizer? Most antipasto trays rely on cold cuts piled on a platter, which can get soggy, bland, or just plain boring after a few minutes. My version bakes everything together, sealing in juices and creating a symphony of textures that stay crisp and flavorful from the first bite to the last. The secret is a simple layering technique that ensures each ingredient shines without overwhelming the others, and a quick brush of olive oil that gives the crust a glossy finish you’d expect from a professional bakery. Plus, the recipe is forgiving—if you’re missing one type of meat, you can swap in whatever you have on hand, and the dough will still rise to the occasion.
Okay, ready for the game‑changer? I’m about to walk you through every single step—by the end, you’ll wonder how you ever made antipasto any other way. I’ll reveal a tiny hack involving pepperoncini brine that adds a zing you won’t find in any other recipe, and I’ll challenge you to taste this and not go back for seconds. Let’s dive in and turn your next gathering into a legendary feast.
What Makes This Version Stand Out
- Taste: The combination of salty capicola, spicy pepperoni, and mellow provolone creates a balanced flavor profile that hits every palate, from the mild to the bold.
- Texture: Crispy, buttery crust meets gooey cheese and tender meat, delivering a contrast that’s as satisfying as biting into a perfectly toasted crostini.
- Simplicity: Using store‑bought crescent roll dough means you skip the labor‑intensive dough‑making step without sacrificing that fresh‑baked feel.
- Uniqueness: The pepperoncini brine brush adds a subtle tang that lifts the whole dish, a trick most recipes completely miss.
- Crowd Reaction: Guests invariably line up for seconds, and the squares hold up well on plates, making them perfect for standing‑room‑only parties.
- Ingredient Quality: High‑quality deli meats and a blend of provolone and Colby Jack give depth and meltability that cheap alternatives can’t match.
- Cooking Method: Baking on a sheet pan ensures even heat distribution, so every bite is uniformly golden and delicious.
- Make‑Ahead Potential: Assemble the night before, refrigerate, and pop in the oven when guests arrive—minimal effort, maximum impact.
Inside the Ingredient List
The Flavor Base
The heart of this dish is the blend of cured meats. Capicola brings a delicate marbling of fat and a subtle smokiness that pairs beautifully with the sharper notes of pepperoni. If you skip the capicola, you’ll lose that nuanced depth, but you can substitute with thinly sliced mortadella for a milder profile. Salami adds a robust, peppery kick that anchors the flavor trio, and its firm texture holds up during baking, preventing the squares from becoming soggy. When selecting these meats, look for ones that are thinly sliced but still have visible fat—this ensures meltiness without drying out.
The Texture Crew
The dough is the silent hero here. Crescent roll dough provides a buttery, flaky foundation that rises just enough to give a light, airy bite while still supporting the weight of the toppings. Using two cans ensures you have enough material to create a uniform sheet, but if you’re feeling adventurous, you can roll out a single can and stretch it thinner for extra crispness. Parmesan cheese, grated finely, forms a golden crust that adds a nutty crunch; without it, the top would lack that satisfying snap. Remember, the cheese should be dry—moisture will steam the crust and keep it from turning crisp.
The Unexpected Star
Enter the pepperoncini. Their briny, slightly sweet tang cuts through the richness of the meats and cheese, acting like a palate cleanser between bites. The half‑cup measurement includes both the peppers and a splash of their brine, which you’ll later brush onto the dough for that extra zing. If you can’t find pepperoncini, try thinly sliced banana peppers or a quick pickle made from sliced cucumbers and vinegar.
The Final Flourish
Finishing touches are what turn good into unforgettable. Olive oil brushed on top before baking creates a glossy, golden surface and helps the Parmesan adhere. Italian seasoning brings herbaceous notes of oregano, basil, and thyme that round out the flavor profile, while the blend of provolone and Colby Jack cheeses ensures meltiness and a subtle sharpness that keeps each bite interesting. Skipping the seasoning will make the dish taste flat; a light sprinkle is all it takes to elevate the entire square.
Everything's prepped? Good. Let's get into the real action...
The Method — Step by Step
Preheat your oven to 400°F (200°C) and line a full‑size sheet pan with parchment paper. While the oven heats, open the cans of crescent roll dough and lay them side by side on a lightly floured surface. Press the dough together gently, forming a single, even rectangle about ¼ inch thick. This step ensures a uniform bake and prevents any thin spots that could burn.
Transfer the dough rectangle onto the prepared sheet pan, using the parchment to lift it without tearing. Lightly brush the entire surface with 1 tablespoon of olive oil, then sprinkle the grated Parmesan evenly. You’ll notice the cheese begin to adhere—this is the first layer of flavor that will turn golden and crunchy.
Now comes the meat montage. Evenly distribute the capicola, pepperoni, and salami over the dough, overlapping slightly for a rustic look. I dare you to arrange them in a pattern that looks like a work of art; the visual appeal is half the fun. The fats from the meats will melt into the dough, creating pockets of savory richness.
Scatter the shredded provolone and Colby Jack cheeses over the meat layer, ensuring every corner gets a generous amount. The blend of these cheeses creates a melt that’s both creamy and slightly sharp—think of it as the perfect cheese duet. If you prefer a milder flavor, you can swap half the provolone for mozzarella.
Take the pepperoncini (including a few tablespoons of their brine) and distribute them across the top. The brine will seep into the dough as it bakes, adding a subtle tang that balances the richness of the meats and cheese. Sprinkle the Italian seasoning evenly for that herbaceous finish.
Slide the pan into the preheated oven and bake for 18‑20 minutes, or until the edges turn a deep golden brown and the cheese is bubbling with a caramelized top. The scent at this point is a signal that you’ve nailed the timing—if you hear a faint sizzle, you’re on the right track. Resist the urge to open the oven too often; each peek drops the temperature and can affect the rise.
While the squares are baking, prepare a small bowl with the remaining tablespoon of olive oil mixed with a teaspoon of the pepperoncini brine. This will be your finishing glaze. As soon as the squares emerge from the oven, brush this mixture over the top; the glossy sheen not only looks gorgeous but also locks in moisture.
Allow the antipasto squares to rest on the pan for 5 minutes before cutting. This short rest lets the cheese set slightly, making clean cuts easier and preventing the toppings from sliding off. Then, using a sharp pizza cutter or a chef’s knife, slice the sheet into 3‑inch squares. Serve warm, and watch the crowd dive in.
That's it — you did it. But hold on, I've got a few more tricks that'll take this to another level. Stick around for the insider tips that will make your next batch even more unforgettable.
Insider Tricks for Flawless Results
The Temperature Rule Nobody Follows
Most home bakers set the oven to 350°F and hope for the best, but the magic happens at 400°F. The higher heat creates that coveted crisp edge while keeping the interior tender. If your oven runs cool, crank it up an extra 10‑15 degrees; the extra heat ensures the dough puffs just enough without drying out the cheese.
Why Your Nose Knows Best
Before you even peek at the timer, trust your nose. When the edges start to smell nutty and the cheese releases a toasty aroma, you’re within seconds of perfection. This sensory cue is more reliable than a timer because ovens vary, and the scent tells you exactly when the crust has reached that golden‑brown stage.
The 5‑Minute Rest That Changes Everything
Resisting the urge to cut immediately is a game‑changer. Letting the squares sit for five minutes after baking lets the cheese firm up, making slicing clean and preventing a messy slide. I once cut too early; the cheese stretched like taffy and the toppings fell off—lesson learned.
Uniform Slices, Uniform Smiles
Use a ruler or the edge of a pizza box to gauge your cuts. Consistent 3‑inch squares not only look professional but also ensure each guest gets an even portion of meat, cheese, and crust. Uneven pieces can lead to one person getting all the cheesy goodness while another gets mostly dough.
Brine Boost for the Win
The pepperoncini brine isn’t just for flavor; it adds a subtle moisture that keeps the crust from drying out during the final minutes of baking. A quick brush with brine‑infused oil right after you pull the pan out creates a glossy finish that catches the light and the eye.
Creative Twists and Variations
This recipe is a playground. Here are some of my favorite ways to switch things up:
Spicy Sriracha Drizzle
Swap the pepperoncini brine glaze for a mixture of sriracha and honey. The sweet‑heat combo adds a bold kick that pairs perfectly with the mellow provolone. Great for guests who love a little fire.
Veggie‑Loaded Version
Replace half the meat with thinly sliced zucchini, roasted red peppers, and caramelized onions. The veggies add moisture and a fresh crunch, making the squares suitable for a lighter, vegetarian crowd while still delivering that buttery crust.
Herb‑Infused Dough
Before laying out the crescent roll dough, sprinkle it with dried rosemary and thyme, then gently press them in. The herbs infuse the crust with an aromatic depth that complements the Italian seasoning on top.
Cheese‑Only Delight
For a cheese lover’s dream, double the cheese ratio—use equal parts mozzarella, gouda, and sharp cheddar. Omit the meats entirely and add a sprinkle of crushed red pepper flakes for a mild heat. This version is a gooey, melty masterpiece.
Mini Antipasto Bites
Instead of a full sheet, cut the dough into 2‑inch circles, top each with a mini portion of the meat and cheese, and bake on a muffin tin. These bite‑size wonders are perfect for cocktail parties where guests are constantly mingling.
Storing and Bringing It Back to Life
Fridge Storage
Allow the squares to cool completely, then transfer them to an airtight container. They’ll stay fresh for up to three days. When you’re ready to serve, reheat in a preheated 350°F oven for 8‑10 minutes; the crust will regain its crunch.
Freezer Friendly
Wrap a single layer of squares in parchment, then seal the whole batch in a zip‑top freezer bag. They freeze beautifully for up to two months. To serve, bake from frozen at 400°F for 15‑18 minutes, then brush with the brine‑oil glaze.
Best Reheating Method
For ultimate crispiness, avoid the microwave. Instead, use a hot skillet: place a square face‑down over medium heat for 2 minutes, then flip and cover for another minute to melt the cheese. Adding a tiny splash of water to the pan before covering creates steam that revives the interior without sogging the crust.