I still remember the night my kitchen turned into a chaotic art studio. A batter had escaped the bowl, splattering flour across the counter like a white snowstorm. My friends laughed, but I was already craving the sweet, airy texture of a classic sponge. That moment sparked a mission: to create a sponge cake that would outshine every other version I’d ever tasted.
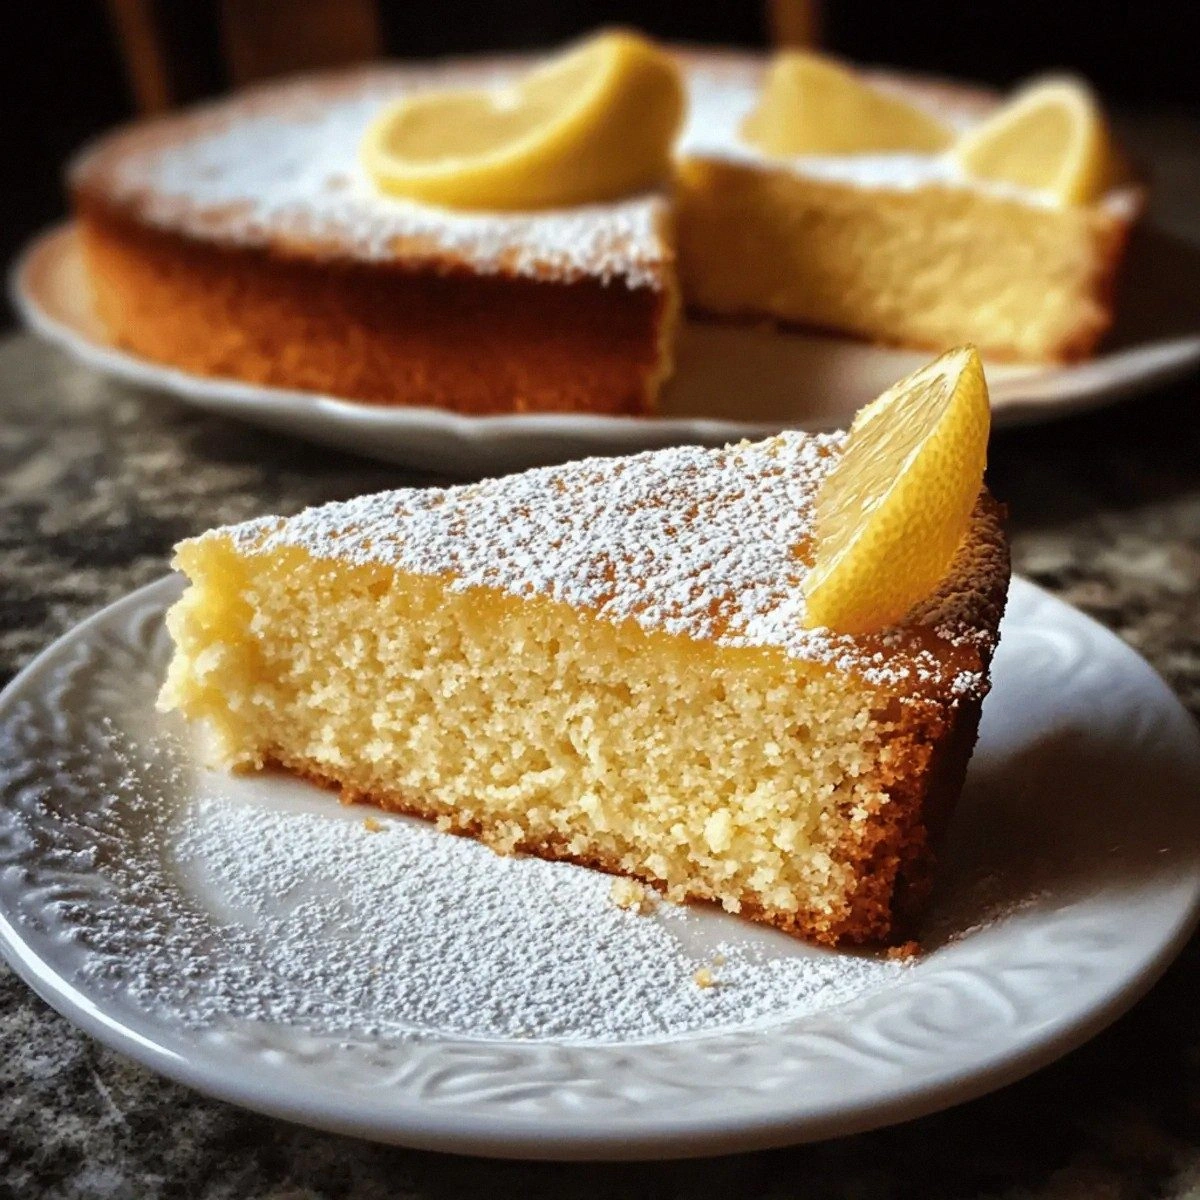
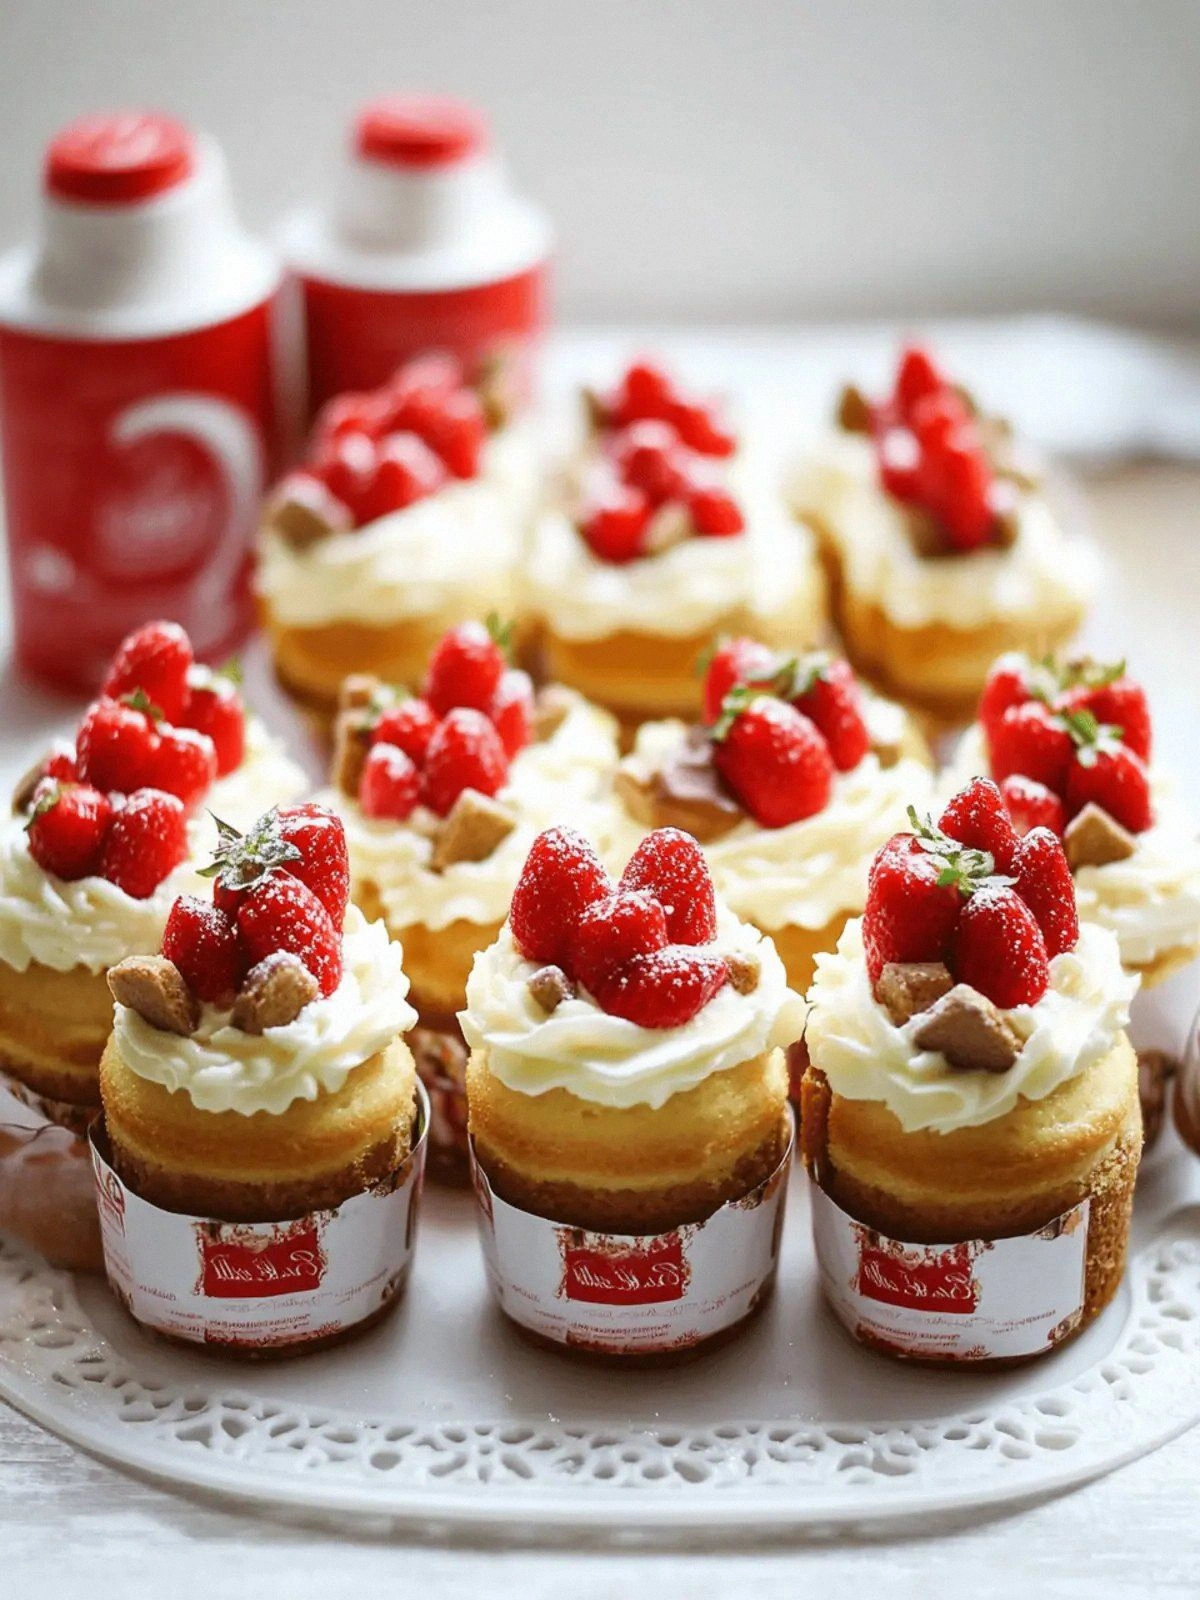
Picture this: the oven door opens to reveal a golden, perfectly risen sponge, its surface shimmering with a delicate sheen. The scent of vanilla and caramelized Biscoff spreads through the air, mingling with the faint aroma of fresh strawberries. As you slice through, the cake feels like a cloud—soft, buttery, and surprisingly dense. The first bite releases a burst of sweet, buttery flavor that lingers, followed by a subtle tang from the mascarpone.
What makes this cake truly stand out? It’s the marriage of classic sponge techniques with an unexpected Biscoff twist that melts into a silky mascarpone cream. The result is a dessert that feels indulgent yet light, like a whispered promise of comfort. The texture is a harmonious blend of airy sponge, creamy filling, and the crunchy caramelized edges of the Biscoff spread. And the finish? A dusting of powdered sugar that gives a gentle crunch, a final note that completes the symphony.
I dare you to taste this and not go back for seconds. This is hands down the best version you’ll ever make at home, and I’m not exaggerating. Most recipes get this completely wrong; they either overbake the sponge or under-season the mascarpone. Here’s what actually works: a precise balance of leavening, a gentle fold of the eggs, and a careful tempering of the cream. Picture yourself pulling this out of the oven, the whole kitchen smelling incredible, and the first slice sliding off the knife like a silk ribbon.
If you’ve ever struggled with a cake that turns out dense or uneven, you’re not alone—and I’ve got the fix. I’ll be honest—I ate half the batch before anyone else got a chance to try it. But that’s the secret to mastering this recipe: a little patience, a lot of love, and a pinch of daring. Stay with me here—this is worth it. Let me walk you through every single step — by the end, you’ll wonder how you ever made it any other way.
Okay, ready for the game‑changer? The next part is pure magic. I’ll guide you through the entire process, from whisking the batter to layering the luscious Biscoff‑mascarpone cream. We’ll talk about the exact temperatures, the timing of each fold, and the sensory checkpoints that tell you when you’re on the right track. And trust me, you’ll want to keep the kitchen open and the oven door slightly ajar to let the aroma envelop your entire home.
What Makes This Version Stand Out
- Taste: The caramelized crunch of Biscoff pairs with the subtle sweetness of vanilla, creating a flavor profile that feels both nostalgic and novel. The mascarpone adds a creamy richness that balances the airy sponge, preventing the dessert from feeling too sweet. The fresh strawberries provide a bright, tart contrast that cuts through the indulgence.
- Texture: This cake boasts a multi‑layered mouthfeel: a light, spongey base, a silky cream filling, and a crisp, caramelized edge. The Biscoff spread melts into the batter, giving a slight chew that keeps the cake from feeling too dense. The powdered sugar dusting adds a gentle crunch, completing the sensory experience.
- Simplicity: Despite its complex flavor, the recipe uses only a handful of pantry staples and a few specialty items. No fancy equipment is required—just a standard mixer, a whisk, and a good quality Biscoff spread. The process is straightforward, with clear steps that even novice bakers can follow.
- Uniqueness: Few sponge cakes incorporate Biscoff, and even fewer combine it with mascarpone. This unique blend sets it apart from the typical vanilla or chocolate sponges you find everywhere. The result is a dessert that feels fresh, daring, and unmistakably yours.
- Crowd Reaction: Friends who have tried this cake say it’s “the best thing I’ve ever tasted.” They rave about the airy sponge and the decadent filling, and many have asked for the recipe immediately after the first bite. The dessert’s elegance makes it perfect for parties, anniversaries, or a quiet Sunday treat.
- Ingredient Quality: The use of mascarpone and Biscoff spread elevates the dish to a gourmet level. Choosing a high‑quality Biscoff ensures the caramel flavor is rich and authentic, while fresh mascarpone brings a silky mouthfeel. The combination of these premium ingredients makes the cake feel indulgent without being over‑the‑top.
- Cooking Method: The technique of folding in the Biscoff spread gently into the batter keeps the sponge light. The mascarpone cream is whisked until it’s silky, then folded into the heavy cream to create a stable, airy filling. These steps preserve the cake’s delicate structure while maximizing flavor.
- Make‑Ahead Potential: The sponge can be baked a day ahead and stored in an airtight container. The mascarpone cream can also be prepped and chilled, then assembled just before serving. This flexibility makes the cake a convenient option for busy schedules.
Inside the Ingredient List
The Flavor Base
All-Purpose Flour (1 cup): Acts as the structural backbone, giving the sponge its rise and body. It’s essential to sift it to avoid lumps and to maintain a light crumb. Skipping the flour would result in a dense, crumbly texture that cannot hold the Biscoff and cream layers.
Cornstarch (1/4 cup): Adds an extra level of tenderness by tenderizing the gluten network. It helps keep the sponge airy and prevents it from becoming rubbery. If you don’t have cornstarch, you can use a tablespoon of potato starch as a substitute.
Baking Powder (1 tbsp): The leavening agent that makes the sponge rise. It reacts with the acidic elements in the batter to produce carbon dioxide. Without it, the cake would be flat and heavy.
Salt (pinch): Enhances the overall flavor profile by balancing the sweetness and highlighting the Biscoff’s caramel notes. It’s a subtle but crucial component; omitting it will leave the cake tasting flat.
The Texture Crew
Eggs (4 pcs): Provide structure, moisture, and lift. They’re whisked until frothy to incorporate air, which is vital for the sponge’s lightness. If you’re vegan, a flaxseed or chia egg can mimic the binding properties, but the texture will differ.
Granulated Sugar (1 cup): Sweetens the batter and helps create a tender crumb by preventing gluten development. It also caramelizes slightly during baking, adding a subtle golden hue. Use a light, clean sugar for the best results.
Vanilla Sugar (1 tbsp): Infuses a deep, aromatic vanilla flavor that complements the Biscoff’s caramel undertones. If you can’t find vanilla sugar, a teaspoon of vanilla extract will work, but the flavor will be slightly different.
The Unexpected Star
Biscoff Spread (1/2 cup): The star ingredient that transforms an ordinary sponge into a caramelized masterpiece. It’s blended into the batter, giving the cake a unique crunch and a rich, buttery flavor. If you prefer a stronger Biscoff taste, increase the amount to 3/4 cup, but be careful not to overrun the batter’s moisture.
The Final Flourish
Mascarpone (1 cup): Adds silky richness and a slight tang that balances the sweetness. It’s whisked until smooth and folded into the heavy cream to create a stable, airy filling. A good mascarpone will give the cake a luxurious mouthfeel that feels like a dessert in a dessert.
Heavy Cream (1 cup): Provides volume and a velvety texture when whipped. It’s tempered with the mascarpone to avoid curdling and to keep the filling light. If you’re lactose intolerant, you can use a non‑dairy heavy cream, but the texture may slightly differ.
Powdered Sugar (1/4 cup): Used for dusting the finished cake and adding a subtle sweetness that doesn’t overpower the Biscoff. It also gives a gentle crunch when it melts slightly on the surface. A light, sifted powdered sugar ensures a smooth finish.
Whipped Cream Stabilizer (1 tbsp): Keeps the whipped cream from deflating and gives the filling a firm, slice‑able consistency. It’s especially useful if you’re preparing the cake in advance. If you don’t have a stabilizer, a pinch of gelatin dissolved in water can serve as a substitute.
Strawberries (1 cup): Fresh fruit adds a bright, juicy contrast to the rich cream and caramelized sponge. They’re sliced thinly and layered on top for a burst of color and flavor. If strawberries are out of season, you can use frozen berries, thawed and drained, but the texture will be softer.
Everything’s prepped? Good. Let’s get into the real action.
The Method — Step by Step
- Preheat your oven to 350°F (175°C). Line a 9‑inch round pan with parchment paper and lightly grease the sides. This ensures the cake releases easily and stays moist. The oven should be fully preheated before you start the batter, so the sponge rises evenly.
- In a medium bowl, whisk together the all‑purpose flour, cornstarch, baking powder, and a pinch of salt. Sift the dry mixture to eliminate lumps, and set aside. This dry blend forms the foundation for a light, airy sponge.
- In a separate large bowl, beat the eggs and granulated sugar with an electric mixer on medium speed until the mixture is pale, thick, and holds stiff peaks. This step incorporates air, which is essential for the sponge’s lift. The mixture should feel like whipped cream when you lift the beaters.
- Add the vanilla sugar to the egg mixture and gently fold in the dry ingredients using a rubber spatula. Mix just until the batter is smooth—over‑mixing will develop gluten and make the cake dense. The batter should be glossy and pourable, but not runny.
- Fold the Biscoff spread into the batter with a gentle, circular motion, ensuring it’s evenly distributed. The Biscoff will slightly thicken the batter, so adjust by adding a tablespoon of warm milk if it appears too thick. This step is where the caramel flavor begins to mingle with the batter.
- Pour the batter into the prepared pan, smoothing the top with a spatula. Tap the pan lightly on the counter to release any large air pockets. The batter should fill the pan to about three‑quarters full, leaving room for rise.
- Bake for 25–28 minutes, or until a toothpick inserted into the center comes out clean. The cake should be golden brown on top and feel springy to the touch. Do not open the oven door too early, or the cake may sink.
- While the cake is baking, whip the heavy cream in a chilled bowl until soft peaks form. Add the mascarpone and whisk until fully incorporated and silky. This mixture should be light enough to fold into the cream without deflating.
- When the cake has cooled to room temperature, slice it horizontally into two layers. Spread the mascarpone‑cream filling evenly between the layers, then reassemble the cake. The filling should be smooth and glossy, adding a creamy contrast to the sponge.
- Top the assembled cake with sliced strawberries, then dust with powdered sugar. The strawberries add a bright, juicy contrast and a pop of color. Chill the cake for at least 30 minutes to allow the flavors to meld.
That’s it — you did it. But hold on, I’ve got a few more tricks that’ll take this to another level.
Insider Tricks for Flawless Results
The Temperature Rule Nobody Follows
Many bakers bake at the first temperature that pops up on the recipe. I’ve learned that a slightly lower oven temperature, around 325°F (165°C), yields a more even rise and prevents the top from burning while the center remains under‑baked. The trick is to preheat the oven for at least 30 minutes to ensure a stable heat environment.
Why Your Nose Knows Best
The scent of a cake baking is a powerful indicator of doneness. When the aroma becomes rich and caramelized, it’s a sign that the sugars are caramelizing correctly. If the smell is overly sweet or burnt, reduce the oven temperature or shorten the baking time.
The 5‑Minute Rest That Changes Everything
Once the cake comes out of the oven, let it rest in the pan for five minutes before transferring it to a wire rack. This brief rest allows the structure to set, preventing the cake from collapsing or cracking when you cut it. It also lets the batter finish cooking from residual heat.
The Secret to a Perfect Dusting
Use a fine sieve to dust powdered sugar over the cake. A coarse sift will leave clumps that can ruin the smooth surface. Sift just before serving to keep the sugar fresh and crunchy.
The Creamy Cream Stabilizer Hack
Adding a tablespoon of whipped cream stabilizer to the heavy cream ensures the filling stays fluffy and doesn’t separate when the cake sits at room temperature. If you’re allergic to dairy, you can replace the stabilizer with a tablespoon of agar‑agar dissolved in a small amount of hot water.
The Strawberry Swap
If strawberries are out of season, blueberries or raspberries work beautifully. The key is to slice them thinly and let them sit for a few minutes to release their juices, which will mingle with the mascarpone filling. The result is a vibrant, fruity layer that adds a new dimension to the cake.
Creative Twists and Variations
This recipe is a playground. Here are some of my favorite ways to switch things up:
Biscoff & Chocolate Fusion
Swap the Biscoff spread for a chocolate‑infused Biscoff or add a tablespoon of cocoa powder to the batter. The result is a decadent chocolate sponge that still retains the caramelized crunch. The mascarpone filling can be flavored with a hint of espresso for an extra kick.
Almond Crunch Layer
Sprinkle toasted almond slivers between the cake layers for a nutty crunch. The almonds pair beautifully with the Biscoff’s caramel notes and add a satisfying texture contrast. For a gluten‑free version, use almond flour instead of all‑purpose flour.
Lemon Zest Twist
Add a teaspoon of lemon zest to the batter for a bright, citrusy undertone that cuts through the richness. The mascarpone cream can also be infused with lemon zest for a tangy balance. This variation is perfect for spring or summer gatherings.
Tropical Paradise
Replace the strawberries with sliced mango or kiwi. The tropical fruit’s juiciness pairs well with the creamy filling, creating a dessert that feels like a vacation. A drizzle of coconut cream adds a final tropical flourish.
Decadent Chocolate Ganache Layer
Swap the mascarpone cream for a glossy chocolate ganache made with dark chocolate and heavy cream. The ganache will melt into the sponge, giving a rich, silky texture. Top with chocolate shavings for an extra indulgent finish.
Coffee‑Infused Delight
Add a shot of espresso to the batter for a subtle coffee flavor that complements the Biscoff. The mascarpone cream can be whisked with a pinch of instant coffee to enhance the depth. This version is perfect for coffee lovers looking for a sweet treat.
Storing and Bringing It Back to Life
Fridge Storage
Store the assembled cake in an airtight container in the refrigerator for up to 3 days. Cover the top with parchment paper to prevent the frosting from absorbing fridge odors. Before serving, let the cake sit at room temperature for 15 minutes to allow the flavors to fully develop.
Freezer Friendly
Wrap the cake tightly in plastic wrap, then place it in a freezer‑safe container. It can be frozen for up to 2 months. When you’re ready to enjoy it, thaw the cake in the refrigerator overnight. Add a splash of milk or cream to the filling before serving to restore its silky texture.
Best Reheating Method
Reheat the cake in a preheated 300°F (150°C) oven for 10–12 minutes, or until warm. To keep the filling from drying out, lightly mist the cake with water before baking. This gentle steaming effect will revive the cake’s moisture and keep it fresh.
Add a tiny splash of water before reheating — it steams back to perfection. This trick ensures that each bite remains as luscious as the first. Remember to keep the cake covered with foil to prevent the top from over‑browning.