I still remember the morning I accidentally created the most addictive breakfast of my life — what started as a desperate attempt to use up leftover sweet potatoes turned into a full-blown obsession. My kitchen looked like a flour bomb had detonated, the dog was wearing more batter than the bowl, and I had three different gluten-free flours scattered across the counter like some kind of experimental science lab. But when those first golden discs hit the skillet and that caramel-vanilla aroma started drifting through the house, I knew I had stumbled onto something magical. My roommate wandered in, still half-asleep, took one bite straight from the pan (because apparently forks are optional at 7 AM), and immediately demanded the recipe.
Here's the thing about most sweet potato pancake recipes out there — they're either gummy disasters that taste like baby food or they're so loaded with sugar you might as well eat cake for breakfast. If you've ever struggled with gluten-free pancakes that fall apart faster than your New Year's resolutions, you're not alone — and I've got the fix. These pancakes changed everything for me because they actually taste like sweet potatoes, not like someone waved a sweet potato over some flour and called it a day. They're fluffy enough to soak up maple syrup like little edible sponges, but sturdy enough that you can actually flip them without turning your breakfast into abstract art.
What makes this version absolutely irresistible is how the natural sweetness of the sweet potatoes means you need barely any added sugar, while the combination of gluten-free flours creates this incredible texture that's both tender and slightly crisp at the edges. Picture yourself pulling these off the griddle, steam rising into the morning light, the smell of vanilla and warm spices making it impossible to wait for proper plating. That first bite? It's like autumn and comfort and "why don't I make these every weekend" all rolled into one perfect forkful. I dare you to taste these and not go back for seconds — I personally inhaled four before my coffee was even ready.
The secret weapon here isn't some fancy ingredient you have to special order from the internet — it's actually in the technique and the way we coax maximum flavor from simple ingredients. Most recipes get this completely wrong by treating sweet potatoes like regular flour, but we're going to unlock their natural starch power to create pancakes so light they practically levitate off the plate. Stay with me here — this next part is worth it.
What Makes This Version Stand Out
- Texture Triumph: These pancakes achieve what every gluten-free recipe dreams of — a light, fluffy interior with crispy, lacy edges that shatter like thin ice when you bite into them. The secret lies in how we treat the sweet potatoes and the specific ratio of flours that creates structure without density.
- Flavor-First Philosophy: Instead of drowning the sweet potato in sugar and spices, this recipe lets the natural earthy sweetness shine through, enhanced by just enough warmth from cinnamon and a touch of vanilla that makes them smell like Saturday morning at grandma's house.
- Weekend-Simple Method: While some gluten-free recipes require seventeen different ingredients and the patience of a saint, this one comes together in one bowl with ingredients you probably already have. Okay, ready for the game-changer? We're using leftover sweet potatoes if you've got them, or microwaving them if you don't.
- Crowd-Pleasing Flexibility: Whether you're feeding picky kids who think vegetables are poison or health-conscious adults who Instagram their breakfast, these hit the sweet spot. They're naturally gluten-free without tasting like health food, sweet enough for the syrup-lovers but substantial enough for the savory crowd.
- Make-Ahead Magic: The batter actually improves after a 30-minute rest, and cooked pancakes freeze beautifully between layers of parchment paper. Future pacing here — imagine waking up on a busy weekday morning and having homemade pancakes ready in less time than it takes to find your keys.
- Ingredient Integrity: Every component pulls its weight, from the sweet potatoes that provide natural binding to the specific gluten-free flour blend that prevents the dreaded gummy texture. No weird gums, no specialty starches, just real food that happens to be gluten-free.
Alright, let's break down exactly what goes into this masterpiece, because understanding why each ingredient matters is what separates good cooks from great ones.
Inside the Ingredient List
The Flavor Base
The sweet potatoes are obviously the star here, but not all sweet potatoes are created equal. You want the orange-fleshed variety (often labeled as "yams" in American grocery stores, though true yams are a completely different tuber) because they're naturally sweeter and creamier than their pale counterparts. One medium sweet potato, about 12 ounces, gives you the perfect amount for a batch that serves four hungry people. Roast it whole until it's practically melting in its skin — this concentrates the sugars and develops those complex caramel notes that make your kitchen smell like you've been baking all day. When it's cool enough to handle, the flesh should slide right out of the skin like silk, ready to be transformed into pancake gold.
The Texture Crew
Here's where gluten-free baking gets interesting, and where most recipes completely miss the mark. Instead of relying on one flour that either turns gummy or gritty, we're creating a blend that mimics the properties of wheat flour. Brown rice flour provides structure and a slightly nutty flavor that complements the sweet potatoes beautifully. Tapioca starch adds stretch and flexibility, preventing your pancakes from crumbling apart like a bad relationship. A touch of oat flour (make sure it's certified gluten-free) gives tenderness and helps create those fluffy layers. The ratio is crucial — too much tapioca and your pancakes turn into rubber frisbees, too little and they'll fall apart faster than my willpower around fresh bread.
The Unexpected Star
This might sound weird, but hear me out — we're using buttermilk powder instead of regular milk. The acidity reacts with the baking soda to create extra lift, while the powder form means we can control the liquid ratio perfectly. Mixed with just enough water to create a thick, creamy liquid, it gives these pancakes a tangy background note that makes the sweet potato taste even sweeter by comparison. If you can't find buttermilk powder, regular buttermilk works too, but reduce the water in the recipe by the same amount. And now the fun part — we're adding a touch of maple syrup right into the batter, not just on top, which creates these amazing caramelized spots during cooking.
The Final Flourish
Baking powder and baking soda work together here like a chemical comedy duo — the powder provides steady lift during cooking, while the soda reacts immediately with the buttermilk for instant fluffiness. A single egg binds everything together without making the pancakes taste eggy, and melted butter adds richness that vegetable oil just can't match. The vanilla extract might seem optional, but leaving it out is like forgetting to wear pants — technically you can do it, but why would you want to? A pinch of salt might be the most important ingredient here, because without it, all the sweet flavors fall flat and taste one-dimensional.
Everything's prepped? Good. Let's get into the real action, because this is where the magic happens and I don't want you to miss a single moment of it.
The Method — Step by Step
- Start by roasting your sweet potato whole at 400°F for about 45 minutes to an hour, depending on size. You want it to be completely tender when pierced with a fork, practically collapsing in on itself. This step is crucial because we're not just cooking the potato — we're concentrating flavors and converting starches to sugars. The skin should be wrinkled and slightly caramelized, and when you split it open, steam should billow out carrying that intoxicating sweet-earthy aroma. Let it cool until you can handle it comfortably, then scoop out the flesh into a mixing bowl — you should have about 1½ cups of gorgeous orange puree.
- Mash the sweet potato until it's completely smooth, or better yet, run it through a food mill or ricer for the silkiest texture possible. This is not the time for rustic chunks — we're after a puree that will disappear into the batter and create a unified texture. Add your egg, melted butter, maple syrup, and vanilla to the warm sweet potato and whisk vigorously until everything is fully incorporated. The mixture should be the color of autumn leaves and smell like you're about to make the best decision of your morning. If the sweet potato is too hot, it might start cooking the egg, so let it cool slightly if needed.
- In a separate bowl, whisk together all your dry ingredients — the brown rice flour, tapioca starch, oat flour, baking powder, baking soda, salt, and spices. This ensures even distribution and prevents bitter pockets of leavening in your finished pancakes. The mixture should smell slightly nutty from the oat flour and earthy from the rice flour, with hints of whatever spices you're using. Make a well in the center of the dry ingredients — this old-school technique helps the wet ingredients incorporate more evenly.
- Mix your buttermilk powder with water according to package directions, or measure out your buttermilk if using liquid. The key here is temperature — room temperature buttermilk blends better and helps create a more uniform batter. Pour the buttermilk into your sweet potato mixture and whisk until smooth, then pour this entire wet mixture into the well in your dry ingredients. Using a spatula, fold everything together with as few strokes as possible — overmixing develops the starches and can make your pancakes tough. The batter should be thick but pourable, like slightly loose mashed potatoes.
- Heat your griddle or heavy skillet over medium heat — this is the temperature rule nobody follows, but it's absolutely critical. Too hot and the outside burns before the inside cooks, too cool and you get pale, gummy pancakes that stick to the pan. Test the temperature by flicking a drop of water onto the surface — it should dance and evaporate quickly but not explode into steam. Brush the surface with a thin film of butter or oil, just enough to prevent sticking. That sizzle when batter hits the pan? Absolute perfection.
- Scoop your batter onto the hot griddle and resist the urge to spread it out — let it find its own shape. Cook for 2-3 minutes until bubbles form on the surface and the edges start to look set and slightly dry. This is the moment of truth when patience pays off — don't flip too early or you'll have a broken, misshapen mess. When the bottom is golden brown with darker edges, slide your spatula under and flip with confidence. The second side needs only about half the cooking time, so stay alert.
- As each batch finishes, keep them warm on a wire rack set over a baking sheet in a 200°F oven. This prevents the bottoms from getting soggy while you cook the remaining batter. Don't stack them directly on top of each other — steam trapped between pancakes creates that unfortunate rubbery texture we've all experienced with gluten-free baked goods. The whole process should take about 30 minutes from first pour to last flip, and trust me, the anticipation building during that time is part of the experience.
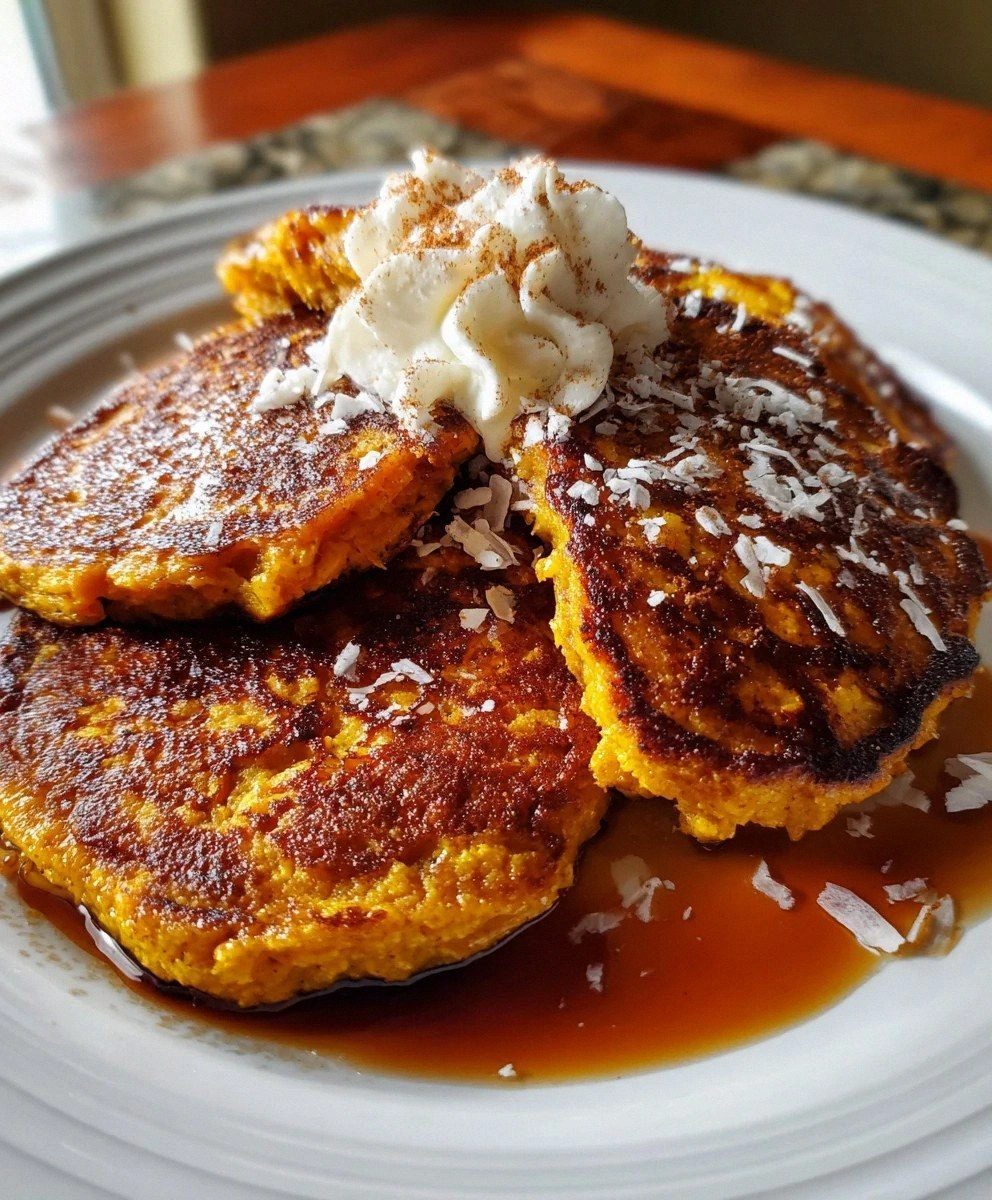
- Serve immediately while they're still warm and the edges are crispy. These pancakes are best enjoyed fresh, though they'll keep for a day or two in the fridge. Top with real maple syrup (the good stuff, not that corn syrup imposter), a pat of butter melting into all the nooks and crannies, and maybe some toasted pecans if you're feeling fancy. The combination of sweet, earthy, buttery flavors with those crispy edges will ruin you for ordinary pancakes forever.
That's it — you did it. But hold on, I've got a few more tricks that'll take this to another level, because good enough isn't in my vocabulary when it comes to breakfast.
Insider Tricks for Flawless Results
The Temperature Rule Nobody Follows
Your griddle temperature is everything, and here's the insider secret — start at medium, then reduce to medium-low after the first batch. The first pancakes always need a slightly hotter surface to compensate for the pan cooling when you add room-temperature batter. After that first batch, lower the heat because the pan will retain more heat as you continue cooking. This prevents the dreaded raw-inside, burnt-outside pancake that gives gluten-free cooking a bad reputation. A friend tried skipping this step once — let's just say it didn't end well, and her smoke detector got a workout that morning.
Why Your Nose Knows Best
Don't just rely on the timer — your sense of smell is actually the most reliable indicator of when pancakes are ready to flip. When you start smelling that sweet, slightly nutty aroma of caramelizing sugars, it's time to check the undersides. The edges should look set and slightly dry, and a few bubbles should be breaking the surface. If you wait for the whole surface to be covered in bubbles like regular pancakes, you'll overcook these — gluten-free batters behave differently and set faster than wheat-based ones.
The 5-Minute Rest That Changes Everything
After mixing your batter, let it rest for exactly five minutes before cooking. This isn't just some chef-y nonsense — it's food science magic. During this rest, the starches fully hydrate and the leavening starts working, creating a lighter texture. Too short and you get gritty pancakes, too long and they become dense. Set a timer and use these five minutes to heat your griddle and prep your toppings. This small pause makes the difference between good pancakes and legendary ones that'll have people asking for your secret.
The Flip Technique That Prevents Disasters
Use a thin, flexible spatula and get it completely under the pancake before attempting to flip. Don't hesitate — a confident, quick motion prevents the pancake from folding in on itself like a bad origami project. If you try to flip too early, the batter will stick and tear. If you wait too long, the bottom burns. The sweet spot is when the edges are set but the center still jiggles slightly when you shake the pan. This next part? Pure magic — give the pan a gentle shake first to loosen the pancake before sliding the spatula underneath.
Creative Twists and Variations
This recipe is a playground. Here are some of my favorite ways to switch things up:
The Dessert-for-Breakfast Version
Add 2 tablespoons of cocoa powder to your dry ingredients and fold in ½ cup of mini chocolate chips. The sweet potato keeps these incredibly moist while the chocolate creates pockets of melty goodness. Top with whipped cream and fresh berries, and you've basically got cake that society has deemed acceptable to eat before noon. I'll be honest — I ate half the batch before anyone else got to try it, claiming I needed to "test for doneness."
The Savory-Sweet Combo
Reduce the maple syrup to 1 tablespoon and add ½ cup of crumbled goat cheese, 2 tablespoons of chopped fresh rosemary, and black pepper to the batter. These sophisticated pancakes pair beautifully with crispy bacon and a drizzle of hot honey. They're perfect for that friend who claims they "don't like sweet breakfast foods" — this will convert them faster than you can say "gluten-free."
The Tropical Escape
Replace the buttermilk with full-fat coconut milk, add ¼ cup of shredded coconut to the batter, and fold in ½ cup of diced fresh mango. The tropical flavors complement the sweet potato surprisingly well, creating a pancake that tastes like a Caribbean vacation. Toast the coconut first for extra depth — it should smell like sunscreen and happiness by the time it's ready.
The Protein Powerhouse
Add 2 scoops of vanilla protein powder and reduce the brown rice flour by the same amount. These denser, more substantial pancakes are perfect for athletes or anyone who needs breakfast to carry them through a long morning. They'll be slightly less fluffy but keep you full for hours. Top with almond butter and sliced bananas for the complete post-workout package.
The Spice Market Special
Replace the cinnamon with 1 teaspoon each of ground cardamom and ground ginger, plus ½ teaspoon of black pepper. Add ¼ cup of chopped crystallized ginger for little spicy-sweet surprises throughout. These warming spices make the sweet potato taste even more complex, like something you'd find in a Moroccan spice shop. They're particularly amazing on cold mornings when you need breakfast to double as comfort food.
The Breakfast Sandwich Base
Make these pancakes larger (use ½ cup batter per pancake) and cook them until they're sturdy. They become the perfect vehicle for breakfast sandwiches — crispy bacon, fried egg, and maybe some sharp cheddar between two sweet potato pancakes creates the ultimate sweet-savory breakfast experience. The pancakes are substantial enough to hold everything without falling apart, even when loaded up with toppings.
Storing and Bringing It Back to Life
Fridge Storage
Let the pancakes cool completely on a wire rack before storing — trapping heat creates condensation that leads to soggy, sad reheated pancakes. Store them in an airtight container with parchment paper between layers to prevent sticking. They'll keep for up to 4 days in the refrigerator, though honestly, they've never lasted more than 2 days in my house. The key is making sure they're completely cool before sealing them up, or you'll create a humid environment that ruins that crispy edge we worked so hard to achieve.
Freezer Friendly
These freeze beautifully, making them perfect for meal prep. Cool completely, then freeze in a single layer on a baking sheet before transferring to a freezer bag with parchment between layers. They'll keep for up to 2 months, though I recommend using them within 1 month for best texture. Label your bag with the date — future you will thank present you when you're pulling out homemade pancakes on a busy Tuesday morning. Pro tip: freeze them in portions that match your typical breakfast needs, so you're not defrosting more than you need.
Best Reheating Method
The toaster is your friend here — it revives the crispy edges while warming the center without making them rubbery. Medium setting for 2-3 minutes usually does the trick, but keep an eye on them the first time since every toaster is different. The microwave works in a pinch, but wrap them in a damp paper towel and heat for just 30-45 seconds to prevent them from turning into hockey pucks. For that fresh-off-the-griddle experience, reheat them in a dry skillet over medium heat for 2 minutes per side — this brings back the crisp edges and makes them taste almost as good as new.