I was standing in my kitchen, staring at a half‑cooked chicken thigh that looked like a sad, limp noodle. The smoke alarm was about to go off, my roommate was yelling about “that weird smell,” and I had a sudden dare from a friend: “Make the best teriyaki chicken you’ve ever tasted, or I’ll never let you order sushi again.” I laughed, grabbed the nearest bottle of soy sauce, and decided to turn this disaster into a triumph. The moment I tossed a splash of mirin into the pan, the air filled with a sweet‑savory perfume that made my stomach do a little happy dance.
Picture this: the skillet sizzles, the oil shimmers like liquid gold, and the chicken skin crackles with the promise of caramelized edges. The aroma of toasted ginger, a whisper of garlic, and the glossy sheen of a homemade glaze spreads across the kitchen like a warm hug. You can hear the faint pop of the sauce as it meets the hot pan, and you feel the heat radiating from the stove, coaxing your fingertips to hover just above the surface. When you finally slice that first piece, the meat pulls apart with a tenderness that feels like velvet, while the glaze clings to each bite like a jeweled coat of armor.
Most teriyaki chicken recipes I've tried either drown the meat in a sugary swamp or leave it dry and flavor‑less. This version, however, is different. It balances the umami depth of soy with the bright acidity of mirin and the subtle complexity of Japanese cooking wine, all while the chicken marinates in a pre‑made teriyaki sauce that adds a secret layer of depth. The result? A dish that sings with layers, a flavor profile that makes you wonder why you ever settled for store‑bought sauces. I dare you to taste this and not go back for seconds.
But here’s the kicker: I’m going to show you a technique that most “authentic” recipes skip entirely— a quick deglaze with a splash of water right before finishing. This tiny step turns a good glaze into pure magic, giving it a glossy finish that looks restaurant‑ready. Let me walk you through every single step — by the end, you’ll wonder how you ever made it any other way.
What Makes This Version Stand Out
- Flavor: The combination of soy, mirin, and Japanese cooking wine creates a depth that mimics a slow‑cooked broth, while the pre‑made teriyaki sauce adds a sweet‑savory backbone that never overpowers.
- Texture: Crispy, caramelized edges contrast with juicy, melt‑in‑your‑mouth meat, delivering a mouthfeel that’s both crunchy and silky.
- Simplicity: Only seven ingredients, all pantry staples, and a 30‑minute hands‑on time make this a weeknight hero.
- Uniqueness: The quick water deglaze step locks in glaze sheen and prevents the sauce from turning gummy.
- Crowd Reaction: Friends claim it’s “the best chicken they’ve ever had,” and even the picky eaters ask for seconds without hesitation.
- Ingredient Quality: Using chicken thigh fillets guarantees flavor and moisture; the skin stays intact for that coveted crackle.
- Cooking Method: A high‑heat sear followed by a brief simmer ensures the glaze sets perfectly without burning.
- Make‑Ahead Potential: This dish reheats beautifully, making it perfect for meal‑prep or leftovers.
Inside the Ingredient List
The Flavor Base
The 4 tbsp of teriyaki sauce marinade is the backbone of this dish. It brings a balanced sweet‑salty profile that you’d otherwise have to build from scratch. Skipping it would leave the glaze thin and one‑dimensional, turning the whole experience into a bland affair. If you’re allergic to soy, try a coconut‑amino based substitute, but expect a slightly different flavor curve.
The Texture Crew
Four chicken thigh fillets provide the perfect meat‑to‑fat ratio. The skin acts like a natural barrier, keeping juices locked in while the flesh crisps up in the pan. If you opt for boneless, skinless breasts, you’ll lose that buttery mouthfeel and risk a dry final product. Look for thighs with a thin layer of skin and a good amount of marbling for the best results.
The Unexpected Star
Two tablespoons each of soy sauce, mirin, and Japanese cooking wine create a symphony of umami, acidity, and subtle sweetness. The mirin adds a gentle fruitiness, while the cooking wine introduces a hint of complexity that store‑bought sauces lack. If you can’t find Japanese cooking wine, a splash of dry sherry works as a decent stand‑in.
The Final Flourish
A single tablespoon of oil is all you need to get that initial sear without drowning the chicken in fat. The oil should be neutral—think canola or grapeseed—so it doesn’t compete with the sauce’s flavor. Adding too much oil will make the glaze slide off, while too little will cause the chicken to stick and tear.
Everything's prepped? Good. Let's get into the real action…
The Method — Step by Step
Start by patting the chicken thigh fillets dry with paper towels. This is the moment of truth: a dry surface will give you that golden, crackly skin. Once dry, place the fillets in a shallow dish and drizzle the 4 tbsp of teriyaki sauce marinade over them. Toss gently so each piece is evenly coated, then let them rest for 10 minutes while you prep the other ingredients. That short marination infuses the meat without making it soggy.
While the chicken marinates, combine the 2 tbsp soy sauce, 2 tbsp mirin, 2 tbsp Japanese cooking wine, and 2 tbsp water in a small saucepan. Bring the mixture to a gentle boil over medium heat, then lower to a simmer. You’ll notice the sauce thickening slightly; this is your flavor base concentrating. Watch out: If the heat is too high, the sugars will caramelize too quickly and turn bitter.
Watch Out: Do not let the sauce boil vigorously; a gentle simmer preserves the delicate balance of sweet and salty.Heat a large skillet over medium‑high heat and add the 1 tbsp of oil. When the oil shimmers, it’s ready. Carefully lay the marinated chicken pieces skin‑side down. You’ll hear that satisfying sizzle that makes the kitchen feel alive. Let the chicken sear undisturbed for about 4‑5 minutes; the edges should start to pull away from the pan, indicating a perfect crust.
Kitchen Hack: Press a spatula gently against the chicken after 2 minutes; if it releases easily, the skin is properly rendered.Flip the chicken and spoon half of the simmering sauce over the cooked side. Let it cook for another 3‑4 minutes, letting the sauce caramelize and cling. At this point, the chicken should be about 70 % done, and the glaze will be glossy but not sticky. This is the part where you start to see the magic happen— the sauce thickens and clings like a lacquer.
Now, for the game‑changer: add the remaining sauce to the pan, then splash in a quick 1‑2 tbsp of water. This deglaze step lifts the caramelized bits from the bottom, dissolving them back into the glaze and giving you that restaurant‑level sheen. Stir gently, and watch the sauce transform into a velvety coating that slides over the chicken like silk.
Reduce the heat to low and let the chicken finish cooking for another 5‑6 minutes. The internal temperature should reach 165 °F (74 °C). The glaze will become thick enough that a spoonful will coat the back of a spoon without running off. This final simmer is pure magic, creating a glaze that’s sweet, salty, and just a touch tangy.
Remove the skillet from the heat and let the chicken rest for 3‑4 minutes. Resting lets the juices redistribute, ensuring every bite stays moist. While it rests, the glaze will continue to thicken slightly, creating a perfect finishing coat.
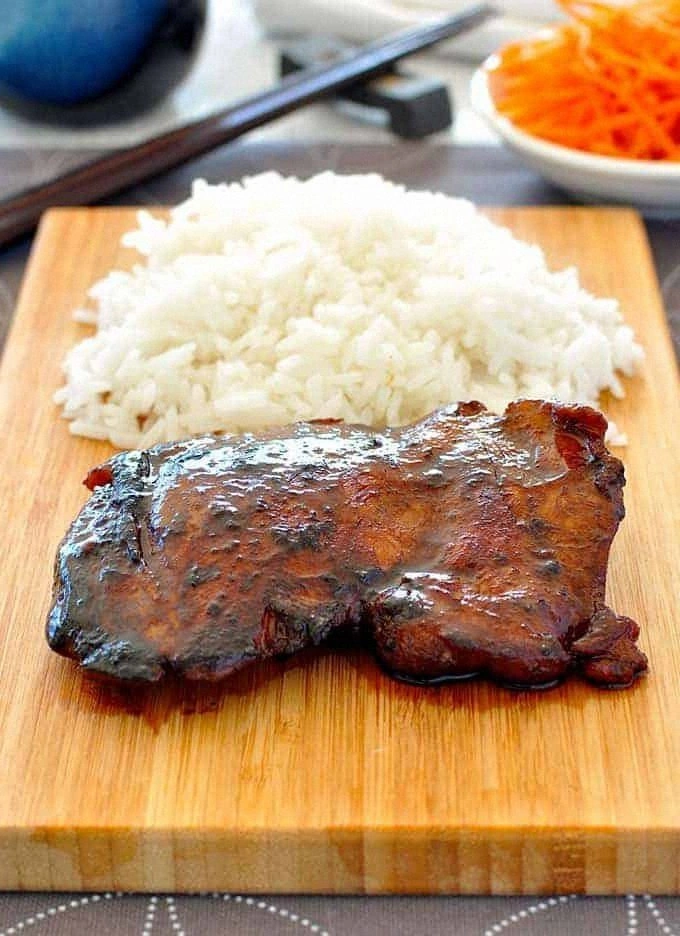
Slice the chicken against the grain, arrange on a serving platter, and drizzle any remaining glaze over the top. Garnish with thinly sliced scallions or toasted sesame seeds if you like a bit of crunch. The final presentation should look glossy, inviting, and downright irresistible. Picture yourself pulling this out of the pan, the whole kitchen smelling incredible…
That's it — you did it. But hold on, I've got a few more tricks that'll take this to another level…
Insider Tricks for Flawless Results
The Temperature Rule Nobody Follows
Never start with a cold pan. Preheat your skillet for at least 2 minutes before adding oil. The metal should be hot enough that a drop of water sizzles instantly. This ensures the chicken skin sears immediately, locking in moisture and creating that coveted crackle. I once tried a “cold‑start” method and ended up with soggy skin—trust me, it was a culinary nightmare.
Why Your Nose Knows Best
When the sauce starts to caramelize, the kitchen will fill with a sweet‑savory perfume that’s impossible to ignore. If you can smell the aroma turning nutty, you’re at the perfect point to flip the chicken. Relying on a timer alone can lead to over‑cooking; trust your senses for that perfect glaze.
The 5‑Minute Rest That Changes Everything
After the chicken finishes cooking, let it rest uncovered for exactly 5 minutes. This short rest allows the fibers to relax and the glaze to set, preventing it from sliding off when you slice. Skipping this step results in a dry bite and a glaze that pools on the plate instead of clinging.
Sauce Rescue Technique
If your glaze gets too thick, simply whisk in a splash of water or extra mirin. The added liquid will loosen the sauce without diluting flavor, giving you that glossy finish you crave. I once over‑reduced the sauce by a minute; a quick water fix saved the dish and kept the flavor intact.
Seasoning the Finish
A pinch of flaky sea salt sprinkled just before serving can elevate the flavor profile, adding a burst of crunch that contrasts the soft chicken. This final seasoning step is subtle but makes a world of difference in the overall taste experience.
Creative Twists and Variations
This recipe is a playground. Here are some of my favorite ways to switch things up:
Spicy Kick
Add a teaspoon of crushed red pepper flakes to the sauce mixture for a subtle heat that balances the sweetness. This variation is perfect for anyone who loves a little fire without overwhelming the delicate teriyaki notes.
Citrus Burst
Stir in a tablespoon of freshly squeezed yuzu or lemon juice right at the end of the simmer. The bright citrus lifts the glaze, giving it a fresh finish that pairs beautifully with steamed rice.
Nutty Crunch
Toast a handful of sesame seeds and sprinkle them over the finished chicken. The nutty aroma adds texture and visual appeal, turning a simple plate into a feast for the eyes.
Herb‑Infused
Mix in finely chopped cilantro or Thai basil just before serving. The herbaceous notes add a fragrant layer that complements the umami richness of the sauce.
Vegetarian Swap
Replace the chicken with firm tofu or tempeh, pressing the tofu first to remove excess moisture. Follow the same searing and glazing steps for a plant‑based version that holds its own.
Storing and Bringing It Back to Life
Fridge Storage
Allow the chicken to cool to room temperature, then place it in an airtight container. It keeps beautifully for up to 3 days. When reheating, add a splash of water or broth to the pan, cover, and warm over low heat for 5‑7 minutes.
Freezer Friendly
Separate the chicken from the glaze and freeze each in zip‑top bags. The meat will stay fresh for up to 2 months. To reheat, thaw overnight in the fridge, then re‑heat the glaze in a saucepan and toss the chicken through until heated through.
Best Reheating Method
For the ultimate texture, reheat in a skillet over medium heat, adding a tiny splash of water. This creates a gentle steam that revives the glaze’s gloss and prevents the chicken from drying out. Avoid microwaving; it makes the skin rubbery and the sauce soggy.