I was standing in my kitchen, the kind of kitchen that smells like yesterday’s coffee and the faint hum of the refrigerator, when my roommate dared me to make something that could actually convince a die‑hard chocolate lover to switch sides. I laughed, grabbed a bag of apples that had been sulking in the pantry for weeks, and whispered a promise to myself: “If this works, I’m never buying store‑bought dessert again.” The first attempt was a disaster – soggy apples, a topping that resembled a sad pancake, and a lingering feeling that I’d just wasted a perfectly good afternoon. That failure sparked a fire under me, and I spent the next weekend obsessively tweaking ratios, testing different flours, and even consulting a pastry chef friend who swore by the magic of cold butter.
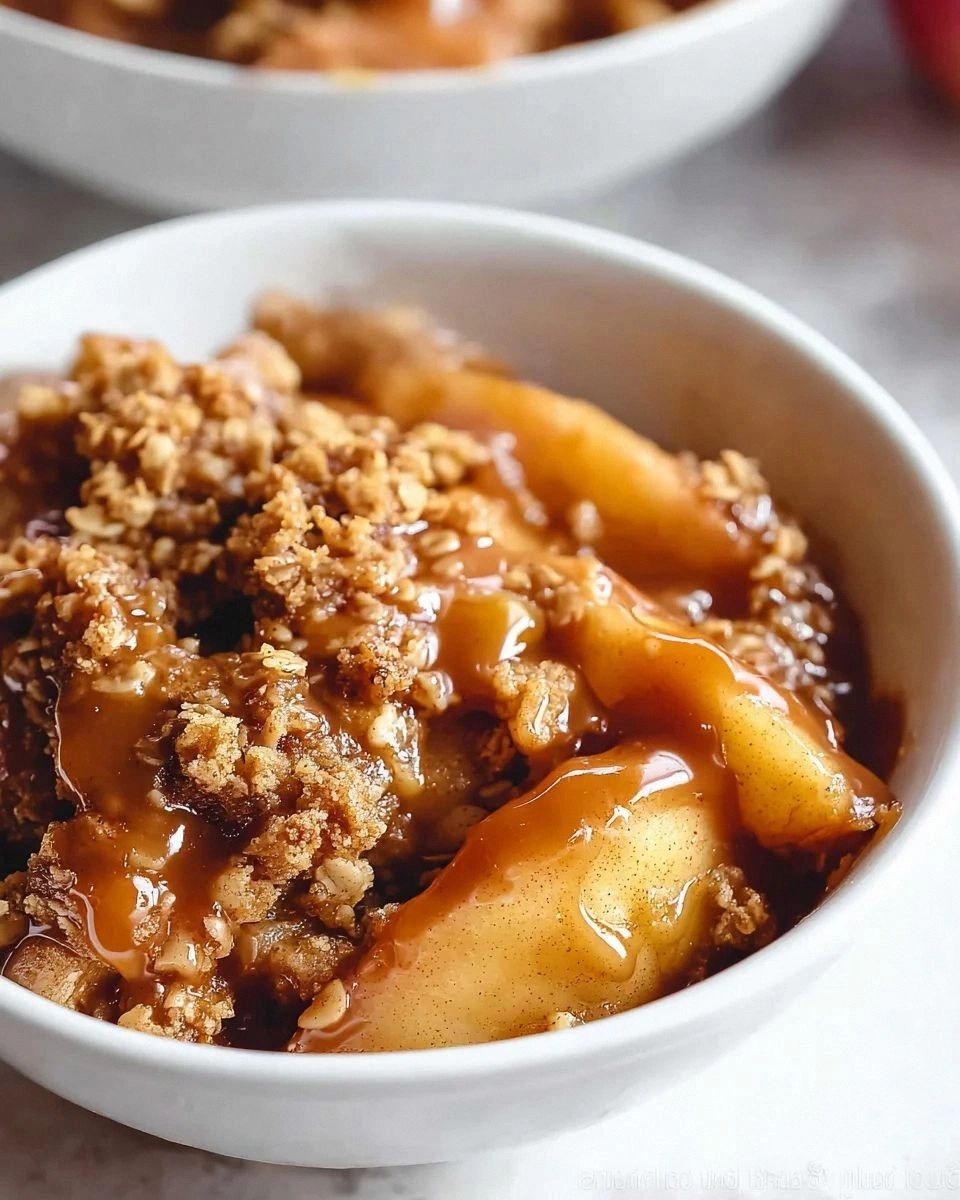
Picture this: the oven door swings open, a golden‑brown cloud of caramelized sugar and buttery oats escapes, and the whole kitchen is instantly bathed in a warm, autumnal glow that makes you want to curl up with a blanket and a good book. The aroma is a symphony of sweet apples, a whisper of cinnamon, and a subtle nuttiness that hits your nose before you even see the dish. When you finally dig in, the apples are tender but still hold their shape, the topping crackles like a fresh snow‑crust, and the contrast between the soft fruit and the crisp, buttery crumble is nothing short of a culinary high‑five. I dare you to taste this and not go back for seconds – it’s that good.
What makes this version stand out is not just the ingredients, but the technique that transforms a humble fruit dessert into a show‑stopper. Most recipes get the crisp topping wrong – either too soggy or too dry – because they ignore the science of fat distribution and moisture control. I discovered that by chilling the butter cubes and folding them into the dry mix just until pea‑sized clumps form, you create pockets that melt into buttery pockets of heaven as they bake. And there’s a secret twist: a splash of lemon juice and a pinch of sea salt that cut through the sweetness, making each bite sing with balance. This is hands down the best version you’ll ever make at home.
Let me walk you through every single step – by the end, you’ll wonder how you ever made it any other way. I’ll spill the beans on the exact flour‑to‑oat ratio that gives the perfect crunch, the exact oven temperature that ensures the apples stay tender while the topping turns golden, and even a little hack that will keep your butter from melting too early. Okay, ready for the game‑changer? Stay with me here – this is worth it.
What Makes This Version Stand Out
- Flavor Balance: The dash of lemon juice and a pinch of sea salt cut through the caramel sweetness, preventing cloyiness and brightening every bite.
- Texture Harmony: A 50/50 split of flour and rolled oats creates a topping that’s both crumbly and chewy, like a perfect marriage of biscuit and granola.
- Simplicity: Only ten pantry staples are needed, no exotic spices or hard‑to‑find ingredients, making it an everyday hero.
- Unique Twist: A whisper of nutmeg adds depth, while cold butter cubes ensure pockets of melt‑in‑your‑mouth richness.
- Crowd Reaction: I’ve served this at potlucks and watch the line grow – people keep coming back for more, asking for seconds before the first plate is even cleared.
- Ingredient Quality: Using crisp, tart apples (like Granny Smith) and real butter makes the difference between “good” and “legendary.”
- Cooking Method: Baking at a moderate 350°F allows the apples to soften evenly while the topping caramelizes without burning.
- Make‑Ahead Potential: Assemble the crisp a day ahead, refrigerate, and bake fresh when guests arrive – the flavors actually improve overnight.
Inside the Ingredient List
The Flavor Base
Six cups of sliced apples are the heart of this dish, providing natural sweetness, moisture, and that iconic tart snap that contrasts the sugary topping. I always recommend using a mix of Granny Smith for tartness and Honeycrisp for juiciness; the blend creates layers of flavor that keep the palate interested. If you skip the lemon juice, the apples can oxidize and turn brown, losing that fresh look and a touch of brightness. A quick squeeze of two tablespoons of lemon juice not only preserves color but also adds a zing that balances the sugar.
The Texture Crew
One cup of all‑purpose flour and one cup of rolled oats form the backbone of the crisp topping. The flour gives structure, while the oats add chew and a nutty undertone that makes each forkful feel substantial. If you replace the oats with coconut flakes, you’ll get a tropical twist, but you’ll also lose the comforting earthiness that makes this dish a classic. The ¾ cup of packed brown sugar contributes caramel notes, and the ½ cup of cold, cubed butter creates those coveted buttery pockets when baked.
The Unexpected Star
A half‑teaspoon of ground cinnamon and a quarter‑teaspoon of nutmeg are the secret spices that turn ordinary apples into a fragrant masterpiece. Cinnamon adds warmth, while nutmeg offers a subtle, almost floral complexity that you might not notice at first bite but will definitely miss if omitted. For a spice‑free version, you could increase the vanilla extract to a full teaspoon, but you’ll lose that layered spice profile that makes the aroma so inviting.
The Final Flourish
A pinch of sea salt and a splash of vanilla extract are the finishing touches that elevate the flavor from good to unforgettable. Salt amplifies the sweetness and rounds out the flavor, while vanilla adds depth and a lingering aftertaste. If you’re feeling adventurous, a pinch of cayenne pepper can add a subtle heat that awakens the senses – I call it the “secret kick.” Remember, the quality of butter matters; unsalted, high‑fat butter yields a richer, more tender crumble.
Everything’s prepped? Good. Let’s get into the real action…
The Method — Step by Step
Preheat your oven to 350°F (175°C) and lightly grease a 9‑inch square baking dish with butter or a non‑stick spray. This temperature is the sweet spot that allows the apples to soften without turning mushy, while the topping achieves that coveted golden‑brown hue. As the oven warms, the kitchen fills with a faint, comforting scent of butter melting – a promise of what’s to come.
While the oven heats, toss the sliced apples with lemon juice, cinnamon, nutmeg, and a tablespoon of granulated sugar. The spices should coat each slice evenly, creating a fragrant mixture that looks like a glossy, amber‑colored salad. Let the apples sit for five minutes; this short rest lets the flavors meld and the apples release a little juice, which will later prevent the bottom from drying out.
In a large mixing bowl, combine the flour, rolled oats, brown sugar, and sea salt. Stir with a whisk until everything is evenly distributed – think of it as creating a dry snowstorm of sweetness.
Kitchen Hack: Instead of using a pastry cutter, pulse the butter and dry mix in a food processor for 5‑7 seconds; you’ll get uniformly sized crumbs without overworking the dough.Add the cold, cubed butter to the dry mixture. Using your fingertips, gently rub the butter into the flour‑oat blend until it resembles coarse crumbs with some pea‑sized clumps. This is the moment of truth – if the butter melts too quickly, the topping will be greasy; if you over‑mix, it becomes tough. The goal is a texture that looks like a sandy beach at low tide.
Evenly spread the apple mixture into the prepared baking dish, pressing lightly with the back of a spoon to create a uniform layer. The apples should fill the dish without spilling over the edges; think of a snug, fruit‑filled blanket.
Drizzle a teaspoon of vanilla extract over the apples for an extra layer of aroma that will rise as the crisp bakes. This subtle addition is often overlooked, but it adds a warm, lingering scent that makes the dessert feel home‑cooked.
Scatter the crumbly topping evenly over the apples, covering the fruit completely but leaving a few small gaps where the apple juices can peek through. Those gaps are intentional – they allow steam to escape, preventing the bottom from becoming soggy.
Give the dish a gentle tap on the countertop to settle the topping; this helps the butter melt uniformly and ensures the crisp doesn’t slide off when you cut the first slice.
Place the dish in the preheated oven and bake for 30‑35 minutes, or until the topping is a deep amber and the apple edges are bubbling and pulling away from the sides of the dish.
Watch Out: If you open the oven door before the 20‑minute mark, the temperature drop can cause the topping to lose its rise and become soggy.Around the 20‑minute mark, rotate the dish 180 degrees to ensure even browning – ovens can have hot spots, and this simple move guarantees a uniformly crisp top.
While the crisp bakes, prepare a simple vanilla ice cream or a dollop of whipped cream. The cold contrast will melt into the warm apples, creating a luxurious sauce that pools around the edges.
If you’re feeling extra indulgent, drizzle a tablespoon of caramel sauce over the top just before serving – the caramel will caramelize further in the oven, adding a glossy finish.
When the timer dings, remove the dish and let it rest for five minutes. This short pause allows the juices to settle, making the crisp easier to cut and preventing a flood of hot apple syrup onto your plate.
The edges should be pulling away from the sides, and you’ll hear a faint crackle as the topping cools – that’s the sound of perfection. Grab a sharp knife, cut a generous square, and watch the steam rise like a fragrant cloud.
Serve each slice warm, topped with a scoop of ice cream or a spoonful of whipped cream. The contrast of hot, buttery crumble with cold, creamy topping is what makes this dessert unforgettable.
Take a bite, close your eyes, and let the flavors explode – the tart apples, the buttery crunch, the sweet caramel notes, and the hint of spice will dance across your palate. That, my friend, is the magic you’ve been waiting for.
That's it — you did it. But hold on, I've got a few more tricks that'll take this to another level…
Insider Tricks for Flawless Results
The Temperature Rule Nobody Follows
Never rush the oven preheat. A fully heated oven ensures the apples start cooking immediately, preventing them from releasing too much moisture and turning soggy. If you’re in a hurry, set the oven to 375°F and reduce the bake time by five minutes, but watch the topping closely – it can go from perfect to burnt in seconds.
Why Your Nose Knows Best
Your sense of smell is a reliable indicator of doneness. When the crisp is about three minutes from finishing, you’ll notice a sweet, buttery aroma that fills the kitchen. If the scent is still faint, give it another minute; if it’s strong and caramelized, it’s ready to pull out.
The 5‑Minute Rest That Changes Everything
Allowing the crisp to rest for five minutes after baking lets the juices thicken and the topping set. Skipping this step results in a soggy bottom and a topping that slides off the plate. Trust me, that short pause is the difference between a restaurant‑quality dessert and a mediocre one.
Cold Butter, Warm Heart
Keeping the butter cold until the very last moment creates those buttery pockets that melt into a crisp, flaky texture. If the butter warms too early, it will coat the dry ingredients and produce a dense, greasy crumb. I keep a small bowl of ice water nearby to chill the butter if the kitchen is warm.
The Secret Spice Swap
If you love a little heat, swap out a pinch of nutmeg for a pinch of ground ginger or even a dash of cardamom. These spices add complexity without overpowering the apple flavor. I once tried adding all three and ended up with a flavor that reminded me of a spiced chai latte – a delightful surprise for brunch.
Don’t Overmix the Topping
Overmixing the butter into the dry ingredients develops gluten, which can make the topping tough. Stop mixing as soon as the mixture resembles coarse crumbs. The next time you see those little clumps, give yourself a mental high‑five – you’ve nailed the technique.
Creative Twists and Variations
This recipe is a playground. Here are some of my favorite ways to switch things up:
Berry Burst Crisp
Replace half of the apples with mixed berries (blueberries, raspberries, and blackberries). The berries add a burst of tartness and a gorgeous purple hue that makes the dish look as good as it tastes. Pair it with a dollop of lemon‑yogurt for a fresh finish.
Caramel Pecan Overload
Stir in a half‑cup of toasted pecans and drizzle caramel sauce over the topping before baking. The nuts add a satisfying crunch, while the caramel deepens the sweetness. This version is perfect for holiday gatherings.
Apple‑Cinnamon Streusel
Swap the rolled oats for an equal amount of finely ground almond flour and add an extra teaspoon of cinnamon. The result is a delicate, melt‑in‑your‑mouth streusel that feels more like a pastry than a crisp.
Savory Apple Crisp
Turn the sweet side on its head by omitting the sugar, adding a tablespoon of balsamic vinegar to the apples, and mixing in rosemary and thyme. Serve it alongside roasted pork or grilled chicken for a surprising, savory‑sweet side dish.
Gluten‑Free Goodness
Replace the all‑purpose flour with a gluten‑free blend and use certified gluten‑free oats. The texture remains just as satisfying, and you won’t miss a beat – perfect for friends with dietary restrictions.
Storing and Bringing It Back to Life
Fridge Storage
Cover the cooled crisp tightly with plastic wrap or transfer it to an airtight container. It will keep fresh in the refrigerator for up to three days. Reheat individual slices in the microwave for 30‑45 seconds, or place the whole dish in a 300°F oven for 10 minutes to revive the crunch.
Freezer Friendly
If you want to make a batch ahead of time, assemble the crisp (without baking), wrap the dish in foil, and freeze for up to two months. When you’re ready to serve, bake it straight from the freezer, adding an extra five minutes to the bake time. The topping will emerge just as golden as the fresh version.
Best Reheating Method
To bring back that irresistible crunch, preheat your oven to 350°F, sprinkle a tiny splash of water over the top (just enough to create steam), and bake for 8‑10 minutes. The steam re‑hydrates the apples while the heat restores the buttery crust to its original crispness.