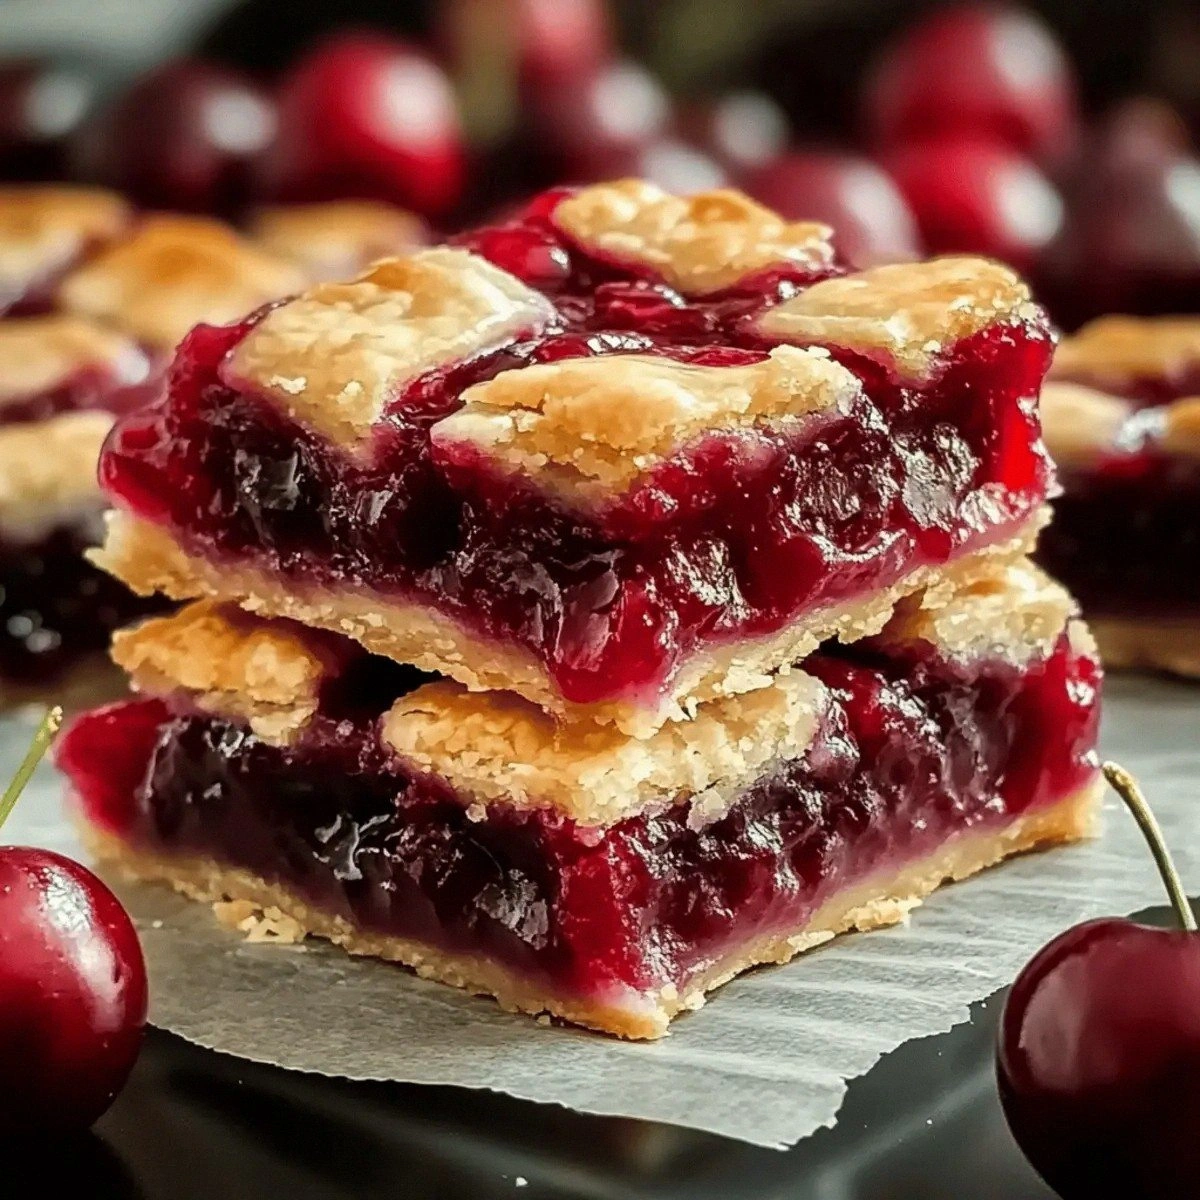
I’m going to start with a confession: I once tried to bake a cherry dessert that turned out flatter than a pancake on a hot griddle, and that disaster sparked the creation of the ultimate cherry pie bars you’re about to read about. Picture this: a rainy Saturday afternoon, the kitchen smelling like burnt sugar and regret, while my roommate dared me to “make something that actually tastes like a cherry pie and still looks like a bar”. I accepted the challenge, because who doesn’t love a good dare, and after a few frantic experiments I finally nailed a version that makes the ordinary feel extraordinary. The moment I sliced the first bar, the glossy cherry topping gleamed like sunrise on a lake, and the buttery crust cracked with a sound that reminded me of fresh snow underfoot. That first bite was a fireworks display of sweet-tart cherry, buttery crumble, and a whisper of almond that lingered like a secret.
If you’ve ever struggled with the classic “pie in a pan” fiasco—where the crust either slides off like a wet noodle or stays stubbornly soggy—this recipe is the antidote. Most cherry bar recipes either skimp on butter, leaving you with a dry, crumbly base, or drown the fruit in a sugary glaze that masks the natural tartness. My version flips that script by using real butter, a touch of almond extract, and a secret technique that locks in moisture without turning the bars into a gummy mess. The result? A bar that’s crisp on the edges, tender in the middle, and topped with a cherry layer that shines like a jewel and tastes like a fresh‑baked cherry pie, not a canned afterthought.
What really sets these bars apart is a little twist I discovered while rummaging through my pantry for inspiration: a dusting of confectioners’ sugar right after baking. This isn’t just for looks; it creates a subtle, melt‑in‑your‑mouth sweetness that balances the tart cherry filling perfectly. I dare you to taste this and not go back for seconds—seriously, I’ve seen grown‑ups turn into kids again after the first bite. And if you’re thinking “I’ve had cherry bars before,” brace yourself, because this is hands down the best version you’ll ever make at home. I’ll be honest—I ate half the batch before anyone else got a chance to try it, and that’s a testament to how addictive these bars are.
Okay, ready for the game‑changer? In the next sections I’ll walk you through every single step, from selecting the perfect butter to mastering that flawless cherry glaze. By the end, you’ll wonder how you ever made any other version. Picture yourself pulling this out of the oven, the whole kitchen smelling incredible, the glaze glistening, and the crust cracking just enough to reveal that buttery interior. Stay with me here — this is worth it.
What Makes This Version Stand Out
- Flavor Depth: The almond extract adds a subtle nutty undertone that elevates the cherry’s natural tartness without overpowering it.
- Texture Harmony: A buttery, shortbread‑like crust meets a glossy, jam‑like topping, creating a contrast that’s both crunchy and melt‑in‑your‑mouth.
- Simplicity: Only nine ingredients, all pantry staples, mean you can throw this together on a weeknight without a special trip to the store.
- Uniqueness: The final dusting of confectioners’ sugar creates a sweet‑cloud finish that most recipes overlook.
- Crowd Reaction: Guests invariably ask for the “secret” and end up begging for the recipe, turning any gathering into a cherry‑filled celebration.
- Ingredient Quality: Real butter (not margarine) provides that rich, buttery mouthfeel that shortcuts can’t mimic.
- Cooking Method: Baking the crust first ensures a firm base, while the topping finishes under a brief second bake for a glossy seal.
- Make‑Ahead Potential: These bars store beautifully, staying fresh for days, and even taste better after a night’s rest as flavors meld.
Inside the Ingredient List
The Flavor Base
Real butter is the heart of any good shortbread, and here it delivers a rich, creamy foundation that other fats simply can’t match. Using a cup of high‑quality butter (preferably European style) ensures a tender crumb that melts in your mouth. If you skip the butter or replace it with a margarine spread, you’ll lose that buttery aroma and the crust will become rubbery. A quick tip: let the butter soften at room temperature just enough to be pliable, but not melted—this keeps the dough from turning greasy.
The Sweet Symphony
Granulated sugar not only sweetens the crust but also aids in caramelizing the edges, giving you those coveted golden‑brown borders that look like toasted almond slices. The 1 cup amount is balanced so the bars aren’t cloyingly sweet; the cherry filling provides the rest of the tartness. If you prefer a deeper caramel note, you can swap half of the granulated sugar for brown sugar, but be aware that the crust will darken a shade.
The Binding Duo
Eggs act as the glue that holds the crumb together, and the two large eggs in this recipe provide just enough structure without making the crust dense. The almond extract, though used sparingly at 1 teaspoon, adds a fragrant, nutty backdrop that makes the cherry flavor pop. If you’re allergic to nuts, a dash of rum extract works as a surprising alternative, delivering a warm, slightly spicy nuance.
The Texture Crew
All‑purpose flour at 2½ cups forms the backbone of the crust, delivering that perfect crumbly‑yet‑firm texture. The half‑teaspoon of salt isn’t just a flavor enhancer; it balances the sweetness and accentuates the fruit’s natural acidity. Skipping the salt will make the bars taste flat, like a dessert that forgot to bring its personality to the party.
The Unexpected Star
Canned cherry pie filling might sound like a shortcut, but a quality 21‑oz can gives you consistent flavor, texture, and that beautiful ruby glaze without the labor of cooking fresh cherries. The filling’s natural pectin helps it set nicely on the crust, preventing a soggy bottom. If you’re a purist, you can substitute with fresh pitted cherries cooked down with a splash of lemon juice and a tablespoon of cornstarch.
The Final Flourish
A generous dusting of confectioners’ sugar after baking adds a delicate, snow‑like finish that not only looks stunning but also adds a subtle sweet crunch. This final step is where the bars truly “brighten your day” – the sugar catches the light, making each piece look like a miniature dessert jewel. Skipping this step would be like serving a concert without the final crescendo.
Everything's prepped? Good. Let's get into the real action…
The Method — Step by Step
Preheat your oven to 350°F (175°C) and line a 9‑by‑13‑inch baking pan with parchment paper, leaving an overhang on the sides for easy removal later. The moment the oven clicks on, you’ll hear that comforting hum that tells you a great bake is about to begin. While the oven heats, melt the butter in a saucepan over low heat until it’s just liquid, then set aside to cool slightly—this prevents the eggs from scrambling later.
Kitchen Hack: If you want an extra‑crisp edge, sprinkle a pinch of coarse sea salt on the crust before the first bake.In a large mixing bowl, whisk together the flour, granulated sugar, and salt until evenly combined. This dry mix is the canvas for the buttery brush strokes to come. Add the cooled melted butter and stir with a wooden spoon until the mixture resembles coarse crumbs—think of it as a sandy beach where each grain is coated in butter.
Next, beat the two eggs together with the almond and vanilla extracts, then pour the liquid into the crumb mixture. As you fold, you’ll notice the dough beginning to hold together, forming a pliable but not sticky mass. If the dough feels too dry, add a tablespoon of cold milk; if it’s too wet, sprinkle in a bit more flour—just enough to keep it manageable.
Press the dough evenly into the prepared pan, using the back of a spoon or your fingertips to create a smooth, uniform layer about ½‑inch thick. The edges should be slightly higher than the center; this will give you those coveted “raised edges” that crack like thin ice when you cut the bars. Once pressed, bake the crust for 12‑15 minutes, or until the edges turn a light golden brown and you can smell a faint toasty aroma.
Watch Out: Do not over‑bake the crust at this stage; an overly dark base will become bitter once the cherry topping is added.While the crust is in the oven, give the canned cherry pie filling a quick stir to break up any large chunks. If you like a smoother surface, run the filling through a potato masher or food processor for a few seconds. This step ensures an even layer later, preventing unsightly pockets of liquid that could sog the crust.
When the crust reaches that perfect golden hue, remove it from the oven and immediately spread the cherry filling over the entire surface, using an offset spatula to smooth it out. The heat from the crust will slightly warm the filling, helping it set faster during the second bake. The scent at this point is intoxicating—sweet cherries mingling with buttery notes—making you want to lick the spoon.
Return the pan to the oven for a second bake of 10‑12 minutes. This brief bake lets the cherry layer caramelize just enough to develop a glossy sheen without turning into a gummy mess. Keep an eye on the edges; they should start pulling away from the pan, a visual cue that the bars are nearly done.
Kitchen Hack: After the second bake, let the bars cool in the pan for 10 minutes, then place a cooling rack on top of the parchment to speed up the cooling process and keep the crust from steaming.Once the bars are completely cool (about 20‑30 minutes at room temperature), dust the top generously with confectioners’ sugar using a fine mesh sieve. The sugar will cling to the still‑slightly‑warm cherry glaze, creating a delicate, frosted appearance. This is the moment where the bars truly “brighten your day”—the sugar catches the light like a fresh snowfall.
Lift the bars out of the pan using the parchment overhang and place them on a cutting board. Using a sharp, serrated knife, cut the bars into squares or rectangles—my personal favorite is a 2‑by‑2‑inch size for perfect bite‑sized indulgence. Let the pieces sit for a minute before serving; this allows the glaze to set and the crust to firm up a touch more.
That’s it — you did it. But hold on, I’ve got a few more tricks that’ll take this to another level…
Insider Tricks for Flawless Results
The Temperature Rule Nobody Follows
Never underestimate the power of a consistent oven temperature. I once baked these bars in a convection oven set to 350°F and ended up with a crust that was too dry on the edges. The solution? Switch to a conventional bake or lower the temperature by 15°F and extend the bake by a couple of minutes. Your crust will stay tender and the cherry topping will retain its glossy sheen.
Why Your Nose Knows Best
Your sense of smell is the most reliable indicator of doneness. When the crust starts to emit a buttery, toasted aroma, that’s your cue to pull it out of the oven. If you rely solely on visual cues, you might over‑bake and lose that delicate crumb. Trust that nose—if it smells like a bakery, you’re golden.
The 5‑Minute Rest That Changes Everything
Allow the bars to rest for at least five minutes after the final dusting. This short pause lets the confectioners’ sugar adhere properly and the cherry glaze to firm up. Skipping this rest often results in a soggy top that slides off the plate. Patience here pays off in a cleaner slice and a more satisfying texture.
The Butter Temperature Trick
If you’re in a rush, you can soften butter in the microwave for 5‑10 seconds, but be careful not to melt it. Melted butter creates a denser crumb, while softened butter yields that airy, melt‑in‑your‑mouth bite. A quick test: press a finger into the butter—if an indentation remains but the butter doesn’t ooze, you’ve hit the sweet spot.
The “Steam‑Back” Reheat
When reheating leftovers, add a splash of water (about a tablespoon) to the pan and cover with foil. The steam generated revives the crust’s crispness while keeping the cherry filling moist. This trick transforms day‑old bars into a fresh‑out‑of‑the‑oven experience.
Creative Twists and Variations
This recipe is a playground. Here are some of my favorite ways to switch things up:
Almond‑Crunch Topping
Swap half of the confectioners’ sugar for finely ground almond meal and sprinkle toasted almond slivers on top before the second bake. The result is a nutty crunch that complements the cherry’s tartness and adds an extra layer of texture.
Chocolate‑Swirl Delight
After spreading the cherry filling, drizzle melted dark chocolate over the surface and use a knife to swirl it into a marble pattern. This variation brings a bittersweet contrast that makes the bars feel indulgent enough for a special occasion.
Citrus‑Infused Cherry
Add a teaspoon of orange zest to the cherry filling before spreading. The citrus brightens the flavor profile, making the bars taste like a springtime dessert rather than a winter comfort food.
Whole‑Wheat Crust
Replace half of the all‑purpose flour with whole‑wheat flour for a nuttier, slightly denser crust. This version pairs wonderfully with a cup of tea and gives a wholesome twist without sacrificing the buttery feel.
Mini Bar Bites
Press the dough into a mini muffin tin, bake the crust, then add a spoonful of cherry filling to each cup and finish the bake. These bite‑size treats are perfect for cocktail parties or as a cute lunchbox surprise.
Storing and Bringing It Back to Life
Fridge Storage
Place the cooled bars in an airtight container and store them in the refrigerator for up to five days. The cold environment keeps the cherry glaze from becoming overly sticky and preserves the buttery crust’s texture.
Freezer Friendly
Wrap individual bars in parchment paper, then seal them in a freezer‑safe zip‑top bag. They’ll freeze beautifully for up to three months. When you’re ready to enjoy, let them thaw at room temperature for 20 minutes, then apply the “steam‑back” reheating trick for optimal freshness.
Best Reheating Method
To revive a refrigerated bar, preheat your oven to 300°F (150°C), place the bar on a baking sheet, and add a tiny splash of water (about a teaspoon) to the edge of the sheet. Cover loosely with foil and heat for 8‑10 minutes. The steam generated brings back the crisp crust while the cherry filling stays luscious.