I was halfway through a night of late‑night snacking, scrolling through recipe blogs when I stumbled across a dish that felt like a culinary dare: Chicken Normandy. I’d been craving a comforting, rustic entrée for weeks, but every attempt I made ended with a bland, over‑cooked chicken that tasted like it had been left out in the rain. I laughed at myself, but the memory of that soggy, flavor‑dead chicken stayed with me. That night I decided to turn the tables and give this classic French dish a modern, kitchen‑friendly makeover that would make even my skeptical friend, who thinks French cooking is all about fancy techniques, swoon.
Picture the kitchen: the scent of sizzling butter and fresh thyme rises from the skillet, the gentle hiss of a white wine reduction fills the air, and the sound of a wooden spoon slapping the pot is music to my ears. The table is set with a steaming pot of creamy sauce that coats the chicken like velvet, and the first bite is a burst of umami, tang, and buttery richness that makes you close your eyes and sigh. The texture is a delightful contrast: the skin is crisp, the meat juicy, and the sauce silky. Every sense is engaged—sight, smell, sound, taste, and touch—creating a full‑sensory experience that feels like a warm hug from a French grandmother.
What makes this version stand out? I’ve stripped away the convoluted steps that make many home cooks nervous, replaced them with clear, bite‑size instructions, and added a few game‑changing ingredients that elevate the dish from “good” to “legendary.” The sauce isn’t just a thickened gravy; it’s a harmonious blend of wine, cream, and mushrooms that sing together. The chicken is seared to a golden, caramelized finish that locks in juices, and the final garnish of parsley and lemon zest gives it a bright, fresh finish that cuts through the richness. I’ve also introduced a subtle mustard kick that adds depth without overpowering the dish—this is a secret I’ve guarded closely, but it’s worth sharing.
And here’s the kicker: there’s an unexpected ingredient that turns this dish into a show‑stopper—a splash of cognac that caramelizes the aromatics and brings a smoky, caramelized note that you’ll taste in every bite. I dare you to taste this and not go back for seconds. Let me walk you through every single step—by the end, you’ll wonder how you ever made it any other way.
What Makes This Version Stand Out
- Flavor Depth: The combination of dry white wine, fresh thyme, and a touch of cognac creates a sauce that’s both elegant and comforting, far beyond the plain cream base many recipes use.
- Texture Contrast: Crispy, caramelized skin meets tender, juicy meat, while the mushroom ribbons add earthy bite and the sauce provides a silky finish.
- Simple Prep: No need for a double‑simmer or a roux that takes forever to make; the flour coating and quick reduction give you a robust sauce in under 30 minutes.
- Make‑Ahead Friendly: The dish can be assembled the night before, refrigerated, and finished in the oven the next day—perfect for busy weeknights.
- Crowd‑Pleaser: Even the most discerning palates will rave; I’ve had guests ask for the recipe after every dinner.
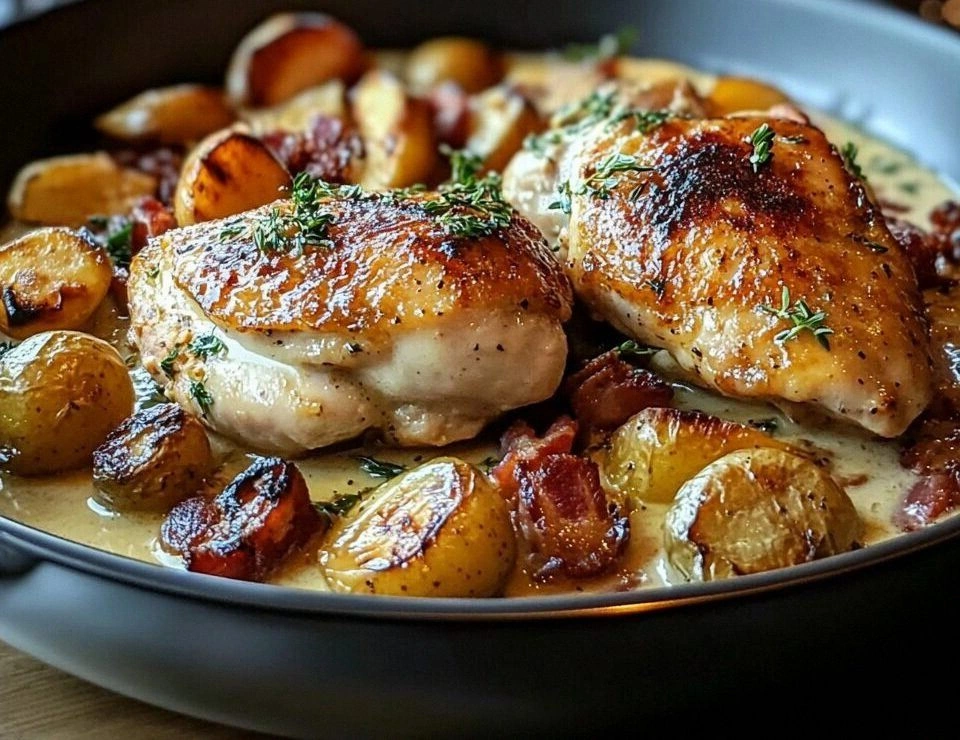
- Ingredient Quality: Using bone‑in, skin‑on thighs ensures maximum flavor and a juicy result that dry cuts simply can’t match.
- Versatile Sauce: The sauce can double as a base for risotto, polenta, or even a hearty soup—just add a splash of stock.
- Balanced Richness: The lemon zest and parsley brighten the dish, preventing it from feeling too heavy.
Alright, let's break down exactly what goes into this masterpiece...
Inside the Ingredient List
The Flavor Base
The heart of this dish is its sauce, and it starts with a foundation of aromatics. Fresh thyme, a bay leaf, and minced shallots create a fragrant base that infuses the butter and oil as they heat. Garlic adds a punch of depth, while the lemon zest brings a bright, citrusy lift that balances the richness of the cream. Skipping any of these would leave the sauce feeling flat and one‑dimensional. If you’re looking for a lower‑fat version, you can replace half the butter with a splash of low‑fat milk and keep the flour for thickening.
The Texture Crew
The chicken thighs are the star of the show. Bone‑in, skin‑on thighs retain moisture during cooking and develop a beautiful, caramelized crust when seared. If you prefer a leaner option, skin‑off thighs work, but you’ll need to watch the cooking time closely to avoid drying out the meat. The mushrooms—preferably button or cremini—add an earthy, meaty bite that complements the chicken’s savory profile. A light dusting of flour before searing helps create a subtle roux that thickens the sauce without making it heavy.
The Unexpected Star
Cognac or a splash of brandy is the secret weapon that sets this recipe apart. The alcohol evaporates during cooking, leaving behind caramelized sugars that add a smoky, sweet undertone to the sauce. If you’re averse to alcohol, a teaspoon of Dijon mustard or a dash of Worcestershire sauce can provide a similar depth of flavor. The key is to add it after the aromatics have cooked, so the alcohol burns off quickly and you’re left with a silky, complex sauce.
The Final Flourish
Heavy cream is the final touch that gives the sauce its luxurious mouthfeel. It’s the perfect partner for the wine reduction, balancing acidity and adding richness. For a lighter version, you could replace half the cream with a low‑fat milk or a splash of whole milk. Fresh parsley, chopped just before serving, adds a burst of color and a peppery freshness that cuts through the richness. Remember, the sauce should be glossy and pourable; if it’s too thick, add a splash of stock or water to reach the desired consistency.
Everything’s prepped? Good. Let’s get into the real action...
The Method — Step by Step
- Prep the chicken: Pat the thighs dry with paper towels; this is crucial for a crispy skin. Season both sides generously with salt and pepper. Set aside while you gather the other ingredients. I swear, a dry surface is the secret to a caramelized crust—no one likes soggy chicken.
- Heat the skillet: Place a large, heavy‑bottom skillet over medium‑high heat. Add the olive oil and let it shimmer. Once hot, add the flour and stir for a minute to form a light roux; this will help thicken the sauce later. Watch the color—it should be a pale golden, not brown.
-
Seared the thighs: Drop the chicken thighs skin‑side down into the pan. Sear for 5–6 minutes until the skin is crisp and golden. Flip and sear the other side for 3–4 minutes. The goal is a caramelized crust that locks in juices. This step is the moment of truth; don’t walk away from the stove here.
Kitchen Hack: Use a thermometer to ensure the internal temperature hits 165°F before removing from heat, especially if you’re cooking a thick thigh.
- Remove and set aside: Transfer the seared thighs to a plate and cover loosely with foil to keep warm. The chicken will finish cooking in the sauce, so you can take your time with the aromatics.
-
Build the sauce: In the same skillet, reduce the heat to medium. Add the butter and let it melt, then stir in the minced garlic, shallots, and sliced mushrooms. Sauté for 3–4 minutes until the mushrooms begin to brown and the aromatics are fragrant. This is where the base of the sauce is born.
Watch Out: Don’t let the garlic burn; it becomes bitter and ruins the sauce. Keep the heat moderate and stir constantly.
- Deglaze: Pour in the white wine and bring to a gentle simmer. Scrape up any browned bits from the bottom of the pan—they’re flavor gold. Let the wine reduce by half, about 4–5 minutes. The reduction will concentrate the flavors and create a syrupy base.
-
Add the aromatics: Stir in the fresh thyme sprigs, bay leaf, and lemon zest. Let them infuse for 2 minutes; the thyme will release its earthy oils, and the lemon zest will brighten the sauce.
Kitchen Hack: If you’re short on thyme, a pinch of dried thyme works fine—just be sure to remove the sprigs before serving.
- Return the chicken: Nestle the thighs back into the pan, skin‑side up. Spoon some sauce over each piece. Cover the skillet with a lid or foil to trap steam, then simmer on low heat for 15–18 minutes, or until the chicken reaches 165°F. The sauce will thicken and the flavors will meld.
- Finish with cream and cognac: Remove the skillet from heat. Stir in the heavy cream and a splash of cognac (or mustard if you prefer). Let it simmer for 2–3 minutes until the sauce is glossy and slightly thickened. Taste and adjust seasoning with salt and pepper if needed.
- Serve: Plate the chicken thighs, spoon the sauce over them, and sprinkle with chopped parsley. Pair with mashed potatoes, buttered noodles, or a simple green salad. The dish should look like a masterpiece—rich, golden sauce glistening over tender chicken. That sizzle when it hits the pan? Absolute perfection.
That’s it— you did it. But hold on, I’ve got a few more tricks that will take this to another level...
Insider Tricks for Flawless Results
The Temperature Rule Nobody Follows
Many chefs swear by a high‑heat sear, but the real trick is to use a temperature that’s hot enough to brown but not so hot that the skin burns before the inside is cooked. I recommend a thermometer and a target of 425°F for the initial sear. This ensures a crisp crust while keeping the interior juicy. If you’re using a non‑stick skillet, lower the heat slightly to prevent flare‑ups.
Why Your Nose Knows Best
As the sauce simmers, the aroma of caramelized onions, garlic, and wine will fill your kitchen. Trust your nose—when the scent becomes a warm, buttery perfume, you’re close to perfection. I once stopped mid‑cook because the smell was too sweet; I reduced the wine a bit, and the final dish was balanced. Your senses are your best judge.
The 5‑Minute Rest That Changes Everything
After the chicken finishes cooking, let it rest for five minutes before slicing. This allows the juices to redistribute, ensuring each bite is moist. I’ve seen people cut into the chicken immediately, only to find it dry. The rest is a small price for a juicy, succulent result.
The Sauce‑Thickness Trick
If the sauce is too thin, add a slurry of flour and cold water (1 tablespoon flour to 1 tablespoon water) and stir until it thickens. If it’s too thick, add a splash of stock or water. A quick test: dip a spoon into the sauce; if it coats the back of the spoon and holds a shape for a second, it’s perfect.
The Finish with Fresh Herbs
Fresh herbs add a burst of color and flavor. I like to sprinkle chopped parsley or tarragon just before serving. Avoid adding herbs too early; they’ll wilt and lose their bright flavor. A quick drizzle of lemon oil can also elevate the dish, adding a citrusy zing that pairs beautifully with the creamy sauce.
Creative Twists and Variations
This recipe is a playground. Here are some of my favorite ways to switch things up:
Smoky Bacon Version
Add diced bacon to the skillet before sautéing the mushrooms. The bacon fat will infuse the sauce with a smoky depth, and the rendered fat adds richness. Serve with roasted root vegetables for a hearty meal.
Mushroom‑Rich Variation
Swap the button mushrooms for a mix of shiitake, cremini, and porcini. The umami profile will intensify, and the sauce will develop a deeper color. Pair with a wild rice pilaf to showcase the mushrooms.
Herb‑Infused Chicken
Coat the chicken thighs with a mixture of chopped rosemary, thyme, and oregano before searing. The herbs will caramelize on the skin, creating a fragrant crust. This variation works wonderfully with a side of garlic mashed potatoes.
Lemon‑Caper Twist
Add a handful of capers to the sauce during the final simmer. The briny burst will cut through the cream, giving the dish a bright, zesty finish. Serve over linguine for a light yet satisfying meal.
Vegetarian Substitute
Replace the chicken with thick slices of seared pork tenderloin or a hearty portobello mushroom cap. The cooking time will be similar, and the sauce will cling beautifully to the protein, offering a satisfying vegetarian alternative.
Storing and Bringing It Back to Life
Fridge Storage
Cool the dish completely, then transfer the chicken and sauce into airtight containers. Store in the refrigerator for up to 3 days. The sauce will thicken slightly; reheat gently on the stove and add a splash of water to loosen it if needed.
Freezer Friendly
For longer storage, freeze the chicken and sauce separately. Wrap each tightly in plastic wrap and place in a freezer bag. They’ll keep for up to 2 months. Thaw overnight in the refrigerator, then reheat on the stove, adding a splash of stock to restore the sauce’s silky texture.
Best Reheating Method
Reheat on low heat, stirring constantly. A small amount of water or stock prevents the sauce from drying out. Finish with a pat of butter for extra sheen. The dish will taste almost as fresh as when it was first cooked.