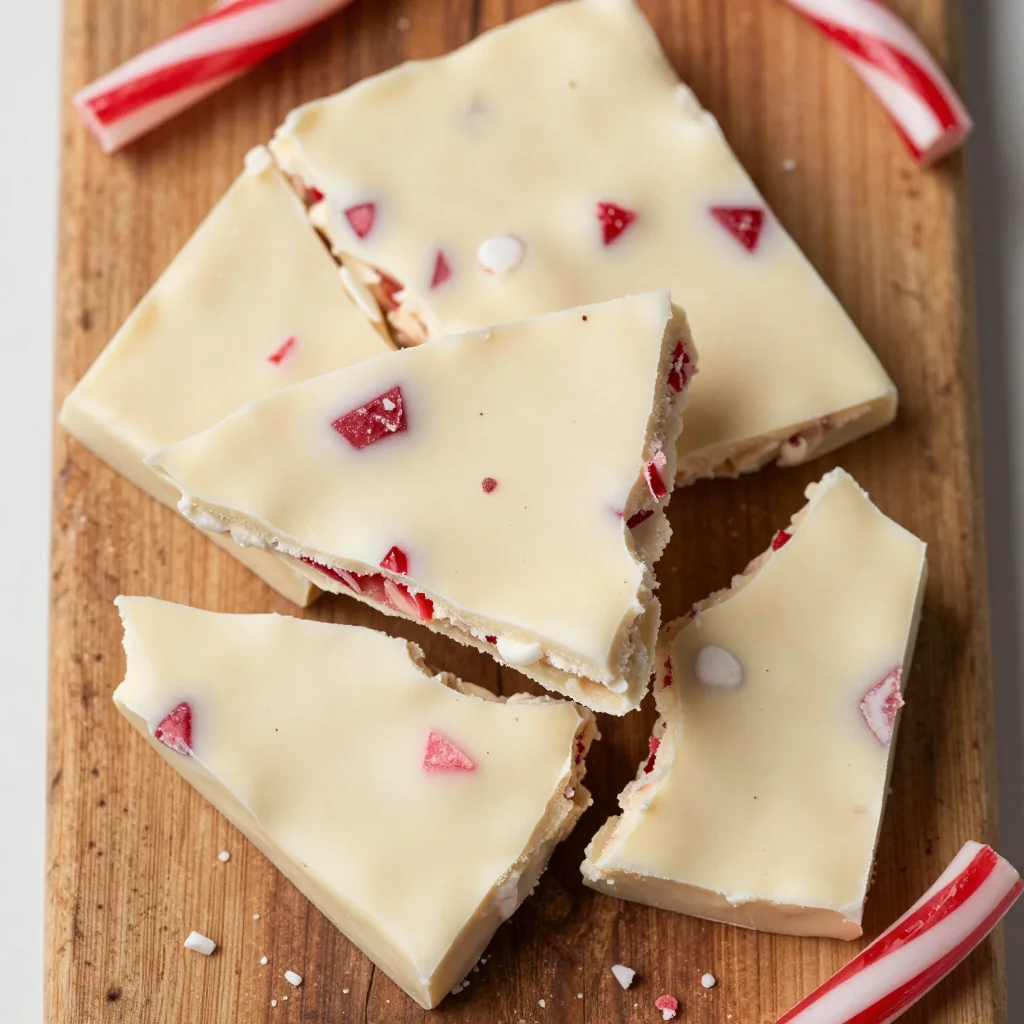
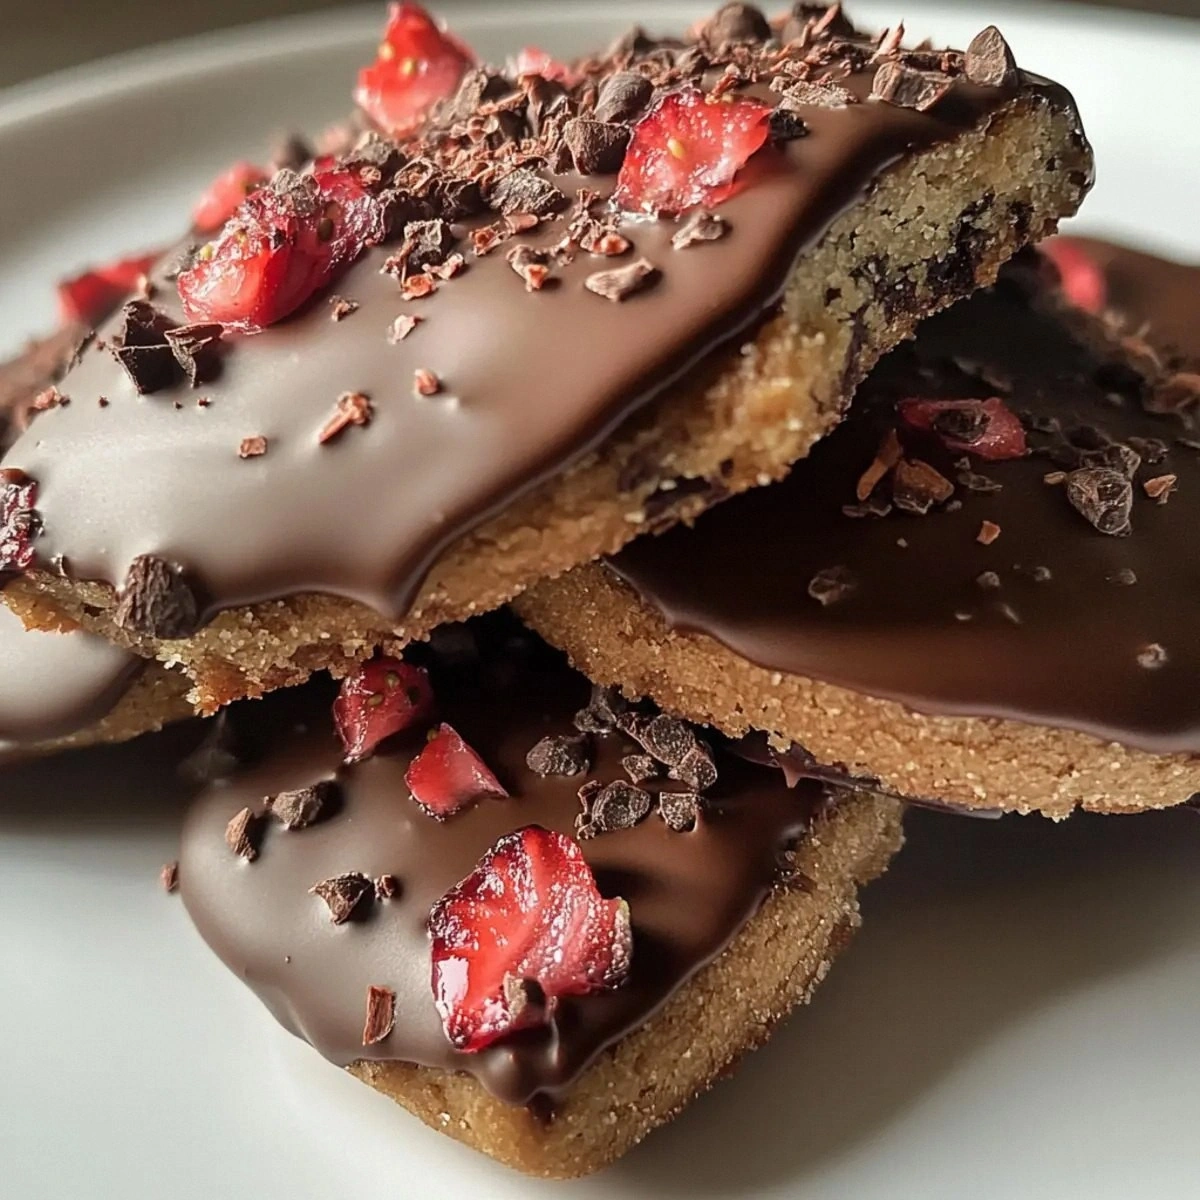
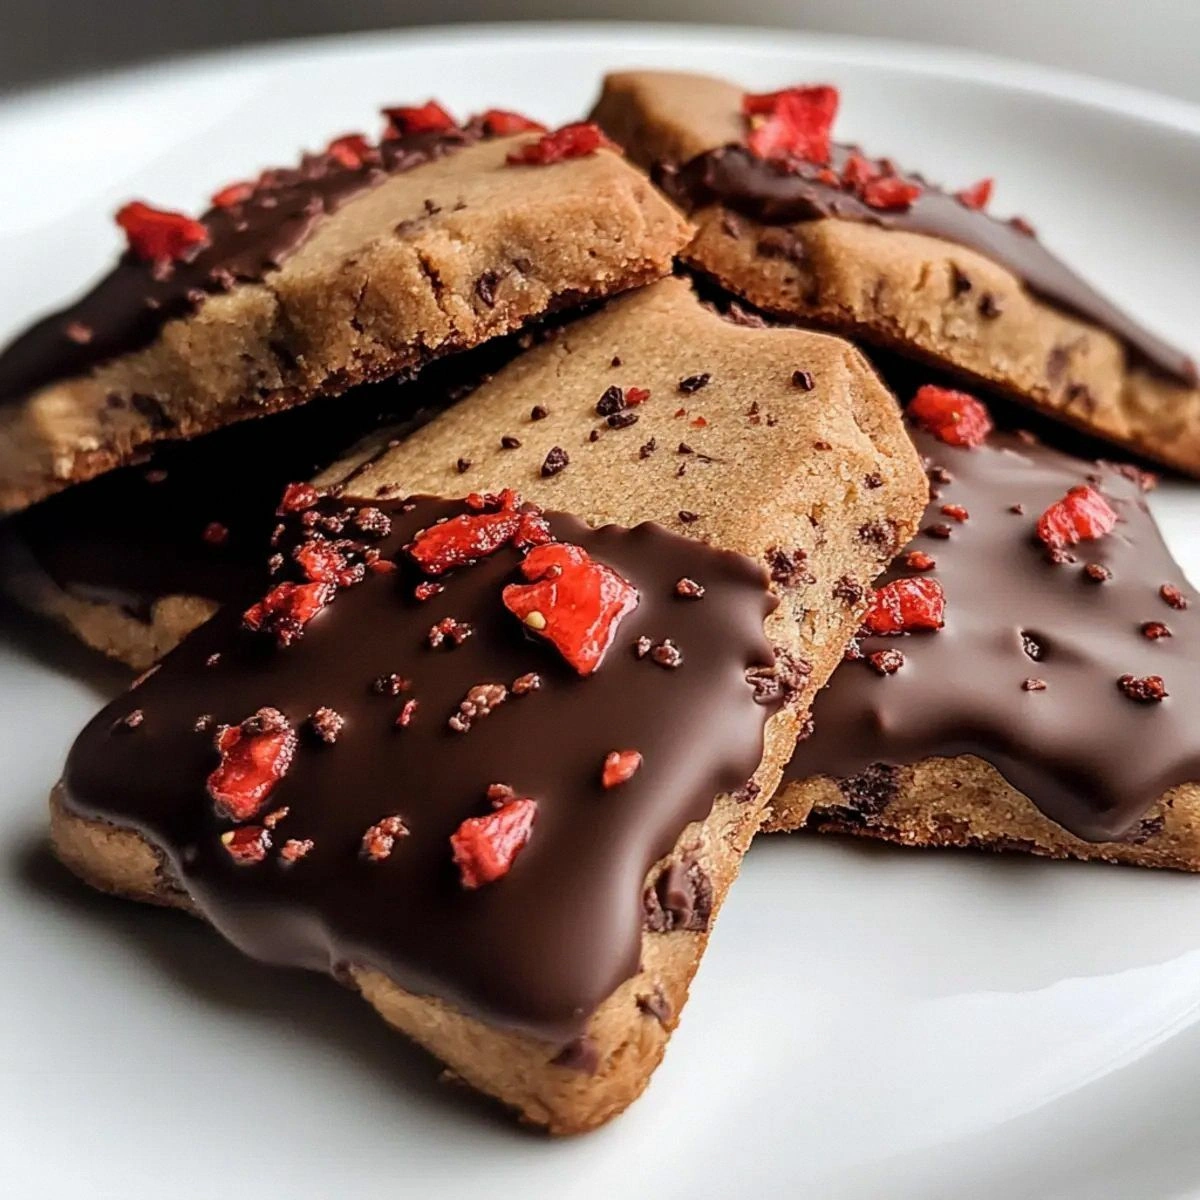
I’m going to start with a confession: I once tried to make a simple chocolate‑dipped shortbread and ended up with a crumbly, bland disaster that could have passed for a construction site. That flop sparked a kitchen‑wide dare from my roommate — “Make something that actually tastes like a dream, or never touch the oven again.” I accepted, and after a week of trial, error, and a few midnight snack sessions, I finally nailed the perfect balance of buttery shortbread, strawberry‑infused crunch, and glossy chocolate. This isn’t just a cookie; it’s a bite‑size celebration that sings with every sense.
Picture this: the moment the dough hits the counter, the butter glistens like sunrise on a calm lake, the scent of vanilla drifts up like a warm hug, and the freeze‑dried strawberries crackle under your fingertips, releasing a concentrated burst of summer. As the cookies bake, the kitchen fills with a buttery perfume that makes you want to dance, while the edges turn a golden‑amber that looks like tiny, edible sunsets. When you finally dip each cookie into silky chocolate, the glossy coating clings like a second skin, and the extra sprinkle of sugar adds a crackle that reminds you of fireworks on the Fourth of July.
What makes this version stand out is simple: I’ve taken the classic shortbread formula and given it a strawberry twist that most recipes completely miss. Most shortbread recipes either ignore flavor depth or drown the buttery base in too much sugar. I dared to incorporate freeze‑dried strawberries, which retain an intense fruit flavor without adding excess moisture that could ruin the crumb. The result? A shortbread that’s tender yet sturdy enough to hold a generous chocolate dip without cracking, and a strawberry note that’s bright, natural, and unmistakably fresh.
I’m about to walk you through every single step — from the exact butter temperature that makes the dough silky smooth, to the secret technique of chilling the dough in a single slab before cutting. By the end, you’ll wonder how you ever made shortbread any other way. I dare you to taste this and not go back for seconds. Okay, ready for the game‑changer?
What Makes This Version Stand Out
- Flavor Explosion: Freeze‑dried strawberries give an intense fruit punch without soggy dough, turning each bite into a summer memory.
- Texture Harmony: The shortbread is buttery and crumbly, yet firm enough to hold a thick chocolate coating without crumbling.
- Simplicity: Only eight ingredients, all pantry staples, yet the technique elevates them to gourmet status.
- Visual Wow Factor: The glossy chocolate dip paired with a dusting of sparkling sugar makes these cookies look as good as they taste.
- Crowd Reaction: Guests invariably ask for the recipe, and the “wow” factor is immediate — they’ll be bragging about them for weeks.
- Ingredient Quality: Using real butter (not margarine) and high‑quality chocolate creates a rich mouthfeel that cheap shortcuts can’t match.
- Cooking Method: Chilling the dough before cutting ensures clean edges and uniform thickness, preventing the dreaded “wonky cookie” syndrome.
- Make‑Ahead Potential: You can bake the shortbread ahead of time, dip later, and store them for up to a week without losing texture.
Inside the Ingredient List
The Flavor Base
Unsalted butter is the heart of any shortbread. Its fat content gives the cookie its melt‑in‑your‑mouth quality. Using real butter (not a blend) ensures a clean, buttery flavor that can’t be replicated with margarine. If you skip the butter or substitute with oil, you’ll lose that tender crumb and end up with a greasy texture. For the best result, choose a European‑style butter with at least 82% butterfat.
Granulated sugar adds sweetness and helps create that delicate, crumbly texture. Too much sugar makes the shortbread spread too thin, while too little leaves it bland. I use a half‑cup, which is just enough to sweeten without overwhelming the strawberry notes. If you prefer a less sweet cookie, you can shave it down to a third of a cup, but the chocolate dip will compensate for any missing sweetness.
Vanilla extract is the subtle background singer that rounds out the flavor profile. It’s the secret that makes the butter taste richer and the strawberry pop brighter. A single teaspoon is all you need; any more and the vanilla will dominate, masking the fruit.
The Texture Crew
All‑purpose flour provides structure. The 2.25 cups give the dough enough body to hold its shape while staying tender. Using cake flour would make the cookie too soft, while bread flour would make it tough. If you’re gluten‑sensitive, you can swap half the flour for a gluten‑free blend, but be aware the texture will change slightly.
Salt, at just a quarter teaspoon, balances the sweetness and enhances the butter flavor. It’s a tiny amount, but without it the cookie would taste flat. If you’re on a low‑sodium diet, you can reduce it to a pinch, but don’t eliminate it entirely.
The Unexpected Star
Freeze‑dried strawberries are the game‑changer. They’re concentrated, dry, and retain a bright strawberry flavor that fresh fruit can’t match without adding extra moisture. The 20‑gram amount might seem small, but it packs a punch. If you can’t find freeze‑dried strawberries, you can grind fresh strawberries into a powder using a dehydrator, but the texture of the dough may become a bit wetter.
The Final Flourish
Chocolate (6 ounces) is the luxurious coating that transforms a humble shortbread into a decadent treat. Choose a good quality dark or milk chocolate with at least 60% cocoa solids for a glossy finish that hardens just right. If you use low‑quality chocolate, the dip will be grainy and melt too quickly. Melt the chocolate gently over a double boiler or in short bursts in the microwave, stirring constantly to avoid scorching.
Additional granulated sugar is used for a final dusting after the chocolate dip. It adds a subtle crunch and a sparkle that catches the eye. You can also experiment with powdered sugar for a softer finish, but the granules give that satisfying crackle.
Everything's prepped? Good. Let’s get into the real action…
The Method — Step by Step
- Preheat your oven to 325°F (163°C). While the oven heats, cut the cold butter into small cubes and let it sit at room temperature for five minutes. This brief softening makes creaming easier while keeping the butter cool enough to prevent the dough from becoming greasy. Pro tip: If the butter starts to melt, pop it back in the fridge for a minute.
- In a large mixing bowl, cream the butter and granulated sugar together until the mixture is pale, fluffy, and resembles a cloud. This usually takes about three minutes with a handheld mixer on medium speed. You’ll notice the mixture becoming lighter in color—that’s the air you’re incorporating, and it’s the secret to a tender crumb. Kitchen Hack: Scrape down the sides of the bowl with a rubber spatula halfway through creaming to ensure every butter particle is evenly aerated.
- Add the vanilla extract and the pinch of salt, mixing just until incorporated. Then, gradually add the flour, mixing on low speed. The dough will start to come together in a shaggy mass. At this stage, you’ll feel a slight resistance as the flour absorbs the butter—this is normal and indicates a proper gluten development for shortbread.
- Stir in the finely crushed freeze‑dried strawberries. The tiny pink specks should be evenly distributed, giving the dough a subtle blush. If you notice clumps, break them up with your fingertips; you want a uniform pink hue throughout.
- Turn the dough onto a lightly floured surface and gently knead it just until it forms a smooth ball—no more than 30 seconds. Over‑kneading will develop gluten and make the cookies tough. Wrap the dough in parchment paper, flatten it into a disc about 1‑inch thick, and refrigerate for 30 minutes. Watch Out: Skipping the chill will cause the dough to spread excessively during baking, resulting in thin, uneven cookies.
- Line a baking sheet with parchment paper. Remove the chilled dough and, using a sharp knife or a cookie cutter, cut out rounds about 2‑inch in diameter. Place them about 1 inch apart; they won’t spread much, but a little room ensures even browning. For a professional look, use a small ring cutter to achieve perfect circles.
- Bake the shortbread for 18‑22 minutes, or until the edges turn a light golden‑brown and the tops are set but not dark. You’ll hear a faint, pleasant crackle as the butter caramelizes—listen for that sound; it’s the auditory cue that the cookies are reaching perfection. Rotate the sheet halfway through for uniform color.
- While the cookies cool on the sheet for five minutes, melt the chocolate. Place the chocolate in a heat‑proof bowl over a pot of simmering water (double boiler) and stir until smooth and glossy. If using a microwave, heat in 20‑second bursts, stirring in between, until fully melted. Kitchen Hack: Add a teaspoon of vegetable oil to the chocolate to give it a shinier finish and a slightly softer snap when it sets.
- Transfer the cooled shortbread to a wire rack set over a baking sheet. Using a fork or a small offset spatula, dip each cookie halfway into the melted chocolate, allowing excess to drip back into the bowl. Immediately sprinkle a pinch of additional granulated sugar over the chocolate‑coated side for that satisfying sparkle. Let the cookies set on the rack until the chocolate hardens, about 15 minutes at room temperature or 5 minutes in the fridge.
- Once the chocolate is firm, give each cookie a gentle tap to release any stray sugar crystals. Transfer them to a serving platter and admire the glossy finish. That moment when you see the contrast between the buttery shortbread, the pink strawberry flecks, and the dark chocolate glaze? Pure magic. That’s it — you did it. But hold on, I’ve got a few more tricks that’ll take this to another level...
Insider Tricks for Flawless Results
The Temperature Rule Nobody Follows
Butter should be cold enough to stay in small pieces when you start creaming, but not so cold that it won’t blend. The sweet spot is around 60°F (15°C). If your kitchen is warm, chill the butter for 15 minutes; if it’s chilly, let it sit out a bit. This balance ensures the dough stays tender and the cookies don’t spread.
Why Your Nose Knows Best
When the shortbread is baking, trust your nose more than the timer. You’ll smell a nutty, buttery aroma that deepens after the first 10 minutes. Once the scent becomes slightly caramelized, you’re at the perfect stage. Over‑baking turns the edges bitter, and the chocolate won’t adhere as well.
The 5‑Minute Rest That Changes Everything
After you’ve mixed the dough, let it rest on the counter for five minutes before chilling. This short rest lets the flour hydrate fully, resulting in a smoother dough that’s easier to roll and cut. A friend once skipped this step and ended up with a crumbly mess—let’s just say the cookies never recovered.
Chocolate Tempering Shortcut
If you don’t have a tempering machine, you can still get a glossy finish by using the “seeding” method: melt two‑thirds of the chocolate, then stir in the remaining third (still solid) until the temperature drops to about 88°F (31°C) for dark chocolate. This gives you a snap and shine comparable to professional tempering.
The Sugar Dusting Technique
When you sprinkle the extra sugar on the chocolate, do it while the chocolate is still wet and the cookies are on a wire rack. The sugar will stick instantly, creating a crunchy sparkle that doesn’t melt away. If you wait until the chocolate hardens, the sugar will slide off.
Creative Twists and Variations
This recipe is a playground. Here are some of my favorite ways to switch things up:
White Chocolate & Raspberry
Swap the dark chocolate for white chocolate and replace freeze‑dried strawberries with freeze‑dried raspberries. The pink‑white contrast is stunning, and the raspberry adds a tart edge that balances the sweet white chocolate.
Almond Crunch
Add a tablespoon of finely chopped toasted almonds to the dough. The nutty crunch pairs beautifully with the strawberry and chocolate, offering an extra texture layer that surprises the palate.
Espresso Infusion
Mix a teaspoon of instant espresso powder into the flour. The subtle coffee note deepens the chocolate flavor and creates a sophisticated flavor profile perfect for an after‑dinner treat.
Coconut Bliss
Replace half the butter with coconut oil and sprinkle toasted coconut flakes on the chocolate‑dipped side. The tropical twist adds a fragrant aroma and a chewy bite.
Spicy Chili
Add a pinch of cayenne pepper to the chocolate melt. The heat awakens the strawberry’s sweetness and gives the cookies an unexpected kick that will wow adventurous eaters.
Storing and Bringing It Back to Life
Fridge Storage
Place the cookies in an airtight container lined with parchment paper. They stay fresh for up to five days, and the chocolate remains firm. If the chocolate softens, pop the container in the fridge for 10 minutes.
Freezer Friendly
Stack the cookies between layers of wax paper and seal them in a zip‑top freezer bag. They freeze beautifully for up to three months. When you’re ready to enjoy them, let them thaw at room temperature for 20 minutes, then give them a quick flash in a 300°F oven for two minutes to revive the crispness.
Best Reheating Method
To bring a day‑old cookie back to life, place it on a microwave‑safe plate, sprinkle a tiny splash of water (about a teaspoon) next to it, and microwave for 8‑10 seconds. The steam re‑hydrates the shortbread without making the chocolate soggy, and the result is as if you just baked them.