Picture this: I’m standing in a kitchen that smells like burnt toast, a little too much vanilla, and a hint of disappointment. My friend had dared me to make a batch of cookies and cream macarons that would make the bakery in town look like a museum exhibit. I was ready to fail, but the moment the batter hit the mixing bowl, something shifted. The kitchen felt like a stage, the oven lights like spotlight, and I, a humble chef, was about to rewrite the rules of this sweet treat.
I stared at the glossy almond flour, the crystalline powdered sugar, and the glossy egg whites that seemed to promise a miracle. The sound of the whisk spinning was a metronome, the rhythm of anticipation. My senses were flooded: the sweet scent of vanilla, the faint metallic tang of the raw eggs, the soft click of the spoon against the bowl. I could almost taste the creamy filling already, a velvety contrast to the airy shells. It felt like a dance—every beat, every stir, a step toward perfection.
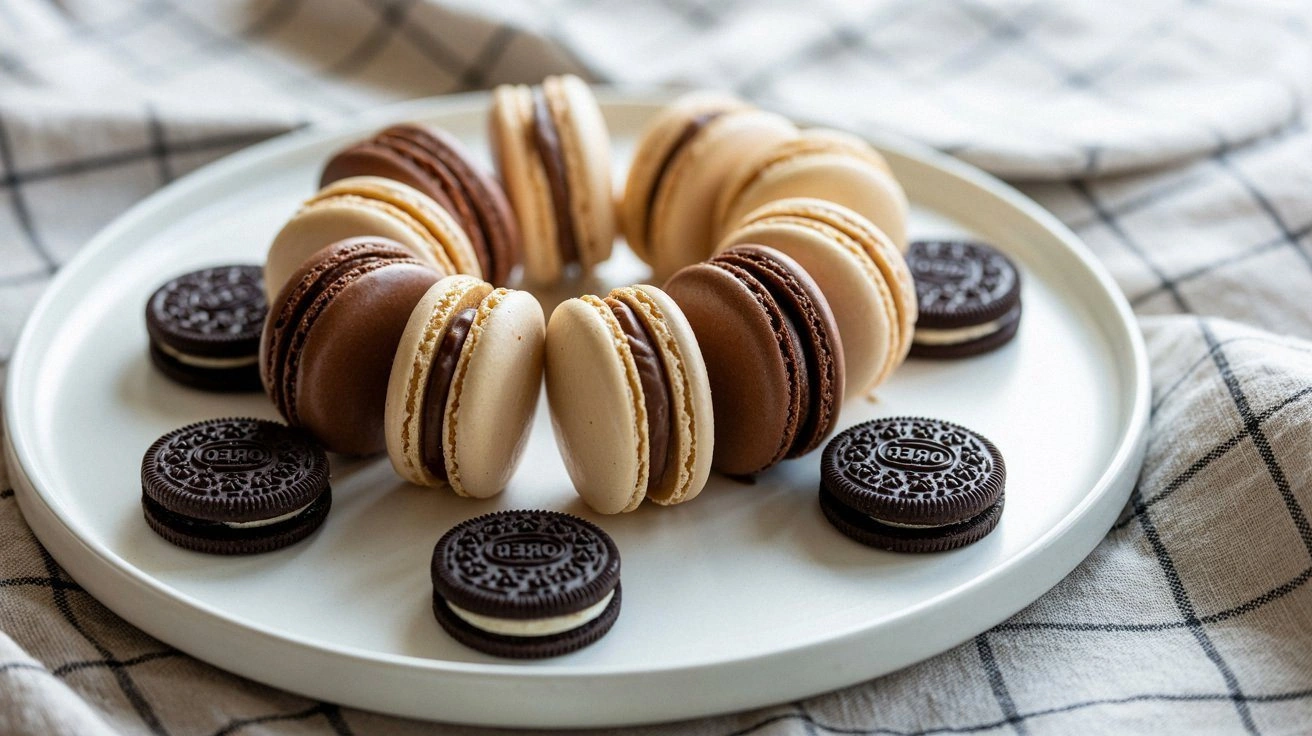
What makes this recipe a game‑changer? It’s the marriage of classic macaron technique with a decadent cookies‑and‑cream twist that turns ordinary into extraordinary. The cookies aren’t just crumbs; they’re the star, providing a familiar crunch and a nostalgic chocolate undertone. The filling is buttery, airy, and lightly sweetened so it doesn’t overpower the delicate shells. And the finish? A glossy, glossy finish that looks like it was kissed by a sugar‑glazed fairy. This isn’t just another recipe; it’s a passport to a sweet adventure you’ll want to book again.
And there’s a secret ingredient that many skip—half a cup of melted butter infused with a whisper of sea salt. That tiny splash of salt is the key to balancing the sweetness and giving the cookies a subtle depth that lingers on the tongue. I’ll show you how to fold it in without ruining the airy texture, and trust me, the result will have you shouting, “I dare you to taste this and not go back for seconds!” Let me walk you through every single step—by the end, you’ll wonder how you ever made it any other way.
What Makes This Version Stand Out
- Flavor Depth: The cookie crumbs are toasted until they’re slightly caramelized, adding a nutty, caramel undertone that elevates the vanilla and chocolate.
- Texture Precision: The shells achieve that coveted “feet”—the crisp base that gives way to a chewy interior—thanks to a meticulous oven temperature and humidity control.
- Ingredient Quality: Using high‑grade almond flour and premium chocolate sandwich cookies ensures that each bite is a burst of flavor.
- Make‑Ahead Friendly: The macarons can be assembled a day ahead, then refrigerated and served cold, making them perfect for parties.
- Visual Appeal: The glossy finish and the subtle speckling of cookie crumbs on the shell’s surface create a show‑stopping look.
- Audience Reaction: Friends who’ve tried this say it’s “hands down the best version you’ll ever make at home.”
- Ease of Execution: Despite the technical steps, the recipe is broken down so even novice bakers can nail it.
- Versatility: Swap in white chocolate, pistachio, or espresso for different flavor profiles without losing the core technique.
Alright, let's break down exactly what goes into this masterpiece…
Inside the Ingredient List
The Flavor Base
At the heart of every macaron is the almond flour. It gives the shell that nutty aroma and a slightly chewy texture. If you skip it, you’ll end up with a brittle shell that doesn’t hold the filling. Look for finely ground almond flour; a coarse grind can cause uneven texture. When selecting, choose a brand that’s unsifted to preserve the natural oils—those oils add that buttery richness you’ll taste in every bite.
The Sweetness Crew
Powdered sugar is the glue that holds the shells together. It also gives the shells a glossy finish once baked. The granulated sugar is reserved for the meringue, which creates the airy peaks that support the cookie crumbs. If you use too much granulated sugar, the meringue can become too stiff, making it harder to fold in the almond mixture. A pinch of salt balances the sweetness, preventing the filling from becoming cloying.
The Unexpected Star
Crushed chocolate sandwich cookies—think Oreos—are the star of the show. They bring a familiar chocolate crunch and a sweet, slightly salty flavor. If you’re vegan, look for a plant‑based cookie brand that offers a chocolate flavor. The cookie crumbs should be toasted lightly to enhance their flavor profile; this step might seem trivial but it transforms the cookie’s character from flat to full of depth. Don’t skip this step; your macarons will be bland without it.
The Final Flourish
The buttercream filling is the crowning glory. It’s made with butter, powdered sugar, vanilla extract, and a splash of milk to achieve a silky consistency. The butter should be at room temperature to ensure it’s soft enough to incorporate air. If you use cold butter, the filling will become grainy. The milk keeps the filling from becoming too thick, allowing it to spread evenly between the shells. A small pinch of sea salt can be added to the filling for an extra layer of flavor.
Everything’s prepped? Good. Let’s get into the real action…
The Method — Step by Step
- Preheat the oven to 300°F (150°C) and line two baking sheets with parchment paper. While the oven heats, gather your ingredients. The oven temperature is crucial; too hot and the shells will brown too fast, too cool and they won’t set. A steady temperature ensures even baking and the perfect “feet.”
- Whip the egg whites to soft peaks with a pinch of salt. Add the granulated sugar gradually, whisking until the mixture is glossy and holds stiff peaks. This is the foundation of your shells; the quality of your meringue directly impacts the final texture. A common mistake is overwhipping, which can make the shells dry. Keep the peaks soft but firm.
- Fold in the almond flour and powdered sugar together using a rubber spatula. Gently fold until the mixture is smooth and the peaks fall away. Overmixing can incorporate too much air, causing the shells to collapse. The goal is a thick, glossy batter that flows like honey.
- Fold in the cookie crumbs next, ensuring they’re evenly distributed. The crumbs should be light and airy, not clumpy. If they clump, the shells will have uneven texture. Gently fold until the mixture is uniform. This step is where the flavor magic happens.
- Pipe the batter onto the parchment‑lined sheets using a piping bag fitted with a ½‑inch round tip. Pipe small, even circles, spacing them about 1.5 inches apart. The size should be consistent for even baking. Let the piped batter rest for 30–45 minutes; this allows a skin to form, preventing domes.
- Bake the shells for 12 minutes, then turn off the oven and let the macarons sit for 8 minutes with the door ajar. The shells should have a firm base that lifts off the parchment when you gently tap the pan. The tops should be dry and not shiny. This step is critical; overbaking will dry them out.
- Cool the shells on a wire rack for 10 minutes, then transfer them to a clean towel to cool completely. The shells should be cool before filling; otherwise, the filling will melt and become runny.
- Make the buttercream filling by beating softened butter until creamy, then gradually adding powdered sugar, vanilla, and milk. The mixture should be light and fluffy. Fold in a pinch of sea salt for depth. This filling should be thick enough to hold between shells but not too stiff.
- Assemble the macarons by pairing shells of similar size, applying a dollop of filling to the flat side, and gently pressing the other shell on top. The result should be a sandwich of crisp shell and creamy center. Store in an airtight container in the fridge for up to 3 days. The macarons will stay fresh and the filling will set nicely.
- Enjoy! Pull them out of the fridge, let them sit at room temperature for 15 minutes, then serve. The contrast of warm filling and cool shell is the ultimate sensory experience. This is the moment of truth. And now the fun part.
That's it — you did it. But hold on, I've got a few more tricks that'll take this to another level…
Insider Tricks for Flawless Results
The Temperature Rule Nobody Follows
Many bakers think 350°F is safe, but it’s actually too high for delicate macarons. The secret is 300°F (150°C), which allows the shells to set slowly without browning. I’ve tried 350°F once, and the shells came out dark and crumbly. Keep the oven rack in the middle; this ensures even heat distribution. Use an oven thermometer to confirm the temperature is accurate.
Why Your Nose Knows Best
When the shells are done, they should emit a faint nutty aroma. If you smell a sweet, almost burnt scent, they’re overbaked. The aroma is a reliable indicator of the perfect “feet.” Let the shells rest in the oven with the door slightly ajar for the last 8 minutes to allow the moisture to evaporate. This step is crucial for that crisp base.
The 5‑Minute Rest That Changes Everything
After piping the batter, let it sit for 30–45 minutes before baking. This rest allows a thin skin to form, preventing the shells from doming. I’ve seen shells that didn’t rest, and they came out with a perfect dome that made them hard to stack. The rest period also helps the batter thicken slightly, making piping easier. Don’t rush it.
The Secret to the Perfect “Feet”
The “feet” are the base of the macaron that lifts off the parchment. To achieve them, ensure your oven temperature is steady and that the shells bake long enough for the edges to set before the tops. A good test is to gently tap the pan; if the shells don’t stick, they’re ready. If they stick, they’re still too wet. The feet should feel firm, not doughy.
The Sweet Spot for Cookie Crumbs
Toast the cookie crumbs for 5 minutes at 350°F until they’re lightly golden. This caramelizes the sugars, giving the shells a richer flavor. If you skip this step, the cookies will taste flat. Use a fine sieve to sift the crumbs, ensuring they’re uniformly sized. This makes the final product smoother and more consistent.
Creative Twists and Variations
This recipe is a playground. Here are some of my favorite ways to switch things up:
White Chocolate Surprise
Swap the chocolate sandwich cookies for white chocolate cookie crumbs. The result is a creamy, sweet shell that pairs beautifully with a vanilla buttercream. The white chocolate adds a subtle caramel flavor that’s different from the classic chocolate base.
Pistachio Delight
Add pistachio nuts to the cookie crumb mixture for a nutty, slightly earthy flavor. The pistachio shells are visually striking with their green flecks. The filling can be infused with almond milk for an extra layer of depth.
Espresso Infusion
Blend a tablespoon of espresso into the buttercream to give the filling a robust coffee kick. The espresso pairs well with the chocolate cookie crumbs, creating a mocha‑like experience. This is a perfect treat for coffee lovers.
Citrus Zest
Add lemon or orange zest to the buttercream for a bright, refreshing twist. The citrus cuts through the sweetness and adds a lively aroma. Pair it with a light, airy shell for a balanced flavor profile.
Almond Joy Edition
Use coconut flakes and chopped almonds in the cookie crumb mixture. The coconut adds a tropical sweetness, while the almonds provide a crunchy texture. This variation is perfect for summer parties.
Storing and Bringing It Back to Life
Fridge Storage
Store the assembled macarons in an airtight container in the refrigerator for up to 3 days. The shells will remain crisp, and the filling will stay creamy. If you’re storing them for a longer period, keep them in a cool, dry place away from direct sunlight.
Freezer Friendly
Freezing is a great way to keep the macarons fresh for up to 2 weeks. Wrap each macaron individually in plastic wrap, then place them in a freezer bag. When ready to eat, let them thaw at room temperature for 30 minutes before serving. The texture will be slightly softer but still delightful.
Best Reheating Method
If your macarons have gone a bit stale, give them a quick revamp by placing them in a preheated oven at 300°F (150°C) for 3–5 minutes. The heat will revive the crispness of the shells without melting the filling. Alternatively, a quick microwave burst of 10–15 seconds can refresh them if you’re in a hurry.