It all began with a kitchen catastrophe that could have turned a simple cookie batch into a sticky, chocolate‑laden disaster. I was in a rush, the oven timer set too low, and the dough had already begun to spread like a mischievous gremlin across the pan. The result? Flat, flavorless cookies that looked like they had been baked in a glass of lukewarm water. I stared at the mess, then laughed, because that moment sparked a craving for something that would actually make my taste buds dance.
The kitchen filled with an aroma that was part chocolate, part buttery heaven, and part sweet anticipation. My fingertips tingled from the coolness of the butter, the slight crackle of cocoa dust, and the faint scent of vanilla that seemed to whisper, “This is going to be good.” The sound of the mixer humming in the background added a rhythmic backdrop, while the sight of the dough—dark, glossy, and perfectly portioned—gave me a visual promise of what was to come. The texture of the dough, firm yet yielding, felt like a promise of that satisfying snap when you bite into a freshly baked cookie. I could almost taste the first bite, the chocolate center exploding into a sweet, nutty, slightly tart symphony.
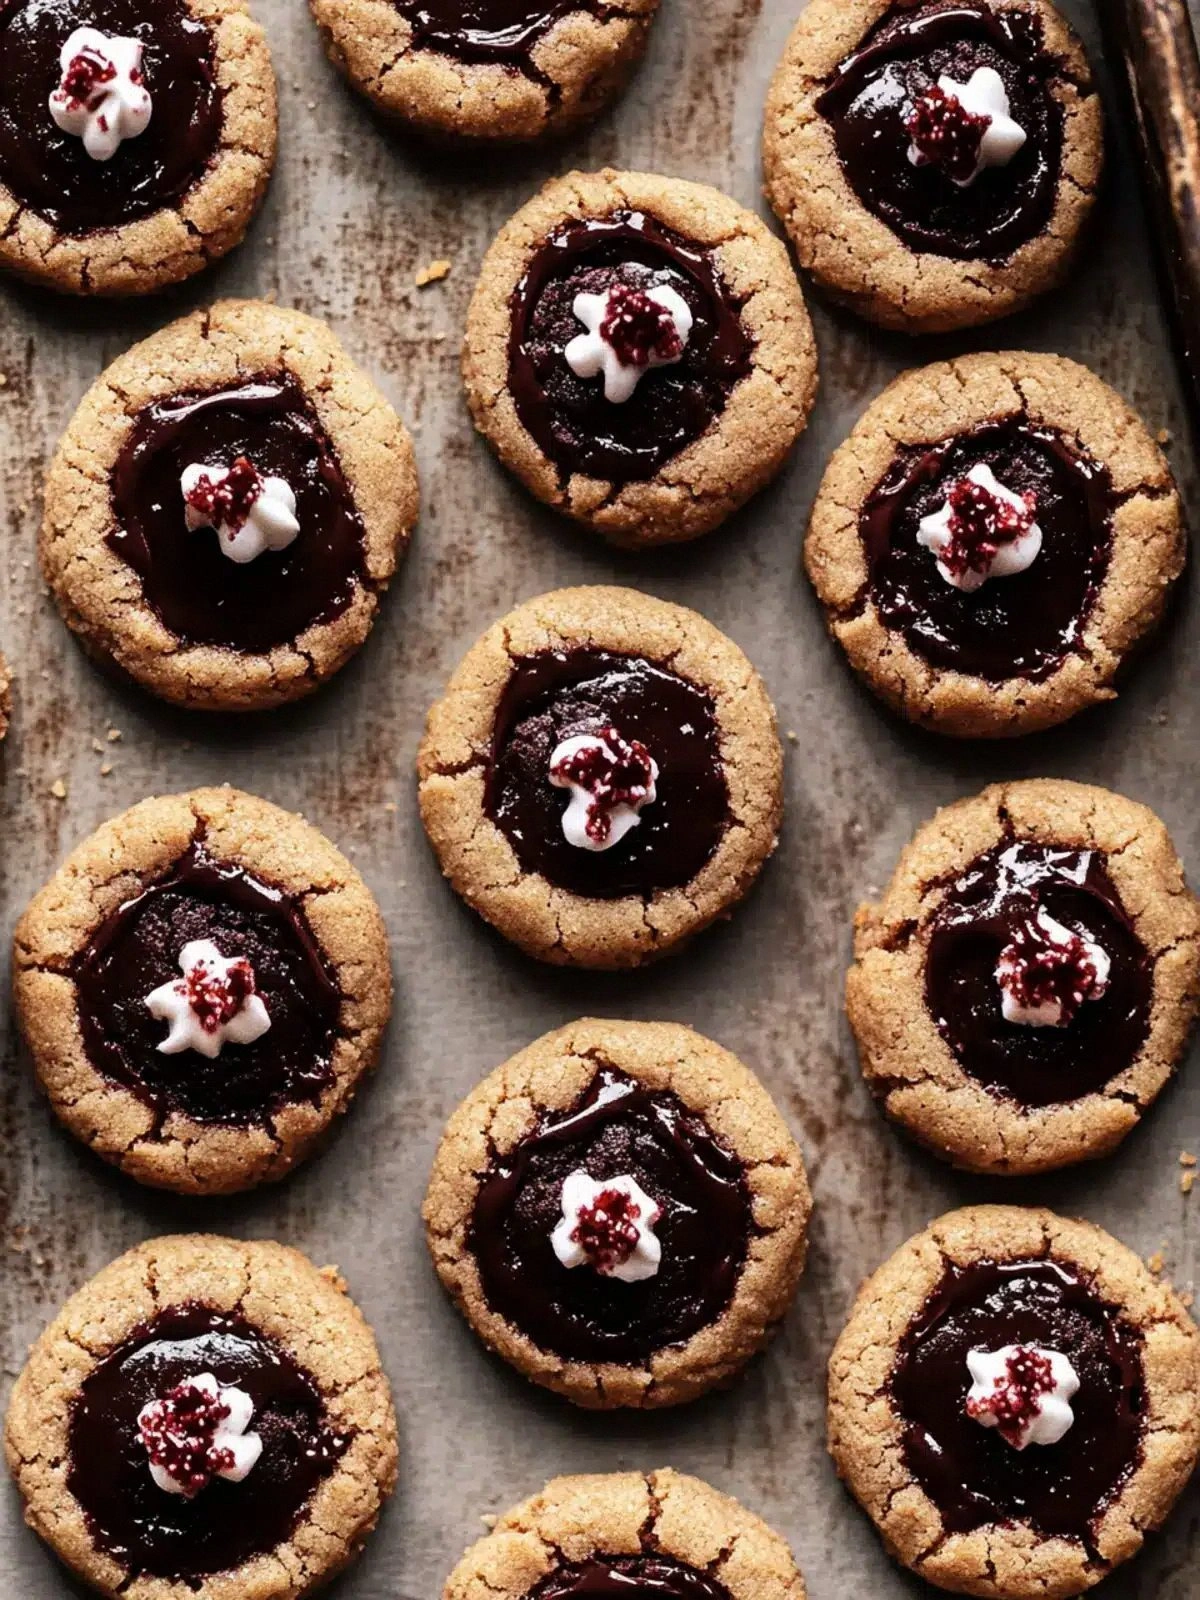
What makes this version stand out is that it’s not just another chocolate cookie recipe; it’s a meticulously engineered masterpiece that balances richness, crunch, and a hint of playful indulgence. The dough’s structure is engineered to hold a generous center of hazelnut spread without collapsing, creating a dramatic contrast between the crisp edges and the molten core. The subtle use of jam adds a bright counterpoint that cuts through the chocolatey density, giving the cookie a layered flavor profile that feels both luxurious and comforting. This recipe is a testament to how a few intentional tweaks—like the exact ratio of cocoa to flour and the precise timing of the bake—can elevate a humble cookie into a showstopper. It’s the kind of cookie that will have your friends asking for the recipe after the first bite, and you’ll be able to say, “I dare you to taste this and not go back for seconds.”
I’ll be honest—this is hands down the best version you'll ever make at home. I’ve experimented with dozens of chocolate cookie recipes, and none have matched the depth of flavor or the satisfying crunch of this one. The secret lies in a little trick I discovered: chilling the dough for just 30 minutes before baking ensures a perfect rise and a crisp exterior that shatters like thin ice. Picture yourself pulling these out of the oven, the whole kitchen smelling incredible, and the first bite sending a wave of chocolate bliss through your palate. Stay with me here—this is worth it.
What Makes This Version Stand Out
- Taste: The chocolate is deep and bittersweet, yet the hazelnut spread adds a creamy, nutty sweetness that balances the richness. The subtle vanilla undertone lifts the flavor profile, making each bite complex without being overpowering.
- Texture: The edges are crisp and buttery, while the center remains soft and gooey, creating a delightful contrast that keeps you coming back for more.
- Simplicity: Despite its luxurious taste, the recipe requires only a handful of pantry staples, making it accessible for both novice bakers and seasoned pros.
- Uniqueness: The combination of hazelnut spread and jam in the center is a playful twist that sets this cookie apart from standard chocolate thumbprints.
- Crowd Reaction: Friends and family rave about the cookie’s indulgent flavor and the way the jam adds a surprising burst of brightness.
- Ingredient Quality: Using high‑quality unsweetened cocoa powder and a generous amount of butter ensures a rich, mouth‑watering result.
- Cooking Method: The technique of chilling the dough and precise oven timing guarantees a perfect rise and texture.
- Make‑Ahead Potential: The cookies can be baked ahead of time, stored in an airtight container, and reheated for a fresh, warm treat.
Inside the Ingredient List
The Flavor Base
Unsweetened Cocoa Powder: It’s the heart of the cookie, delivering a rich, deep chocolate flavor that’s not overly sweet. Skipping it would leave the cookie feeling like a plain biscuit. For a sweeter version, add a tablespoon of sugar, but be careful not to drown the chocolate flavor.
The Texture Crew
All-Purpose Flour: It provides structure and helps the cookie rise evenly. Using bread flour instead can make the cookies too dense. If you want a lighter crumb, replace 1/4 cup of flour with almond flour, but be sure to adjust the baking time slightly.
The Unexpected Star
Hazelnut Spread: This is what makes the cookie truly decadent. It melts into a silky center that contrasts beautifully with the crisp edges. If you’re allergic to nuts, swap it with a smooth almond butter for a similar texture.
The Final Flourish
Jam of Your Choice: The jam adds a bright, fruity contrast that cuts through the chocolate richness. Strawberry jam offers a sweet note, while raspberry adds a tart punch. If you prefer a more subtle flavor, use a thin layer of apricot jam.
Everything's prepped? Good. Let's get into the real action.
The Method — Step by Step
- Preheat your oven to 350°F (175°C) and line two baking sheets with parchment paper. Let the oven heat up fully; a properly warmed oven ensures even baking and a crisp edge. While the oven warms, set aside a small bowl for the jam.
- In a large bowl, sift together the flour, cocoa powder, and salt. Sifting removes lumps and gives the dough a smooth consistency. The fine texture will help the cookies rise evenly.
- Cut the butter into cubes and add it to the dry ingredients. Use your fingers or a pastry cutter to blend the butter into the flour mixture until it resembles coarse crumbs. This creates a flaky, buttery base.
- In a separate bowl, whisk the sugar, egg yolk, and vanilla extract until the mixture is glossy. The yolk adds richness and helps bind the dough together. The vanilla lifts the chocolate flavor with a subtle aromatic note.
- Pour the wet mixture into the dry mixture and stir until a sticky dough forms. Don’t overmix; a few lumps are fine. The dough should be firm enough to hold its shape when scooped.
- Shape the dough into 1.5‑inch balls and place them on the prepared baking sheets, spacing them about 2 inches apart. Flatten each ball slightly with the palm of your hand to create a shallow disc.
- Using a teaspoon, press a shallow indentation into the center of each cookie. The indentation should be about 1/4 inch deep and wide enough to hold the filling.
- Fill each indentation with a dollop of hazelnut spread followed by a small spoonful of jam. The hazelnut spread should be the primary filling, with the jam adding a burst of flavor. This combination creates a sweet‑savory surprise.
- Bake for 12–14 minutes, or until the edges are set but the centers still look slightly soft. The cookies should have a gentle rise and a light golden color. The filling will remain slightly wet, adding to the cookie’s decadence.
- Remove from the oven and let the cookies cool on the sheet for 5 minutes before transferring them to a wire rack. This short rest allows the filling to set without becoming runny. The cookies will be soft and pliable at this stage.
- Let the cookies cool completely on the rack before serving. The flavor will intensify as they cool, and the filling will firm up to a luscious texture. Store any leftovers in an airtight container at room temperature.
That’s it — you did it. But hold on, I've got a few more tricks that'll take this to another level.
Insider Tricks for Flawless Results
The Temperature Rule Nobody Follows
Why it matters: Baking at exactly 350°F ensures the cookies bake evenly and develop a crisp edge without drying out the center. Many bakers accidentally overheat, resulting in hard, over‑browned cookies. Keep the oven at 350°F and use an oven thermometer for accuracy.
Why Your Nose Knows Best
Smell it right: The moment the cookies hit the pan, the aroma should be rich chocolate with a hint of vanilla and butter. If you notice a metallic or sour smell, the butter may be too old. Fresh butter is key to that buttery, melt‑in‑your‑mouth texture.
The 5‑Minute Rest That Changes Everything
Rest the dough: After shaping the cookies, let them rest in the fridge for 20 minutes. This chilling step firms up the dough, making it easier to handle and preventing the cookies from spreading too much during baking.
Use a Silicone Baking Mat
Why it helps: A silicone mat provides a non‑stick surface and distributes heat evenly, resulting in a uniformly browned cookie. It also makes cleanup a breeze, saving you time for the next batch.
Add a Pinch of Sea Salt
Finish with a sprinkle: Just before serving, lightly dust the cookies with sea salt. The salt enhances the chocolate flavor and adds a subtle crunch that elevates the overall experience.
Creative Twists and Variations
This recipe is a playground. Here are some of my favorite ways to switch things up:
Almond Delight
Swap hazelnut spread with almond butter for a nutty, slightly sweet center. Add a dash of almond extract to amplify the flavor. This version is perfect for nut lovers and pairs well with a glass of milk.
Caramel Crunch
Replace the jam with a thin layer of caramel sauce for a sweet, buttery twist. The caramel will melt into a gooey center that pairs beautifully with the chocolate crust. This variation is ideal for dessert parties.
Minty Fresh
Add a few drops of mint extract to the dough for a refreshing undertone. The mint balances the chocolate richness and adds a subtle cooling sensation. It’s a great choice for summer gatherings.
Espresso Boost
Stir in a tablespoon of instant espresso powder into the dry mixture to intensify the chocolate flavor. The espresso adds depth and a slight bitterness that complements the sweet filling. This is a sophisticated option for coffee lovers.
Berry Burst
Use a mixed berry jam for a fruity, tart center. The berries provide a bright contrast to the chocolate, and the jam’s natural sweetness keeps the cookie from feeling too heavy. It’s a delightful option for brunch.
Coconut Cream
Replace hazelnut spread with coconut cream for a tropical twist. The coconut adds a subtle sweetness and a silky texture that melts in the mouth. Pair these cookies with a cold glass of coconut milk for a beach‑inspired treat.
Storing and Bringing It Back to Life
Fridge Storage
Store in an airtight container: Keep the cookies in the fridge for up to a week. The cold environment preserves the buttery texture and prevents the filling from melting. When ready to enjoy, let them sit at room temperature for 10 minutes.
Freezer Friendly
Freeze individually wrapped cookies: Place each cookie on a parchment‑lined tray and freeze until solid. Then transfer to a freezer bag for long‑term storage. These cookies stay fresh for up to 3 months.
Best Reheating Method
Warm in a preheated 350°F oven for 5 minutes: This restores the crispness of the edges while keeping the center gooey. Add a tiny splash of water to the pan before baking; the steam will help keep the cookies moist and prevent them from drying out.