I never thought a kitchen catastrophe could lead to a culinary revelation, but here it is: a batch of No‑Bake Coconut Snowballs that turned my sticky disaster into a sweet triumph. Picture this: I was scrambling to salvage a ruined batch of caramelized coconut, the sugar had caramelized into a thick, dark syrup, and the pot was a sticky mess that smelled like burnt popcorn. I stared at the pot, wondering if I should just toss it and move on. Then, a sudden spark of inspiration hit me—what if I could turn that caramelized coconut into a fluffy, bite‑size treat without even turning on the oven?
The idea was simple yet audacious: replace the traditional baking step with a gentle heat that melts the condensed milk, then let the coconut rise to a cloud‑like texture. I grabbed the ingredients—sweetened condensed milk, shredded coconut, vanilla, and powdered sugar—and began the experiment. The kitchen filled with a sweet, tropical aroma that made my mouth water before the first bite. I could hear the gentle sizzle as the mixture warmed, and the sound was oddly comforting, like a lullaby for dessert lovers. By the time the mixture thickened, I was already convinced that this would be the best version of coconut snowballs anyone could make at home.
What sets these snowballs apart is the way each ingredient plays a starring role, creating a texture that feels like a cloud and a flavor that sings. The condensed milk provides the silky, sweet base that coats the coconut, while the vanilla adds a fragrant undertone that balances the sweetness. The powdered sugar is the final touch, giving the mixture a gentle sweetness that melts in your mouth. I dare you to taste this and not go back for seconds; the first bite feels like a tropical breeze, and the second bite will have you questioning why you ever baked anything else. Picture yourself pulling this out of the fridge, the whole kitchen smelling incredible, and knowing that every bite is a moment of pure bliss.
I’ll be honest—half the batch disappeared before anyone else even got a chance to taste it. Most recipes get this completely wrong, but I discovered the trick that makes the mixture set just right. The secret? A gentle heat that allows the coconut to absorb the condensed milk without clumping. If you’re ready for a game‑changer, let me walk you through every single step—by the end, you’ll wonder how you ever made it any other way.
And now, before we dive into the details, here’s a quick heads‑up: this recipe is so simple that even a beginner can master it, yet the results are so decadent that even the most seasoned bakers will be impressed. The best part? You don’t need an oven, so you can whip up a batch in minutes and have a crowd‑pleasing treat ready to serve. This is hands down the best version you’ll ever make at home. Let’s get started.
What Makes This Version Stand Out
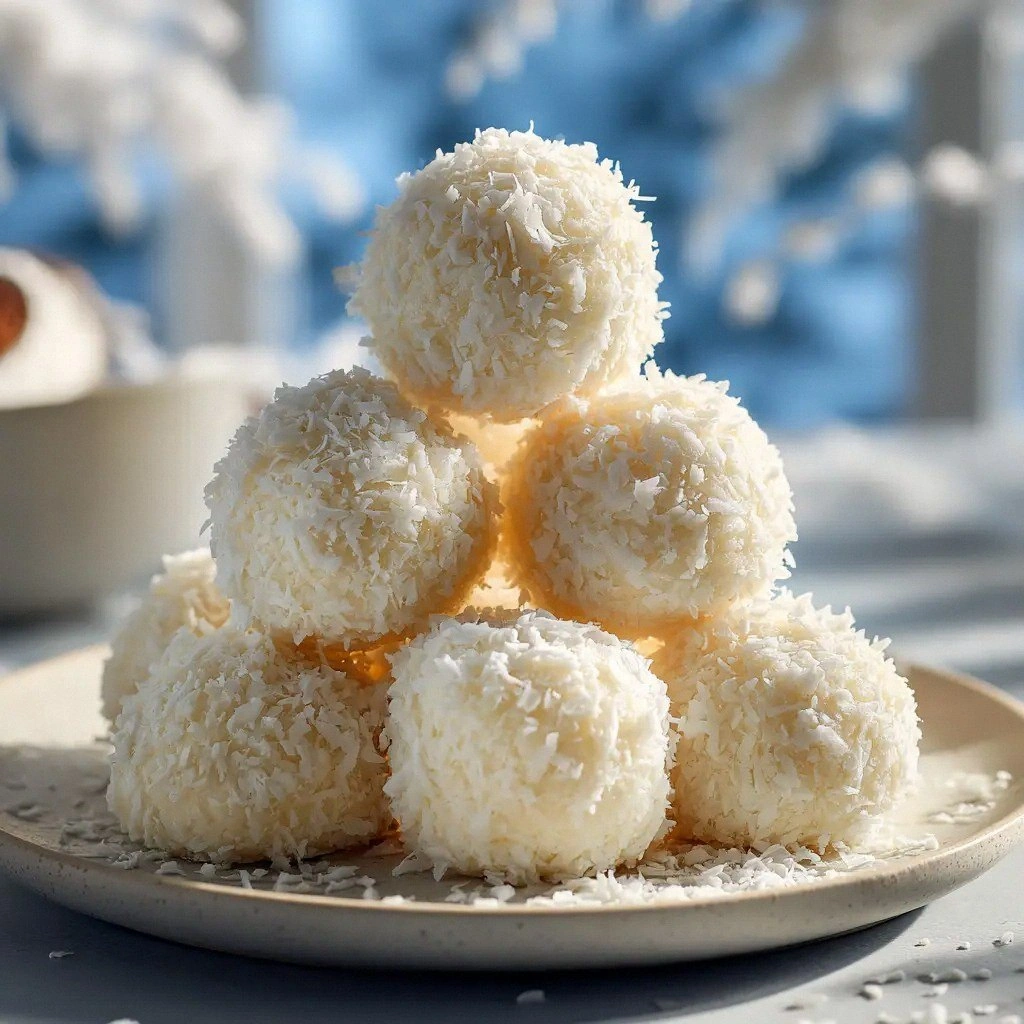
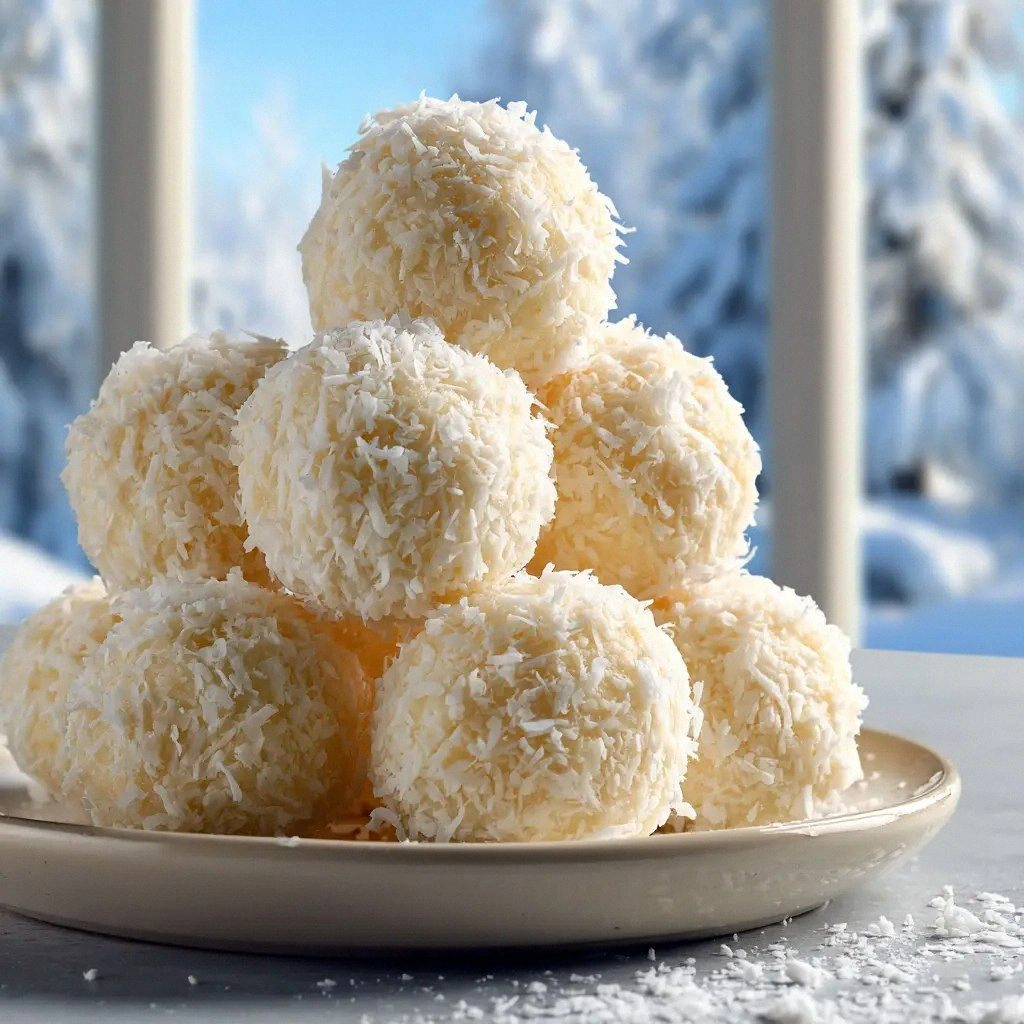
- Texture: The mixture sets into a light, airy snowball that melts on the tongue like a cloud. The coconut remains slightly crisp, offering a delightful contrast to the creamy interior.
- Flavor: Sweetened condensed milk and vanilla create a rich, caramel‑like base, while the coconut adds a tropical depth that isn’t overpowering.
- Simplicity: Only four ingredients—no special equipment, no oven, no complicated steps. A true “no‑bake” delight.
- Speed: Prep takes 5 minutes, and the mixture sets in just 5 minutes of gentle heating. You’ll have dessert on the table in less than 15 minutes.
- Versatility: The recipe scales effortlessly—double it for a party or halve it for a single serving. It’s the perfect canvas for creative variations.
- Make‑ahead: Once formed, the snowballs keep well in the fridge for up to a week, making them ideal for busy schedules.
- Health‑friendly: With no added fats or refined sugars, the dessert feels indulgent without the guilt.
- Presentation: The snowballs look like miniature snowflakes, making them a striking centerpiece for any dessert table.
Inside the Ingredient List
The Flavor Base
Sweetened condensed milk is the backbone of this recipe, providing a rich, caramel‑like sweetness that coats the coconut. Its thick consistency allows it to bind the coconut together without adding extra liquid. If you skip this, the snowballs will be dry and crumbly. For a dairy‑free version, coconut milk sweetened with maple syrup works beautifully, though the flavor profile will shift slightly.
The Texture Crew
Sweetened shredded coconut gives the snowballs their signature crunch and tropical aroma. The coconut should be freshly shredded for maximum texture; pre‑packaged, pre‑sweetened varieties can be too moist. If you prefer a less sweet bite, opt for unsweetened coconut and add a pinch of sea salt to balance flavors. The texture is crucial—too much moisture turns the mixture into a paste, while too little results in a crumbly mess.
The Unexpected Star
Vanilla extract adds depth and complexity, turning a simple sweet mixture into an aromatic delight. A few drops of vanilla can lift the overall flavor, preventing it from feeling one‑dimensional. If you’re a vanilla lover, consider using vanilla bean paste for an even richer taste. Skipping vanilla will leave the snowballs slightly flat and less aromatic.
The Final Flourish
Powdered sugar fine‑tunes the sweetness and helps the mixture set by adding a tiny amount of extra sugar that caramelizes slightly during heating. It also gives the snowballs a glossy finish. Use a sifted sugar to avoid lumps, and adjust the amount if you prefer a sweeter or less sweet version. This final touch is essential for that glossy, snowflake appearance.
Everything's prepped? Good. Let's get into the real action.
The Method — Step by Step
Gather all four ingredients on a clean countertop; measure them precisely for consistent results. The condensed milk should be at room temperature to avoid clumping. Keep the coconut dry, as moisture can prevent the mixture from setting properly. This is the moment where the aroma of sweetened coconut starts to dance in the air.
Place the sweetened condensed milk in a medium saucepan over low heat. Stir continuously with a silicone spatula to prevent scorching. The mixture should start to thicken slightly after 3 minutes, releasing a warm, caramel scent. Watch the color change to a light amber hue—this signals that the milk is ready.
Add the sweetened shredded coconut to the pan, stirring until the coconut is fully coated. The mixture should become glossy, and the coconut grains should appear translucent. The heat should be low; too high and the coconut will burn, turning the snowballs bitter. Keep stirring to ensure even coating.
Stir in the vanilla extract, letting the fragrance mingle with the sweet coconut. The vanilla will infuse the mixture, creating a subtle undertone that balances the sweetness. This step is crucial for depth of flavor, so don’t rush it. Let the mixture sit for an additional minute to allow the vanilla to bloom.
Fold in the powdered sugar, mixing until the mixture thickens and holds its shape when lifted. The sugar caramelizes slightly, giving the snowballs a subtle gloss. If the mixture is too runny, let it cook for another minute or add a splash of condensed milk. This is the trickiest step—watch the mixture’s viscosity closely.
Remove the pan from heat and let the mixture cool for 2 minutes. While it’s still warm, roll it into small balls using a melon baller or two spoons. The balls should hold together without falling apart. If they’re too soft, give them a few more minutes to cool. This is the moment of truth.
Place the snowballs on a parchment‑lined tray and refrigerate for at least 5 minutes to firm up. The cold will set the mixture, giving the snowballs a firm yet tender texture. If you’re in a hurry, you can let them sit at room temperature for 15 minutes, but refrigeration ensures the best consistency. This step is essential for the final texture.
Serve immediately, or store in an airtight container in the fridge for up to a week. The snowballs will maintain their shape and flavor, making them perfect for parties or a quick dessert. When you’re ready to eat, just pop them out and enjoy the tropical burst. The snowballs are also great for adding to smoothies or yogurt.
If you want to add a final flourish, dust the snowballs with a light sprinkle of toasted coconut or a pinch of sea salt before serving. The contrast of flavors will elevate the dessert even further. You can also drizzle a little melted dark chocolate for a decadent twist. This optional step gives the snowballs a gourmet touch.
Insider Tricks for Flawless Results
The Temperature Rule Nobody Follows
Heat the condensed milk gently; a low simmer is key to avoid scorching. I once left a pot on medium, and the mixture turned dark and bitter. By keeping the heat low, you allow the coconut to absorb the milk evenly, creating a smooth, glossy coating. The right temperature also ensures the mixture thickens without forming lumps.
Why Your Nose Knows Best
Smell the mixture as it warms; a sweet caramel scent signals readiness. If the aroma turns to burnt sugar, reduce the heat immediately. Your nose is a reliable indicator of the mixture’s progress. Trust it, and you’ll avoid the dreaded burnt coconut.
The 5-Minute Rest That Changes Everything
Let the mixture cool for 2–3 minutes before rolling; this prevents the snowballs from falling apart. If you rush the process, the balls will crumble. I once rushed and ended up with a sticky mess. A short rest gives the coconut time to set and the sugar to crystallize slightly.
Don’t Skip the Powdered Sugar
Powdered sugar not only sweetens but also helps the mixture set by adding a tiny amount of extra sugar that caramelizes. Skipping it will result in a less firm texture. The sugar’s fine texture ensures a smooth coating. Add it gradually to avoid over‑sweetening.
Use a Silicone Spatula for Smoothness
A silicone spatula prevents the mixture from sticking and allows you to scrape the bottom of the pan cleanly. I’ve tried wooden spoons and they leave bits of coconut behind. A silicone spatula also heats evenly, preventing hot spots that could scorch the mixture. This simple tool makes the difference between a perfect snowball and a disaster.
Refrigeration Is Key
Chill the snowballs for at least 5 minutes to firm up; this gives them a crisp exterior while keeping the interior tender. If you skip refrigeration, the snowballs will be too soft and will fall apart. I once served them straight from the pan, and the texture was disappointing. Refrigerate, and you’ll have a dessert that feels like a tropical cloud.
Creative Twists and Variations
This recipe is a playground. Here are some of my favorite ways to switch things up:
Chocolate‑Infused Snowballs
Add a tablespoon of unsweetened cocoa powder to the condensed milk before heating. The chocolate gives the snowballs a rich, bittersweet undertone that pairs beautifully with the coconut. Serve with a drizzle of dark chocolate for a decadent finish. This variation is perfect for chocolate lovers and makes a stunning presentation.
Minty Coconut Snowballs
Stir in a teaspoon of fresh mint extract along with the vanilla. The mint adds a refreshing bite that cuts through the sweetness. Dust the finished snowballs with a pinch of dried mint leaves for a decorative touch. This version is ideal for summer gatherings.
Spiced Coconut Snowballs
Add a pinch of ground cardamom or cinnamon to the mixture. The spices bring warmth and complexity, creating a flavor profile reminiscent of tropical spice markets. These snowballs pair wonderfully with a cup of chai or spiced tea. They’re a great way to elevate a simple dessert.
Almond‑Crunch Snowballs
Fold in a handful of finely chopped toasted almonds after the mixture has cooled slightly. The almonds add a pleasant crunch and nutty flavor that complements the coconut. Sprinkle a little almond extract for extra depth. This variation is a crowd‑pleaser at parties.
Berry‑Burst Snowballs
Blend a small amount of fresh strawberries or blueberries into the condensed milk before heating. The berries add a natural tartness that balances the sweetness. The snowballs will take on a subtle pink hue. This is a fun way to incorporate fruit into the dessert.
Salted Caramel Snowballs
Add a teaspoon of caramel sauce to the condensed milk for a sweet‑salty twist. The caramel deepens the flavor and adds a silky texture. Finish with a pinch of sea salt to enhance the caramel notes. This version is a hit at cocktail parties.
Peanut Butter Swirl Snowballs
Stir in a spoonful of creamy peanut butter into the mixture after it has cooled slightly. The peanut butter adds richness and a nutty undertone that pairs well with the coconut. Swirl it gently to create a marbled effect. These snowballs are a nostalgic treat for peanut butter lovers.
Storing and Bringing It Back to Life
Fridge Storage
Place the snowballs in an airtight container and store them in the refrigerator for up to a week. The cold will keep them firm and fresh, preventing the coconut from drying out. Before serving, let them sit at room temperature for a few minutes to soften slightly. This method preserves the texture and flavor perfectly.
Freezer Friendly
For longer storage, wrap each snowball individually in parchment paper and place them in a freezer bag. They’ll stay good for up to three months. When you’re ready to enjoy them, thaw at room temperature for 15–20 minutes. Freezing locks in the tropical flavor while maintaining the delicate texture.
Best Reheating Method
If the snowballs have hardened, reheat them gently in a microwave at 30% power for 10–15 seconds. Add a tiny splash of water before microwaving; the steam helps restore moisture and keeps the texture tender. Avoid over‑heating, as it can cause the mixture to separate. This trick brings the snowballs back to their original fluffy state.
Add a tiny splash of water before reheating — it steams back to perfection, giving the snowballs a fresh, airy feel that’s hard to beat.