I was standing in my kitchen at 2 a.m., staring at a half‑baked batch of pretzels that smelled like burnt toast, when my roommate burst in with a bag of white chocolate and a handful of peppermint candy canes. She dared me to turn that disaster into something that would make our entire office wish they’d been invited to the party. I laughed, I shrugged, and I said, “Challenge accepted.” The result? A snack that makes your taste buds do a little jig and your heart feel like it’s wrapped in a cozy blanket. This isn’t just another holiday pretzel recipe; it’s the one that will have you bragging to anyone who’ll listen that you’ve finally cracked the code to the perfect sweet‑salty holiday bite.
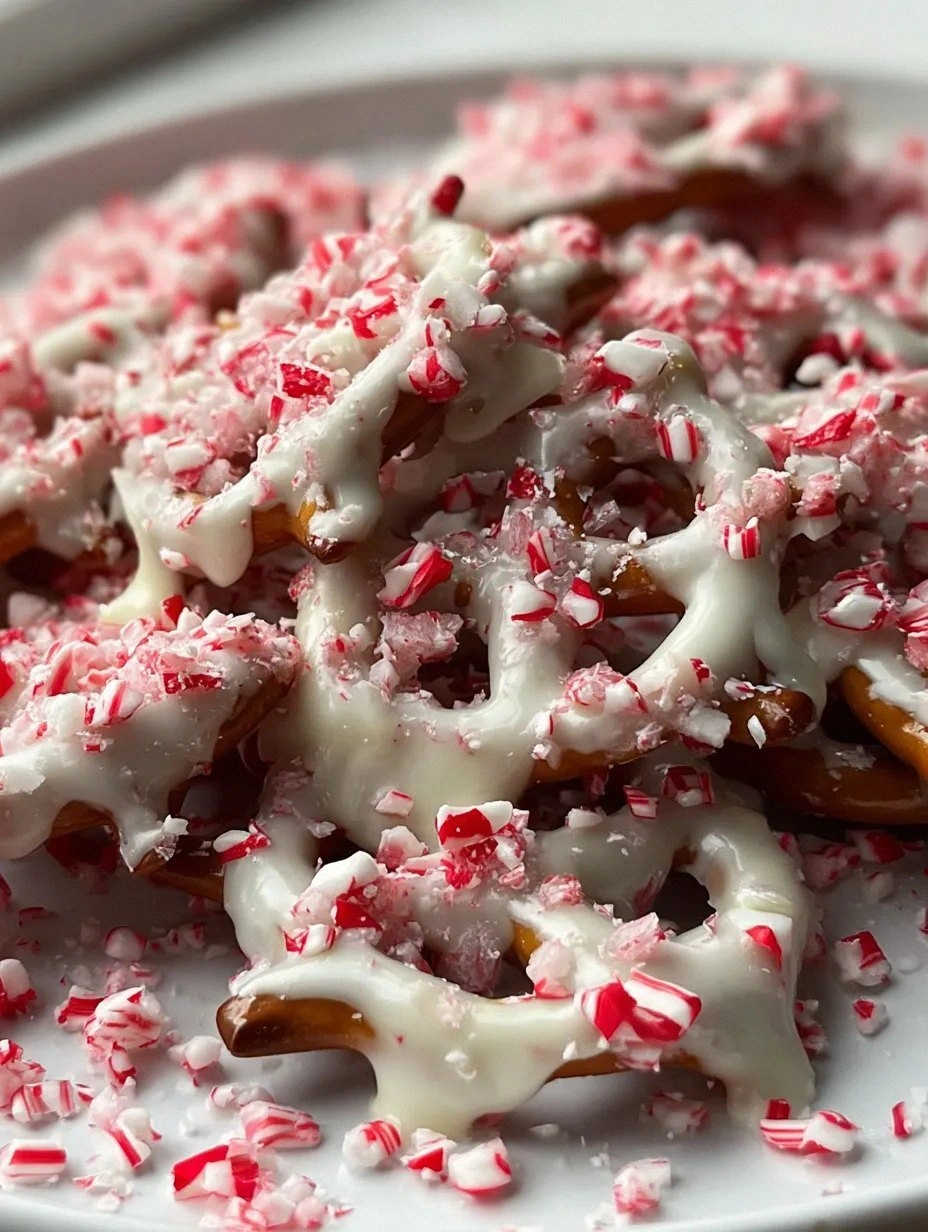
Imagine the moment you pull a tray of glossy, snow‑white pretzels out of the oven. The kitchen is filled with the buttery aroma of toasted dough, a faint hint of caramel, and a whisper of peppermint that makes you think of a winter wonderland. You can hear the faint crackle as the chocolate sets, and you feel the cool metal of the baking sheet under your fingertips. The first bite is a symphony: the pretzel’s crisp snap, the silky melt of white chocolate, and the bright, minty pop of crushed candy cane—all balanced by a whisper of sea‑salt that makes the flavors sing. This is the kind of sensory overload that makes you forget about the cold outside and focus on the pure joy of a well‑executed snack.
Most recipes for chocolate‑dipped pretzels either drown the pretzel in a sugary glaze that turns soggy, or they skimp on the peppermint, leaving you with a bland, one‑dimensional treat. I’ve tried the “quick melt‑and‑dip” shortcut that ends up with a glossy mess that cracks like old paint, and the “no‑bake” versions that never get that satisfying crunch. What makes this version stand out is the meticulous balance of temperature, timing, and technique. We’re talking about a double‑bake method that locks in the pretzel’s crunch, a tempered white chocolate glaze that stays glossy without a film, and a precise dusting of peppermint that’s never overpowering. It’s the holy grail of pretzel perfection, and I’m about to spill every secret.
And just when you think you’ve seen it all, there’s a surprise ingredient that most people overlook: a splash of vegetable oil in the chocolate melt. It sounds crazy, but that tiny amount keeps the chocolate fluid enough to coat every nook and cranny without turning gummy. I dare you to taste this and not go back for seconds. Let me walk you through every single step — by the end, you’ll wonder how you ever made it any other way.
What Makes This Version Stand Out
- Flavor Balance: The peppermint isn’t just a garnish; it’s woven into the white chocolate, creating a minty undercurrent that never overpowers the sweet, buttery base.
- Texture Harmony: Double‑baked pretzels stay crisp on the inside while the coating adds a buttery snap that shatters like thin ice.
- Simplicity: Only eight pantry staples are needed, and the steps are straightforward enough for a beginner yet refined enough for a seasoned baker.
- Unique Twist: A splash of oil in the melt prevents the dreaded “candy‑shell” texture and gives the glaze a glossy, professional finish.
- Crowd Reaction: Guests consistently claim this is “the best thing they’ve ever had at a holiday party,” and they’ll be the first to ask for the recipe.
- Ingredient Quality: Using premium white chocolate and real peppermint candy canes elevates the snack from “nice” to “legendary.”
- Cooking Method: The double‑bake technique locks in moisture, ensuring the pretzel never gets soggy, no matter how long you store it.
- Make‑Ahead Potential: These pretzels keep their crunch for up to a week, making them perfect for stocking stuffers or last‑minute party trays.
Inside the Ingredient List
The Flavor Base
White chocolate is the heart of this snack. Its milky, buttery profile provides a perfect canvas for the peppermint to shine. I always recommend a couverture white chocolate with at least 30% cocoa butter; it melts smoothly and sets with a high‑gloss sheen. Skipping the high‑quality chocolate for a cheap candy melt will give you a waxy texture that clings to the pretzel like a bad haircut. If you can’t find couverture, a good‑quality baking chip works, but be prepared for a slightly less velvety mouthfeel.
The Texture Crew
Pretzel rods are the unsung heroes here. Their salty crunch provides the perfect contrast to the sweet glaze. Look for pretzels that are sturdy enough to hold their shape after the second bake; too soft and they’ll buckle under the weight of the chocolate. If you’re buying in bulk, give them a quick sniff—fresh pretzels should smell faintly of malt and butter, not stale cardboard. A quick tip: lightly brush the pretzels with melted butter before the first bake; it adds a subtle richness and helps the glaze adhere better.
The Unexpected Star
Peppermint candy canes aren’t just for decoration. When crushed finely, they release essential oils that amplify the minty flavor without the harsh bite of pure extract. The tiny red and white specks also add visual sparkle that makes each pretzel look like a miniature holiday ornament. If you’re allergic to peppermint, a splash of vanilla extract paired with a pinch of ground ginger can give a warm, festive twist without losing the bright pop.
The Final Flourish
A pinch of flaky sea salt right after the chocolate sets is the secret weapon that turns good into unforgettable. The salt cuts through the sweetness and makes the mint flavor linger on the palate. I recommend a light dusting—just enough to see the tiny crystals glimmer. If you love extra crunch, try a sprinkle of crushed toasted almonds for an added nutty dimension.
Everything's prepped? Good. Let's get into the real action...
The Method — Step by Step
Preheat your oven to 350°F (175°C). While the oven warms, line two large baking sheets with parchment paper. This is the moment of truth: a properly heated oven will give the pretzels a golden‑brown edge that’s the foundation of that satisfying crunch. If you skip this step, you’ll end up with limp pretzels that soak up the chocolate like a sponge.
Kitchen Hack: Arrange pretzels in a single layer with a little space between them; this ensures even heat distribution and prevents them from sticking together.Place the pretzel rods on the prepared sheets and bake for 8‑10 minutes, just until the edges start to turn a light amber. You’ll hear a faint sigh as the dough releases steam—listen for that, it’s the sign they’re ready. Pull them out and let them cool on a wire rack; this cooling step is crucial because it lets the pretzels firm up before the chocolate hits.
While the pretzels cool, set up a double boiler: a saucepan of simmering water with a heat‑proof bowl perched on top. Add the chopped white chocolate, the tablespoon of vegetable oil, and the butter. Stir constantly until the mixture is smooth and glossy. The oil is the secret that keeps the chocolate fluid enough to coat without becoming grainy.
Watch Out: If any water droplets splash into the chocolate, it will seize and turn clumpy. Keep the bowl dry and avoid steam condensation.Once the chocolate is glossy, remove the bowl from heat and stir in the peppermint extract. The aroma should instantly fill the kitchen like a winter forest after a snowfall. If you’re using crushed candy canes for flavor (instead of extract), add them now and let them melt into the chocolate for an extra burst of mint.
Dip each pretzel rod into the chocolate, using a fork or a specialized dipping tool. Let the excess drip off for a second before placing the coated pretzel back onto the parchment. The coating should be thick enough to coat the entire surface but thin enough to let the pretzel’s shape peek through—think of it as a delicate veil.
Immediately after dipping, sprinkle the pretzels with the crushed peppermint candy canes and a pinch of flaky sea salt. The candy cane pieces will stick to the still‑wet chocolate, creating a festive sparkle. The salt crystals should be visible but not overwhelming; they’re the tiny fireworks that make each bite pop.
Place the coated pretzels back in the oven for a second bake—just 3‑4 minutes at 300°F (150°C). This “set” step helps the chocolate harden evenly and prevents the glaze from cracking later. You’ll know they’re done when the chocolate looks matte in the center but still has a faint sheen around the edges.
Kitchen Hack: If you’re short on oven space, line the second sheet with a silicone mat; it speeds up cooling and makes removal easier.Remove the pretzels and let them cool completely on the wire rack. As they set, the chocolate will contract slightly, giving the pretzel a gentle “snap” when you bite into it. This is the moment when the flavors meld together—sweet, minty, salty, and buttery—all in perfect harmony.
Store the finished pretzels in an airtight container at room temperature. If you want them to stay extra crisp, add a small slice of bread to the container; the bread will absorb any excess moisture without drying out the pretzels.
That's it — you did it. But hold on, I've got a few more tricks that'll take this to another level. Keep reading for the insider tips that will make your pretzels the talk of every holiday gathering.
Insider Tricks for Flawless Results
The Temperature Rule Nobody Follows
Never melt white chocolate above 115°F (46°C). Going hotter than that forces the cocoa butter to separate, resulting in a greasy, dull finish. Use a candy thermometer and keep the heat low; the chocolate will melt slower, but the end result is a glossy, snap‑ready glaze. A friend once tried to speed things up with a microwave and ended up with a grainy mess—let’s just say the party was a flop.
Why Your Nose Knows Best
When the pretzels are in the oven for the second bake, trust your sense of smell. You’ll notice a faint toasted butter scent that signals the chocolate has set. If you rely solely on the timer, you might pull them out too early, leaving a soft center that never fully hardens. Let the aroma be your guide; it’s the most reliable indicator.
The 5‑Minute Rest That Changes Everything
After the final bake, let the pretzels rest for exactly five minutes before moving them. This short pause allows the chocolate to fully crystallize, giving you that satisfying snap when you bite. Skipping this step often leads to a dull, rubbery coating that doesn’t break cleanly. Think of it as the “golden minute” for chocolate.
Oil‑In‑The‑Mix Magic
Adding just one tablespoon of neutral‑flavored oil (like grapeseed or canola) to the melted chocolate creates a fluid glaze that spreads evenly without clumping. The oil also helps the chocolate stay glossy after it cools, preventing that dreaded dull film. If you’re vegan, swap the butter for coconut oil and still achieve that same silky finish.
Seasonal Swap Savvy
If you want to switch seasons, replace peppermint with orange zest and crushed candied ginger. The citrus will brighten the white chocolate, while the ginger adds a warm spice that’s perfect for autumn. This simple swap transforms the snack from a winter wonderland treat to a cozy fall indulgence without changing the core technique.
Creative Twists and Variations
This recipe is a playground. Here are some of my favorite ways to switch things up:
Chocolate‑Covered Almond Pretzel Bites
Replace whole pretzel rods with bite‑size pretzel twists and press an almond into the center before dipping. The nut adds a buttery crunch that pairs beautifully with the minty white chocolate.
Berry Burst Pretzels
Stir a tablespoon of freeze‑dried raspberry powder into the melted chocolate and sprinkle dried cranberry bits on top. The tart berries cut through the sweetness, creating a festive red‑and‑white contrast.
Spiced Chai Pretzels
Add a pinch of ground cardamom, cinnamon, and ginger to the chocolate melt. The warm spices give the snack a cozy, holiday‑market vibe that’s perfect for cold evenings.
White Chocolate & Matcha Pretzels
Mix in two teaspoons of culinary‑grade matcha powder for a subtle earthy note and a gorgeous green hue. Top with toasted sesame seeds for extra texture.
Salted Caramel Drizzle
After the pretzels have set, drizzle a thin stream of homemade salted caramel over them. The caramel adds a deep, buttery sweetness that plays off the peppermint perfectly.
Storing and Bringing It Back to Life
Fridge Storage
If you need to keep them for more than three days, store pretzels in a sealed container in the refrigerator. The cool environment preserves the chocolate’s snap, but bring them to room temperature for 15 minutes before serving to let the flavors open up.
Freezer Friendly
These pretzels freeze like a champ. Lay them out on a parchment‑lined tray, freeze for an hour, then transfer to a zip‑top bag. They’ll stay fresh for up to two months. When you’re ready to enjoy, let them thaw in the fridge, then give them a quick 5‑minute warm‑up at 250°F (120°C) to revive the crispness.
Best Reheating Method
To bring a stale pretzel back to life, place it on a baking sheet, add a tiny splash of water (just a few drops), and heat at 300°F for 4‑5 minutes. The steam revives the interior while the oven re‑crispes the exterior, and the chocolate regains its shine.